Amazon Web Services
Utilizing the Cxlink Suite provides an efficient way to securely store your business documents, manage archive sessions, and handle data exported from your SAP server. Whether you're storing files in S3 buckets, streaming real-time data through Kinesis, or managing access with IAM, it's imperative to ensure that everything is configured correctly.
Cxlink Suites integrates nativelly with AWS IAM and it offers authentication by using both an IAM User for those servers running outside AWS Cloud or IAM Instance Profile for those servers hosted in AWS.
Resources and Permissions for Documents and Archive
To start working with Cxlink Suite for Documents and Archive you just need to provision a storage location for your documents and the proper permissions for both the location and the encryption key if you decide to encrypt your documents with a custom key.
The steps outlined in this process illustrate the creation of a basic and functional environment following best security practices. You may need to adapt the security measures to your company's global policies.
Consider these steps as a reference guide.
Create an encryption key
Find more details in hwo to create KMS keys in Creating keys - AWS Key Management Service
Follow this steps to create an encyption key:
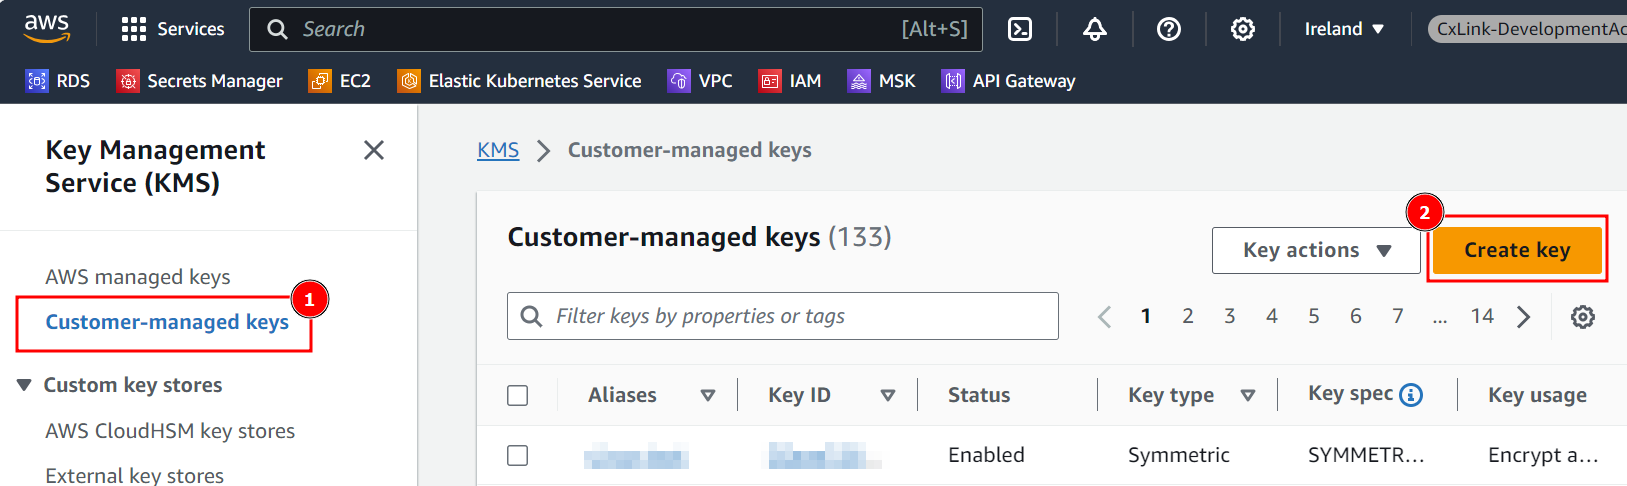
- In the AWS Console, select KMS
- Navigate to Customer-managed keys and select Create key
- In the Configure key section, leave default values and select Next.
- In the Add labels section, define a Alias for the key and a Description that helps you identify the key in later operations.
- Add additional Tags if needed and select Next
- In the Define key administrative permissions, select who within your organization will be responsible for this key and press Next.
- In the Define key usage permissions, select who within your organization will be able to use the key for encrypt/decrypt operations. For this process, leave all user/roles unselected and press Next.
- In the Review section, ensure that all parameters are correct and press Finish to create the key.
- Back in the Customer-managed keys, search for the newly created key and open its properties.
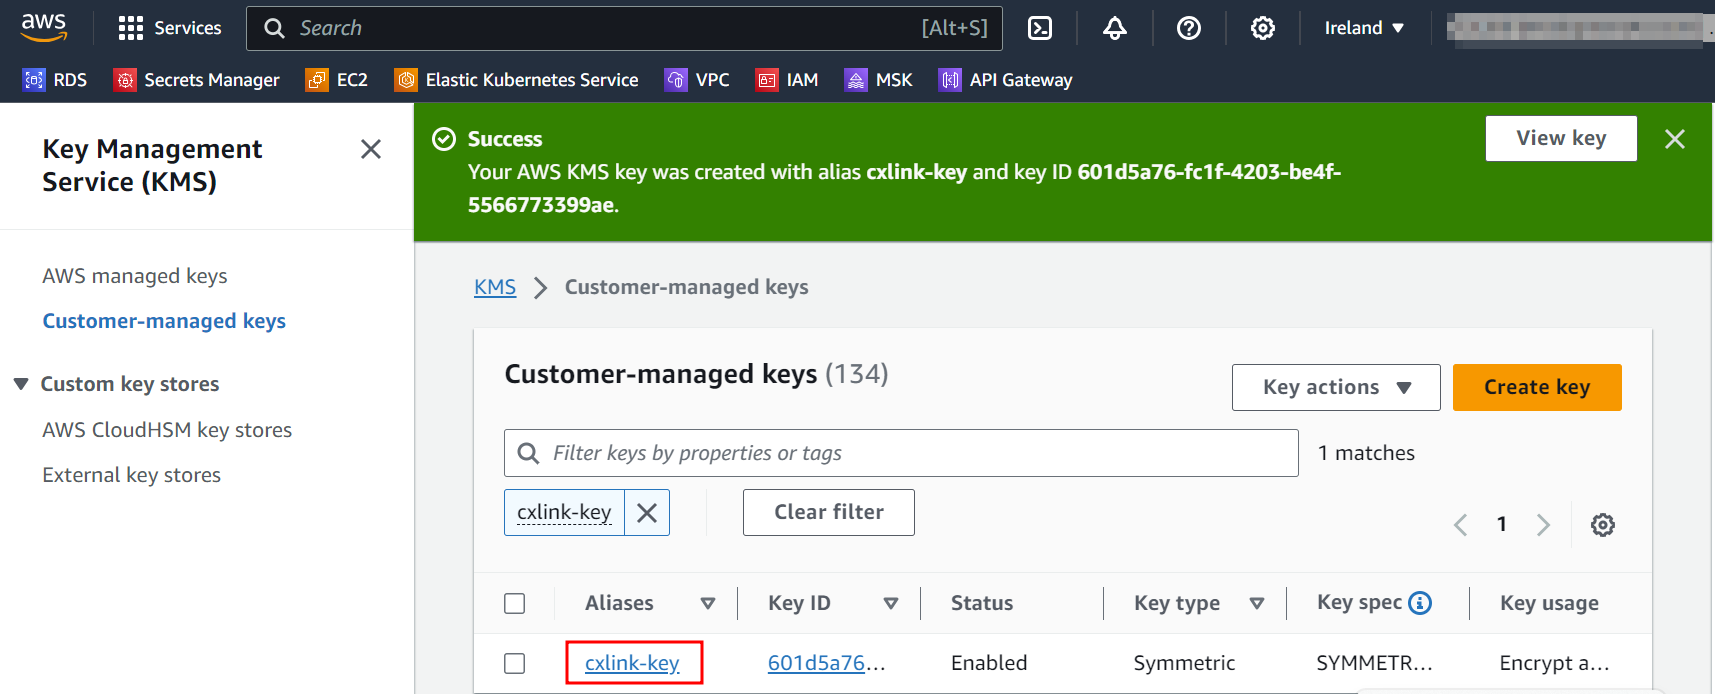
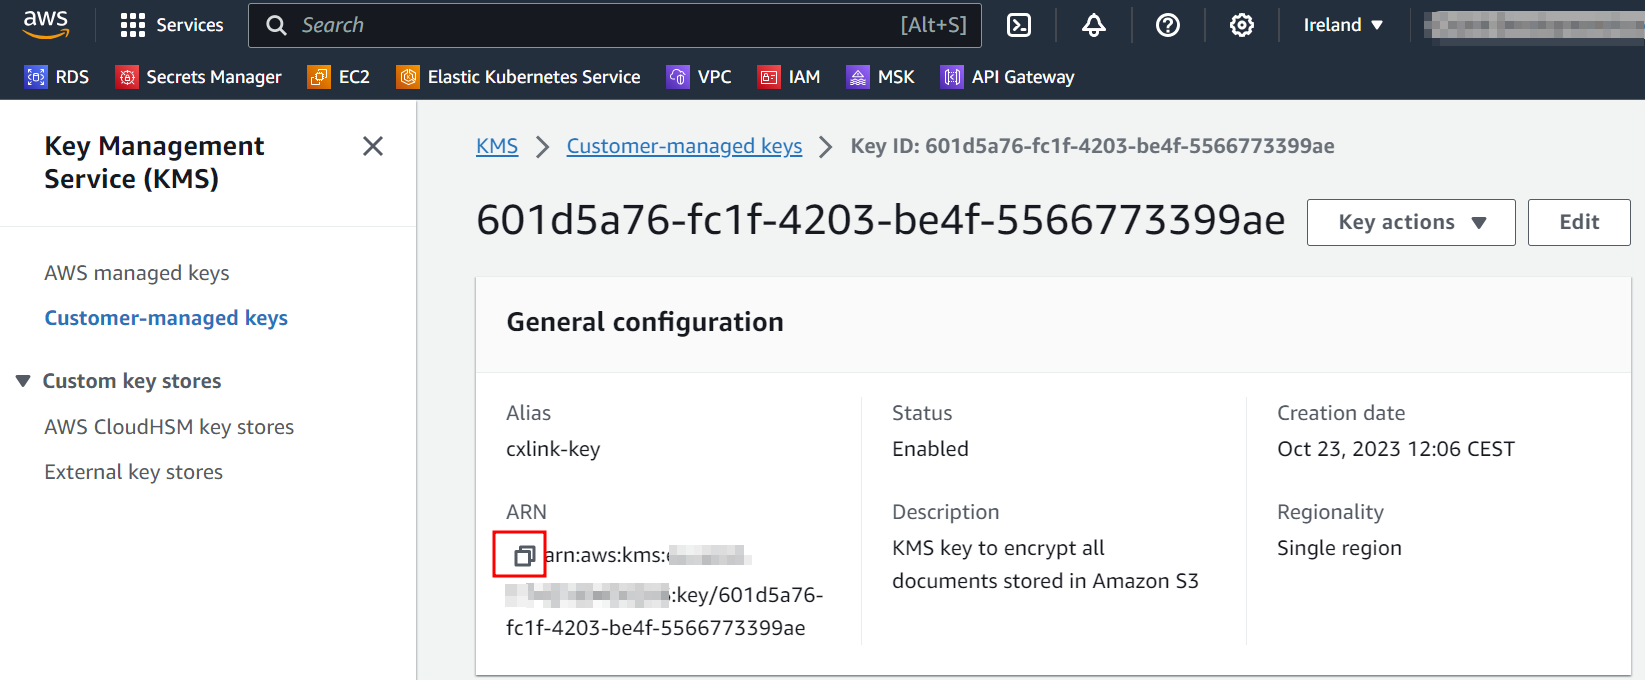
- In the key General configuration note down its ARN for later operations.
Create an storage bucket
Find more information in how to create buckets in Creating a bucket - Amazon documentation
Follow this steps to create an Amazon S3 bucket:
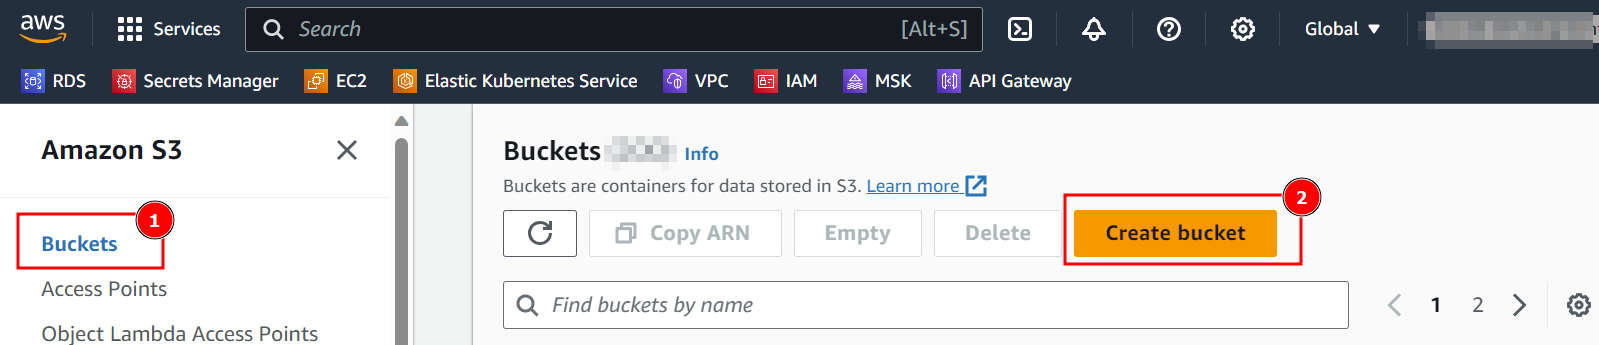
- In the AWS Console, select S3 service.
- Navigate the Buckets and select Create bucket.
- In the Create bucket section:
- Select a Bucket name for the documents/archiving storage. Remember that the bucket name must be unique.
- Select the AWS Region where you want to store the documents/archiving objets.
- Leave ACL disabled as recommended.
- Leave Block all public access by default to ensure your documents are not publicly available.
- Enable Bucket versioning to avoid documents overwriting. (Recommended approach but can be kept as disabled if needed).
- Add Tags as per your tagging policy.
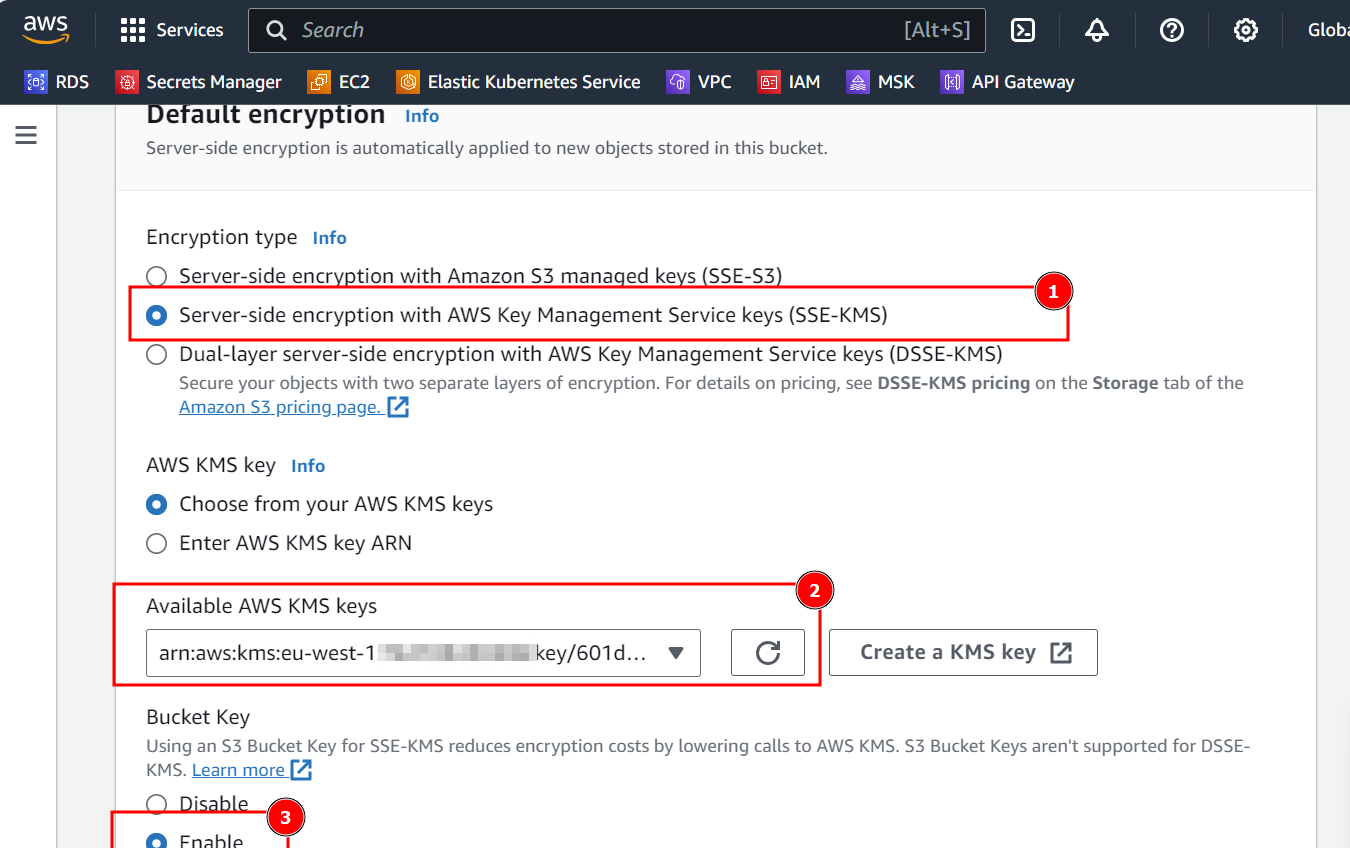
- In the Default Encryption section, select Server-side encryption with AWS Key Management Service keys (SSE-KMS) and search for the previously created key. Ensure that Bucket Key is enabled.
- Leave other options as default and select Create bucket.
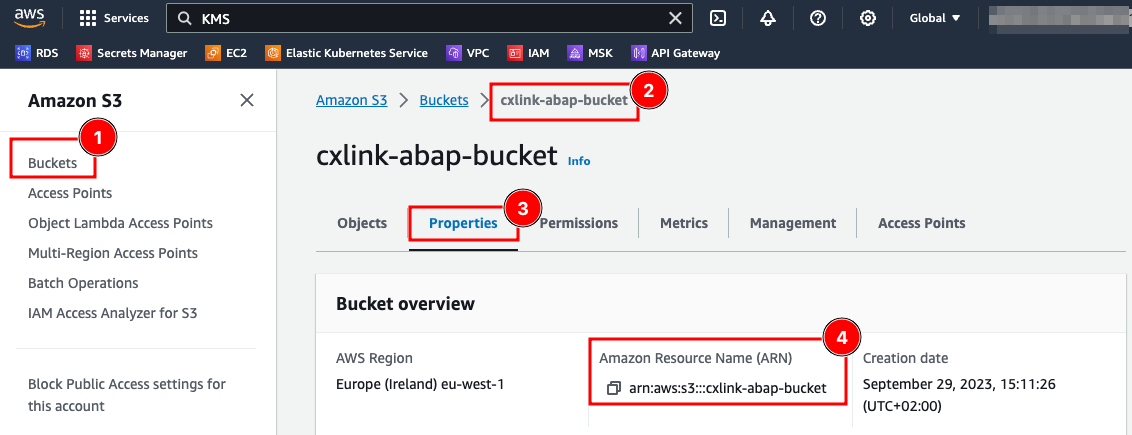
- Back to the Buckets section, search for the newly created bucket and note down its arn for later operations
Grant permission with IAM policy
To grant access to the created S3 bucket to the SAP Server, you will need to create an IAM policy that grants the proper permissions.
The following examples are a basic but functional implementation of a secure IAM Policy for s3 bucket access permissions. You may need to adapt it depending to meet your company requirements. You will need to ensure that the created policy grants access to the SAP server to store, read and delete existing files in the proper bucket.
Follow this steps to create the bucket where you will store the generated objects:
-
Go to the IAM Console: https://console.aws.amazon.com/iam/
-
In the navigation pane, choose Policies then click Create policy.
-
In the visual editor, go the JSON tab and copy the following contents:
Change Bucket and Key ARNsIf you plan to use the below example, remember to change the
<<kms_key_arn>>and<<s3_bucket_arn>>fields for the values previously obtained._55{_55"Version": "2012-10-17",_55"Statement": [_55{_55"Effect": "Allow",_55"Action": [_55"s3:ListAllMyBuckets",_55"kms:ListKeys",_55"kms:ListAliases"_55],_55"Resource": "*"_55},_55{_55"Action": [_55"s3:DeleteObject",_55"s3:GetAccessPoint",_55"s3:GetBucketLocation",_55"s3:GetEncryptionConfiguration",_55"s3:GetIntelligentTieringConfiguration",_55"s3:GetLifecycleConfiguration",_55"s3:GetObject",_55"s3:GetObjectLegalHold",_55"s3:GetBucketObjectLockConfiguration",_55"s3:GetObjectRetention",_55"s3:ListAccessPoints",_55"s3:ListBucket",_55"s3:PutBucketObjectLockConfiguration",_55"s3:PutBucketTagging",_55"s3:PutEncryptionConfiguration",_55"s3:PutIntelligentTieringConfiguration",_55"s3:PutLifecycleConfiguration",_55"s3:PutObject",_55"s3:PutObjectLegalHold",_55"s3:PutObjectRetention",_55"s3:PutObjectTagging"_55],_55"Effect": "Allow",_55"Resource": [_55"<<s3_bucket_arn>>",_55"<<s3_bucket_arn>>/*"_55]_55},_55{_55"Action": [_55"kms:Decrypt",_55"kms:Encrypt",_55"kms:GenerateDataKey"_55],_55"Effect": "Allow",_55"Resource": [_55"<<kms_key_arn>>"_55]_55}_55]_55} -
Review the policy and name it, then click Create policy.
AWS DocumentationFor additional details, check the official IAM documentation: Creating IAM policies (console).
Resources and Permissions for Datalakes
To start working with Cxlink Suite for Datalakes you just need to provision a storage location for the data output, a data stream in Kinesis for real time replication (optional) and the proper permissions for the stream, location and the encryption key if you decide to encrypt your documents with a custom key.
Create an encryption key
Find more details in hwo to create KMS keys in Creating keys - AWS Key Management Service
Follow this steps to create an encyption key:
- In the AWS Console, select KMS
- Navigate to Customer-managed keys and select Create key
- In the Configure key section, leave default values and select Next.
- In the Add labels section, define a Alias for the key and a Description that helps you identify the key in later operations.
- Add additional Tags if needed and select Next
- In the Define key administrative permissions, select who within your organization will be responsible for this key and press Next.
- In the Define key usage permissions, select who within your organization will be able to use the key for encrypt/decrypt operations. For this process, leave all user/roles unselected and press Next.
- In the Review section, ensure that all parameters are correct and press Finish to create the key.
- Back in the Customer-managed keys, search for the newly created key and open its properties.
- In the key General configuration note down its ARN for later operations.
Create an storage bucket
Find more information in how to create buckets in Creating a bucket - Amazon documentation
Follow this steps to create an Amazon S3 bucket:
- In the AWS Console, select S3 service.
- Navigate the Buckets and select Create bucket.
- In the Create bucket section:
- Select a Bucket name for the documents/archiving storage. Remember that the bucket name must be unique.
- Select the AWS Region where you want to store the documents/archiving objets.
- Leave ACL disabled as recommended.
- Leave Block all public access by default to ensure your documents are not publicly available.
- Enable Bucket versioning to avoid documents overwriting. (Recommended approach but can be kept as disabled if needed).
- Add Tags as per your tagging policy.
- In the Default Encryption section, select Server-side encryption with AWS Key Management Service keys (SSE-KMS) and search for the previously created key. Ensure that Bucket Key is enabled.
- Leave other options as default and select Create bucket.
- Back to the Buckets section, search for the newly created bucket and note down its arn for later operations
Create an Amazon Kinesis Data Stream
Find more information in how to create buckets in Creating a Stream via the AWS Management Console
Follow this steps to create an Amazon Kinesis Data Stream:
- In the AWS Console, select S3 service.
- Navigate the Data streams and select Create data stream.
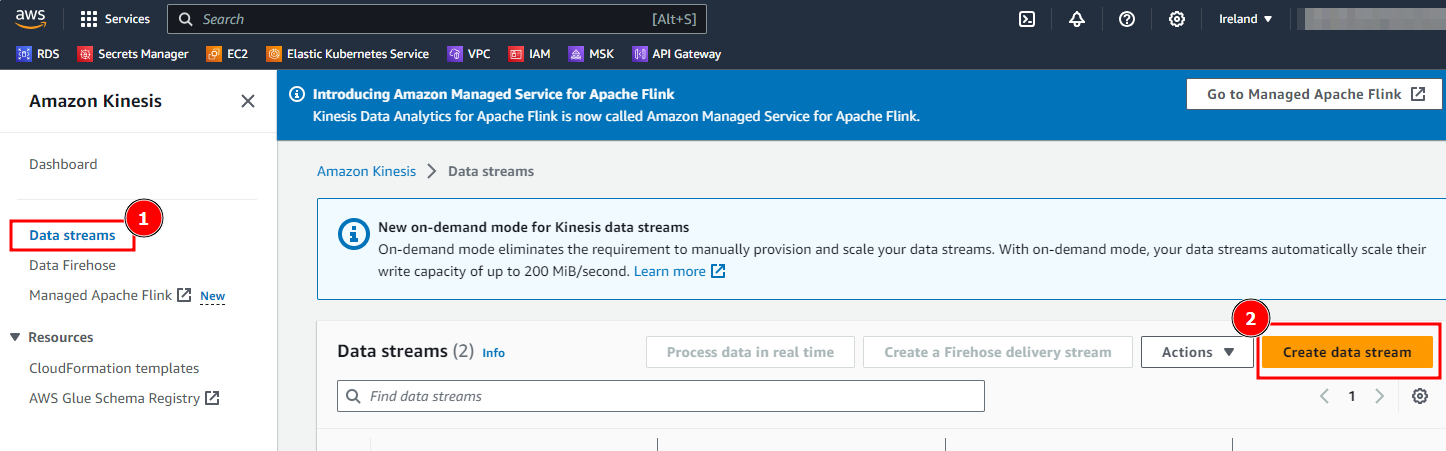
- Define a Data Stream Name and select Create data stream. Leave all other options by default.
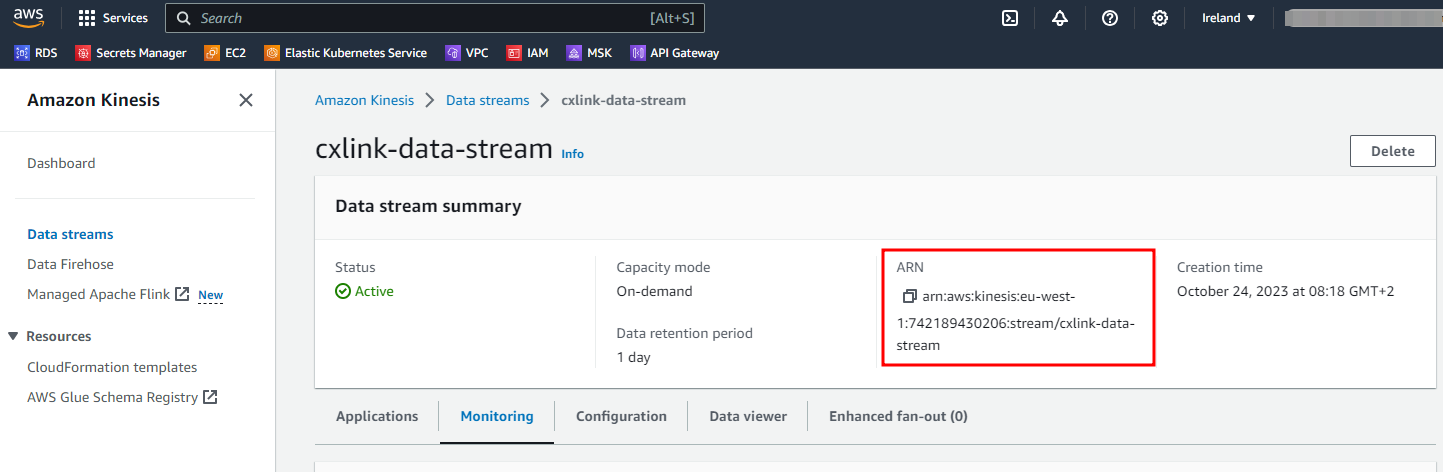
- Once created, you will need to define the consumer of this data stream.
- In the data stream properties, note down the data stream ARN for later purposes.
Grant permission with IAM policy
To grant access to the created S3 bucket to the SAP Server, you will need to create an IAM policy that grants the proper permissions.
The following examples are a basic but functional implementation of a secure IAM Policy for kinesis bucket access permissions. You may need to adapt it depending to meet your company requirements. You will need to ensure that the created policy grants access to the SAP server to populate data into the Kinesis Data Stream.
Follow this steps to create the bucket where you will store the generated objects:
-
Go to the IAM Console: https://console.aws.amazon.com/iam/
-
In the navigation pane, choose Policies then click Create policy.
-
In the visual editor, go the JSON tab and copy the following contents:
Change Data Steream ArnsIf you plan to use the below example, remember to change the
<<kinesis_data_stream_arn>>field for the values previously obtained._40{_40"Version": "2012-10-17",_40"Statement": [_40{_40"Sid" : "AllowListBucketsStreams",_40"Effect": "Allow",_40"Action": [_40"s3:ListAllMyBuckets",_40"kinesis:ListStreams"_40],_40"Resource": "*"_40},_40{_40"Sid": "Allow put objects in bucket",_40"Effect": "Allow",_40"Action": "s3:PutObject",_40"Resource": "arn:aws:s3:::<bucket_name>/*"_40},_40{_40"Sid": "Allow encrypt/decrypt data at rest",_40"Action": [_40"kms:GenerateDataKey",_40"kms:Decrypt",_40"kms:Encrypt"_40],_40"Effect": "Allow",_40"Resource": "arn:aws:kms:eu-west-1:012345678901:key/<key_id>"_40},_40{_40"Sid": "Allow adding records to Kinesis data Stream",_40"Effect": "Allow",_40"Action": [_40"kinesis:DescribeStream",_40"kinesis:PutRecord",_40"kinesis:PutRecords"_40],_40"Resource": "arn:aws:kinesis:eu-west-1:012345678901:stream/<data_stream>"_40}_40]_40} -
Review the policy and name it, then click Create policy.
AWS DocumentationFor additional details, check the official IAM documentation: Creating IAM policies (console).
Attach policy to an IAM entity
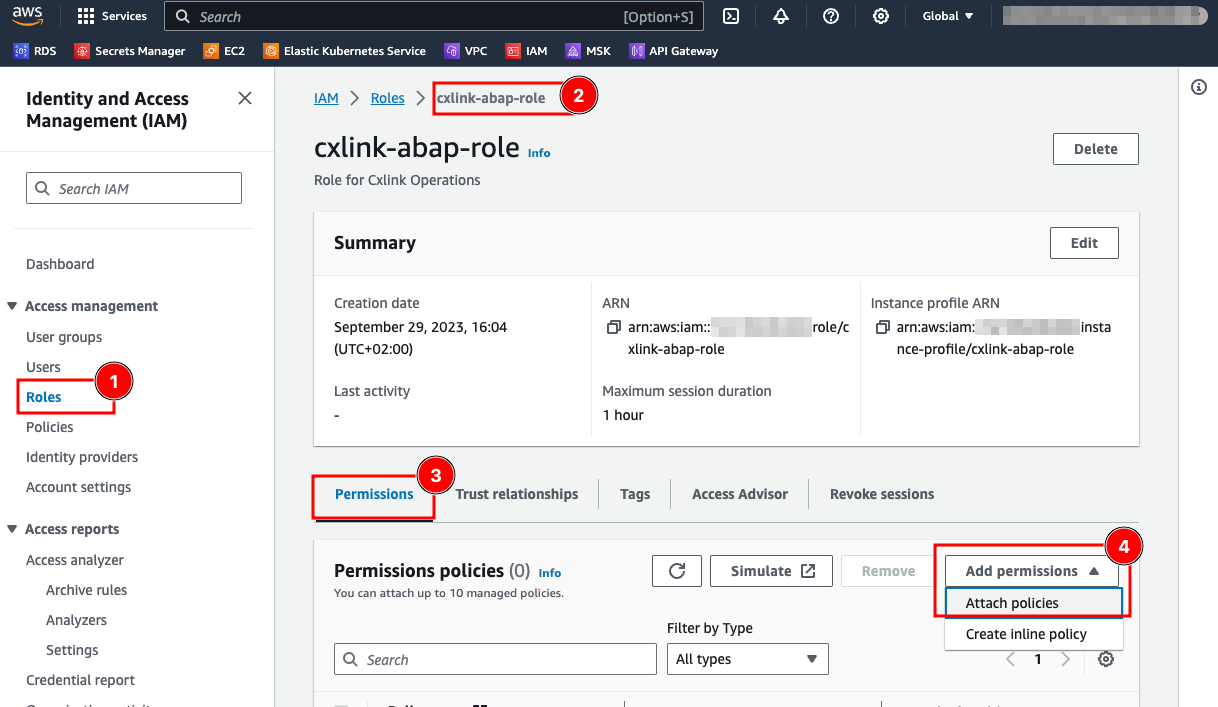
Attach the policy to an IAM role for Amazon EC2
To attach the policy to the IAM role for Amazon EC2:
- Go to the IAM Console: https://console.aws.amazon.com/iam/.
- In the Roles (1) section, select the desired role (2).
- In the Permissions (3) tab, open the Add permissions drop down and select Attach policy (4).
- On the Attach policy to ... page, on the Other permissions policies, search for the previously created IAM policy (1), ensure that the policy is checked (2) and select Add permissions.
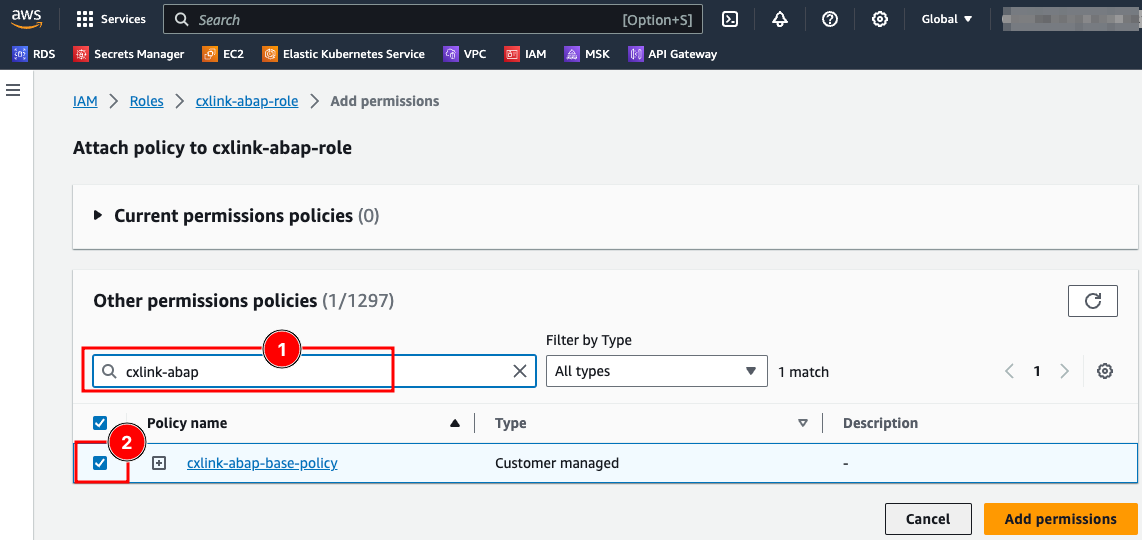
- You are now ready to go. Ensure again that the IAM role for EC2 (instance profile) is attached to all SAP application servers where the Cxlink addon will run.
Attach the policy to an IAM User
Maximum IAM User length must be 27 characters
You will need to access the IAM console and select the user to whom the policy will be attached. If you don't have an IAM user for Cxlink Suite:
- Create a new IAM user: Creating an IAM in your AWS Account
- Ensure that the user has Programmatic credentials and you have its Access Key and Secret Keys for later usage: Managing access keys for IAM users
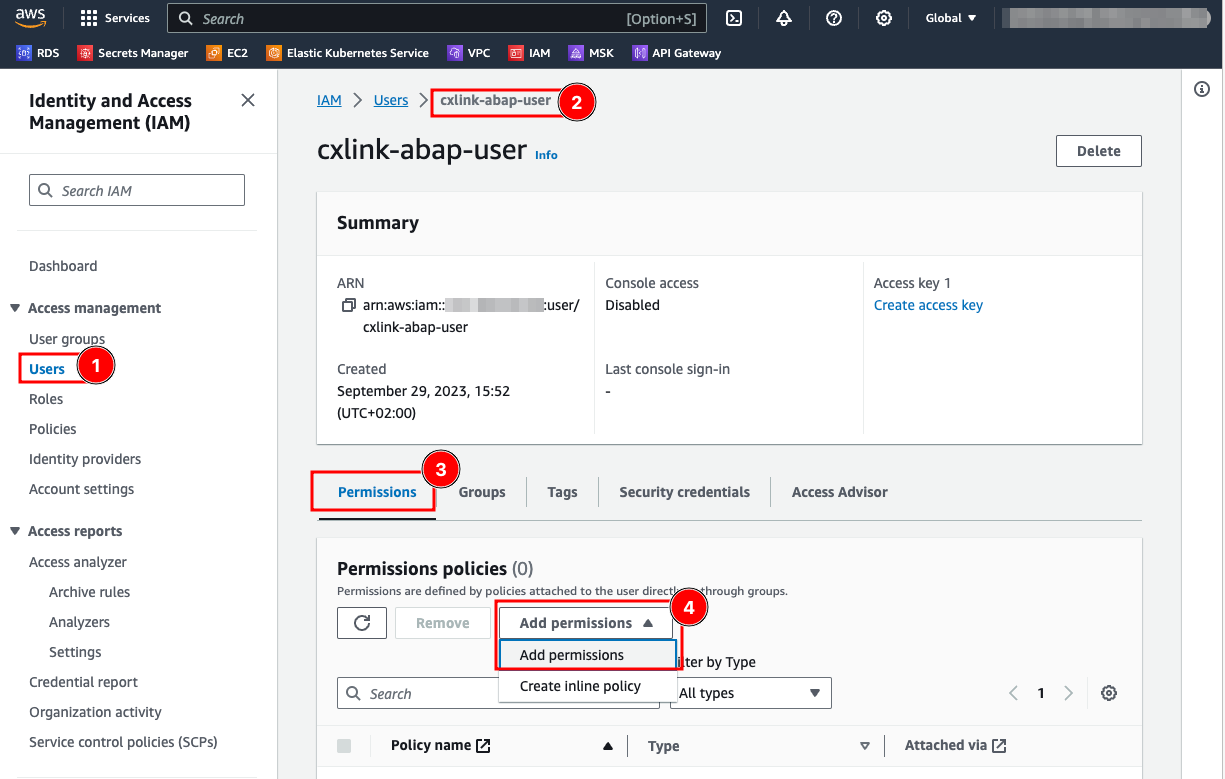
To add the policy to the IAM User:
- Go to the IAM Console: https://console.aws.amazon.com/iam/.
- In the Users (1) section, select the desired user (2).
- In the Permissions (3) tab, open the Add permissions drop down and select Add permissions (4).
- On the Add permissions page, select Attach policies directly (1), search for the previously created IAM policy (2), ensure that the policy is checked (3) and select Next.
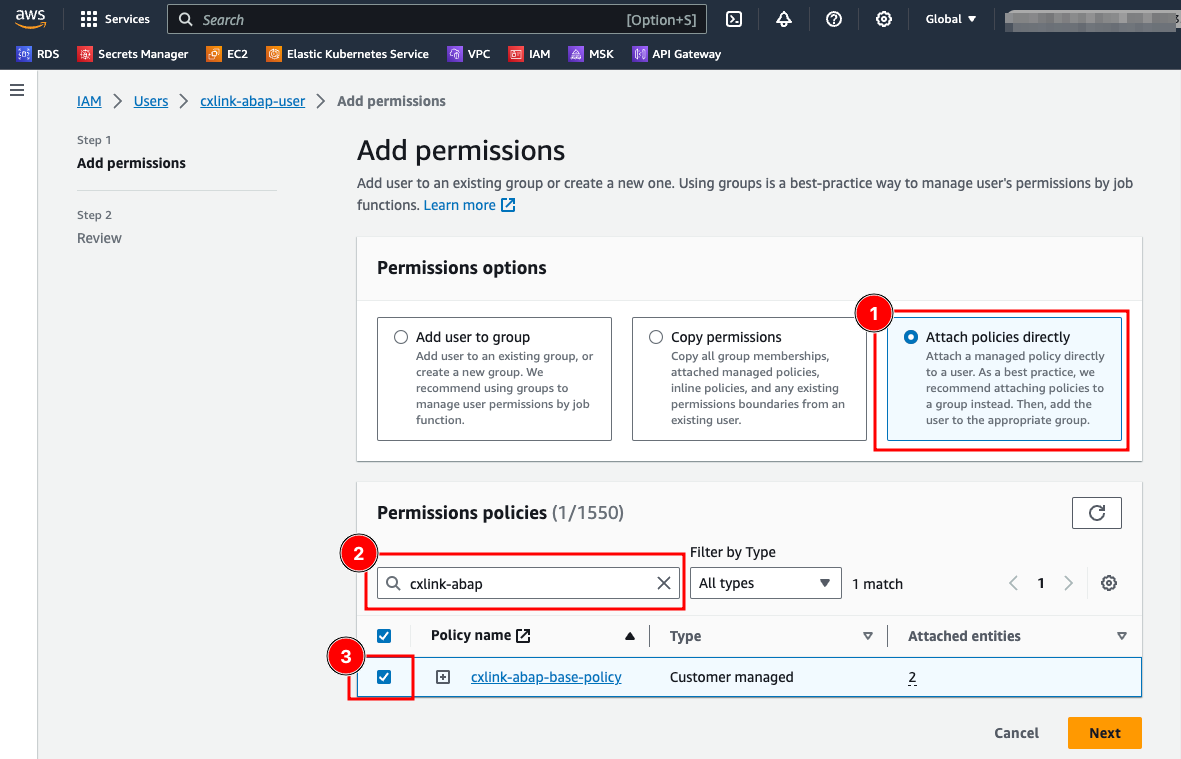
- In the Review panel, check that all parameters are valid and select Add Permissions.