Amazon Web Services
Utilizing the Cxlink Smartstore provides an efficient way to securely store your business documents, manage archive sessions, and handle data exported from your SAP server. Whether you're storing files in S3 buckets, streaming real-time data through Kinesis, or managing access with IAM, it's imperative to ensure that everything is configured correctly.
Cxlink Smartstores integrates nativelly with AWS IAM and it offers authentication by using both an IAM User for those servers running outside AWS Cloud or IAM Instance Profile for those servers hosted in AWS.
This guide will walk you through:
Best Practices Guide for security
The steps outlined in this process illustrate the creation of a basic and functional environment following best security practices. You may need to adapt the security measures to your company's global policies.
Encrypting all documents stored in an Amazon S3 bucket is crucial for several reasons:
- Data Protection: Encryption transforms the data into a format unreadable to anyone without the decryption key, ensuring that sensitive information is protected from unauthorized access. This is particularly important in the case of a security breach, as encrypted data remains secure even if it falls into the wrong hands.
- Compliance with Regulations: Many industries have strict regulations regarding data security and privacy, such as GDPR, HIPAA, and PCI-DSS. Encrypting data in S3 helps in complying with these legal requirements, avoiding potential legal penalties and fines.
- Risk Mitigation: By encrypting data, you reduce the risk associated with storing sensitive information like personal data, trade secrets, or financial information. This is a critical aspect of risk management strategies in any data-driven organization.
- Customer Trust: In an era where data breaches are common, encryption helps in maintaining customer trust. Knowing that their data is encrypted and stored securely can be a significant factor in customers choosing to do business with a company.
- Data Integrity: Encryption also helps in ensuring the integrity of the data. It makes it more difficult for an unauthorized person to alter the data without detection.
- Access Control: When combined with proper access management policies, encryption ensures that only authorized users or systems can access and decrypt the data, thus providing a higher level of security.
- Secure Data Transfer: Encrypting data in S3 also secures it during transfer (in transit) to and from the S3 buckets, protecting it from interception or eavesdropping.
In summary, encrypting documents in Amazon S3 is a key component of a comprehensive data security strategy, essential for protecting sensitive data, complying with legal and regulatory requirements, and maintaining the trust and confidence of customers and stakeholders.
For that reason our recommendation is to create a Customer-KMS key for storage purposes and an Amazon S3 bucket with encryption enabled by default using the Customer-KMS key created. This way we will ensure that only the proper resources and entities with the proper permissions will be able to access the files.
- Find more details in how to create KMS keys in Creating keys - AWS Key Management Service
- Find more information in how to create buckets in Creating a bucket - Amazon documentation
Also when granting permissions for Cxlink Smartstore to your AWS account resources, it is recommended to create an IAM policy adhered to the principle of least privilege by ensuring only the minimum required access rights are provided. This approach not only enhances overall security by reducing the attack surface but also simplifies management by limiting the scope of access to what is strictly necessary for specific tasks or roles. Additionally, it aids in compliance with regulatory standards, which often mandate stringent access controls. Regularly reviewing and updating these policies to align with evolving business needs and security landscapes further strengthens the security posture.
Creating the resources
This section will guide you in the process of creating the resources needed to start working with Cxlink Smartstore.
It is critically important to avoid using AWS root account credentials for operational tasks, including the actions described. The root account has unrestricted access to all resources in the AWS account, which poses a significant security risk if misused or compromised. Always follow best security practices by:
- Creating individual IAM users with the necessary permissions.
- Adhering to the principle of least privilege, assigning only the minimal required access rights.
- Regularly reviewing and updating IAM policies and credentials.
- Failure to follow these guidelines can lead to severe security vulnerabilities and potential data breaches. Protect your AWS resources by using appropriate IAM user credentials. 🛡️
Customer KMS encryption key
Follow this steps to create an encyption key:
-
In the AWS Console, select
KMS -
Navigate to
Customer-managed keysand selectCreate key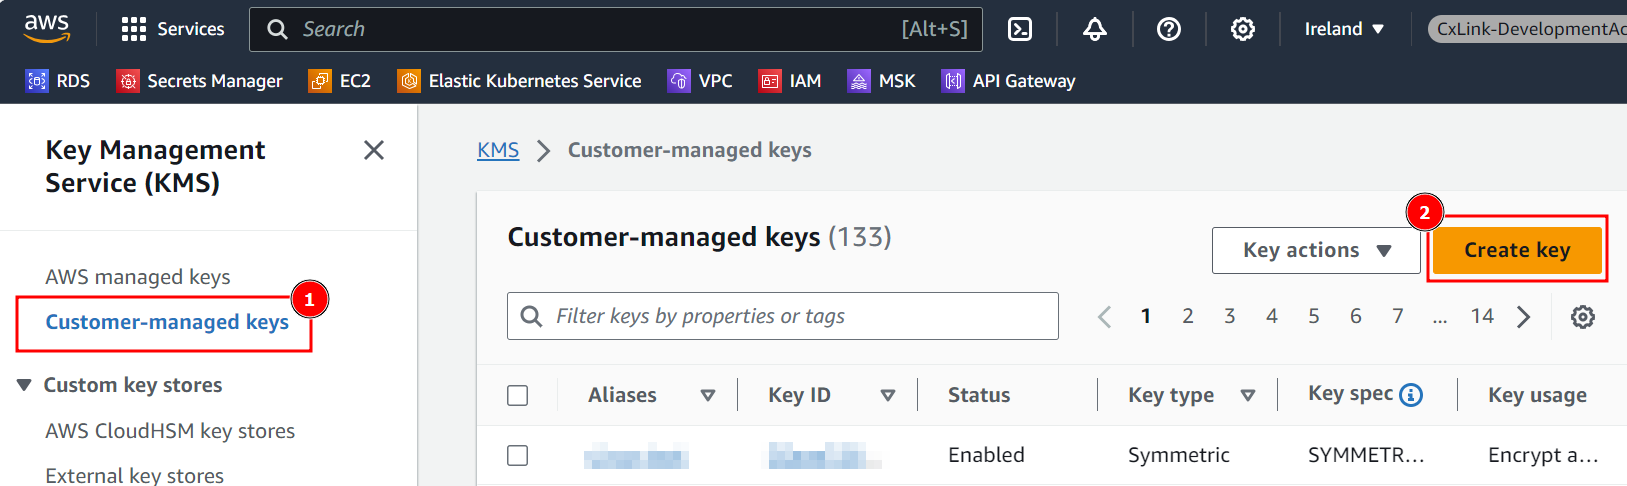
-
In the Configure key section, leave default values and select
Next. -
In the Add labels section, define a Alias for the key and a Description that helps you identify the key in later operations.
-
Add additional Tags if needed and select
Next -
In the Define key administrative permissions, select who within your organization will be responsible for this key and press Next.
-
In the Define key usage permissions, select who within your organization will be able to use the key for encrypt/decrypt operations. For this process, leave all user/roles unselected and press
Next. -
In the Review section, ensure that all parameters are correct and press
Finishto create the key. -
Back in the
Customer-managed keys, search for the newly created key and open its properties.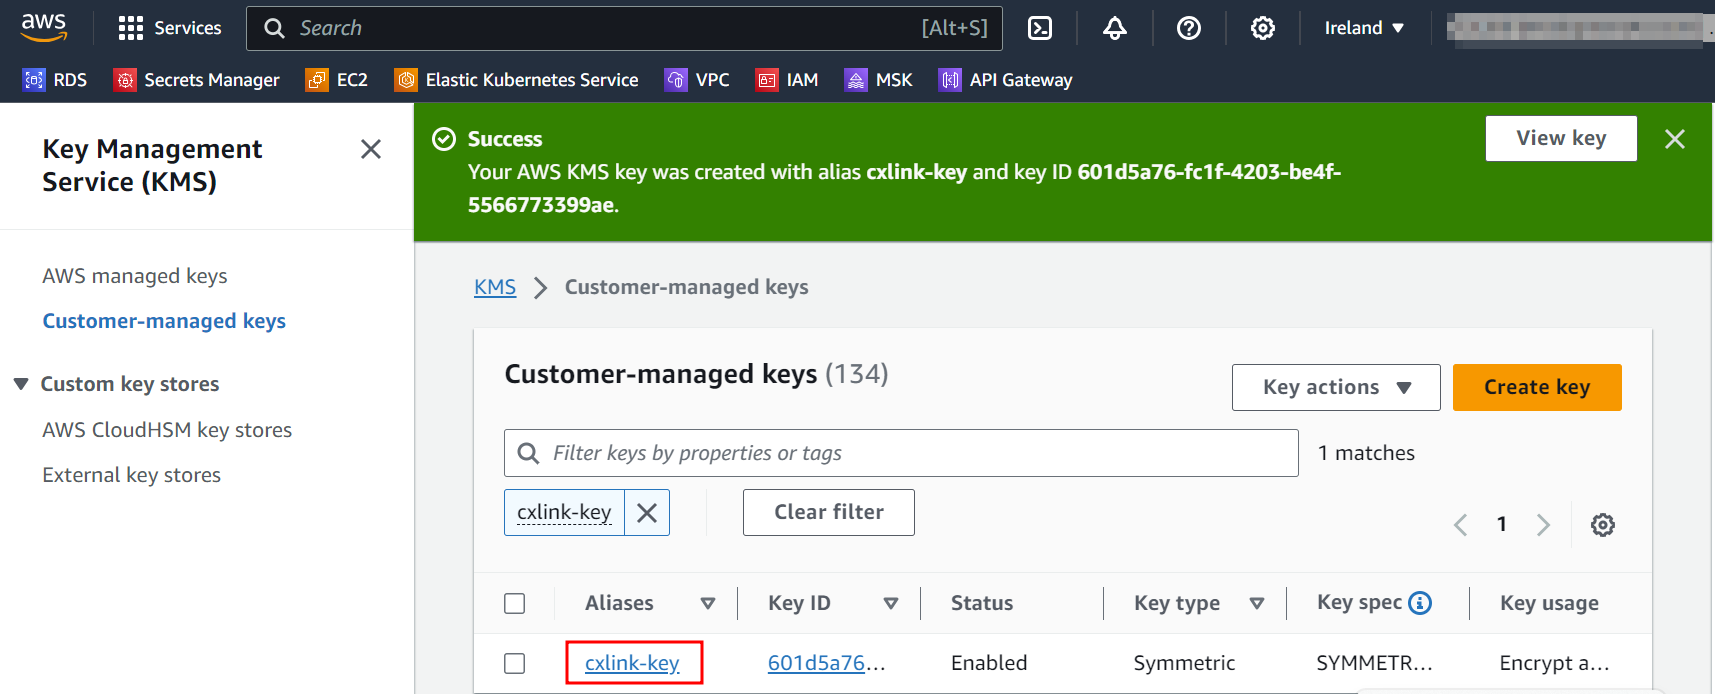
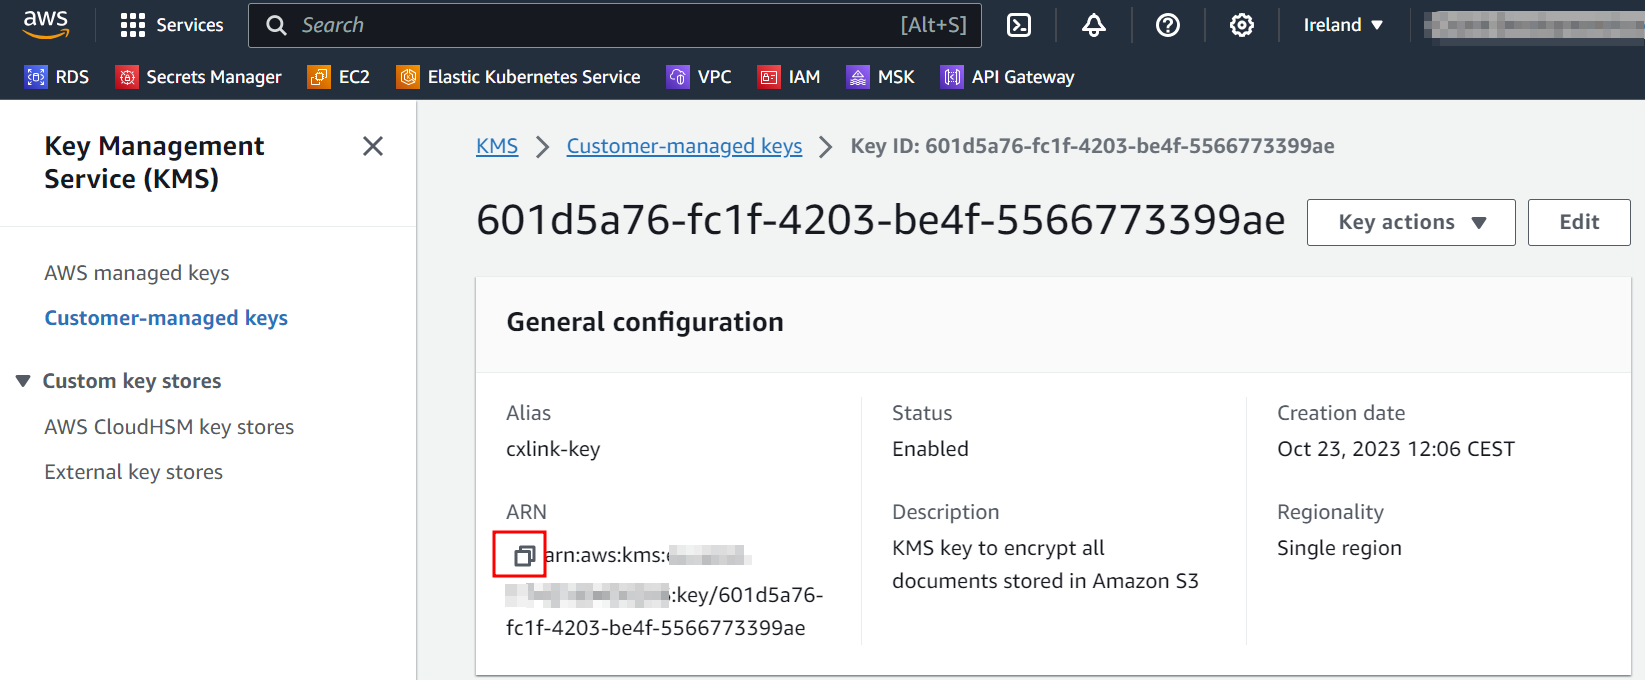
-
In the key General configuration note down its ARN for later operations.
Amazon S3 Bucket
Follow this steps to create an Amazon S3 bucket:
- In the AWS Console, select
S3service. - Navigate the
Bucketsand selectCreate bucket.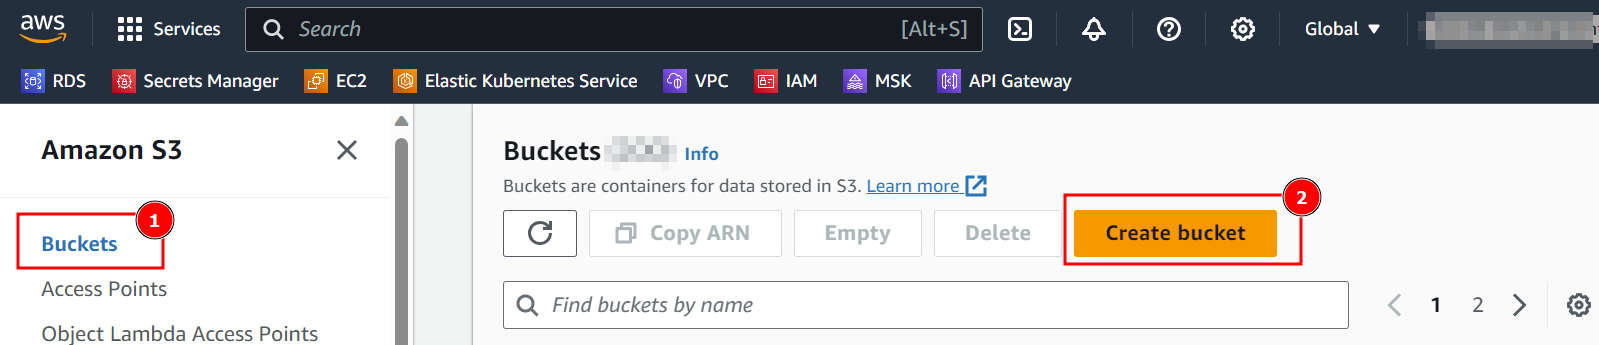
- In the Create bucket section:
- Select a Bucket name for the documents/archiving storage. Remember that the bucket name must be unique.
- Select the AWS Region where you want to store the documents/archiving objets.
- Leave ACL disabled as recommended.
- Leave Block all public access by default to ensure your documents are not publicly available.
- Enable Bucket versioning to avoid documents overwriting. (Recommended approach but can be kept as disabled if needed).
- Add Tags as per your tagging policy.
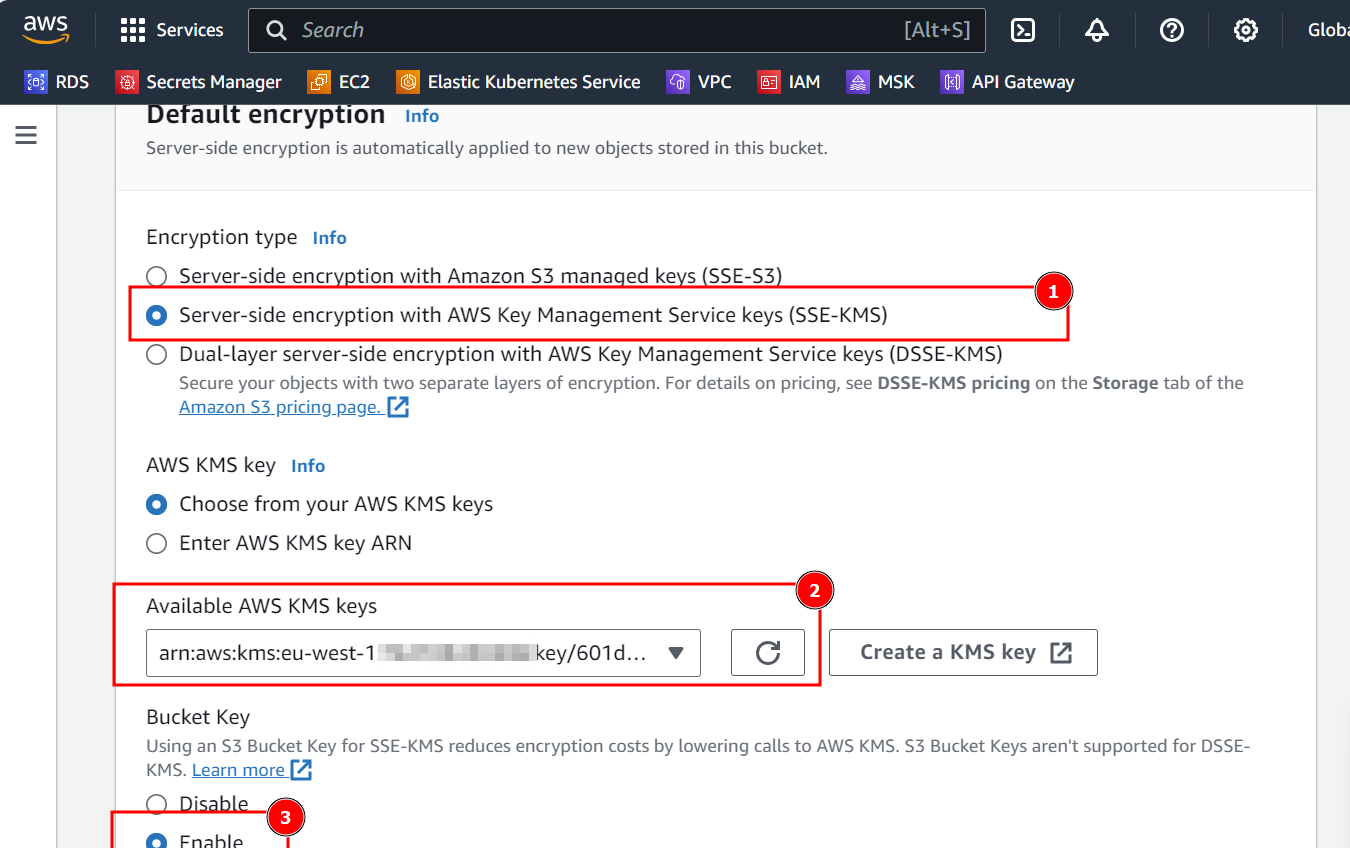
- In the Default Encryption section, select Server-side encryption with AWS Key Management Service keys (SSE-KMS) and search for the previously created key. Ensure that Bucket Key is enabled.
- Leave other options as default and select
Create bucket.
- Back to the
Bucketssection, search for the newly created bucket and note down its arn for later operations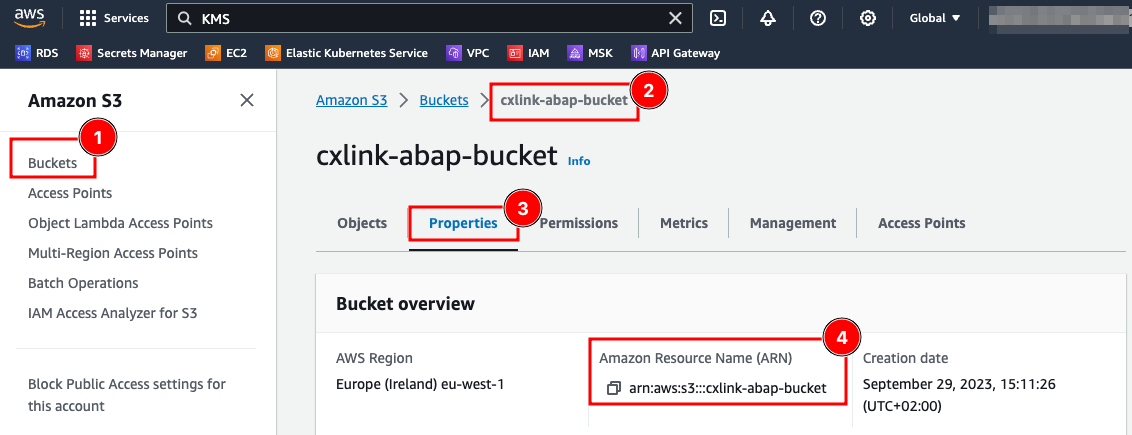
Amazon Kinesis Data Stream (only for replication in Datalakes)
If you plan to use Cxlink Datalakes you can send the CDC replication changes to Amazon Kinesis. Amazon Kinesis Data Streams offers several advantages for real-time data streaming and processing:
- Real-Time Data Processing: Kinesis Data Streams enables the collection, processing, and analysis of data in real time. This is crucial for applications requiring immediate insights from streaming data, like financial transaction analysis, real-time analytics, and IoT data processing.
- Scalability: It is highly scalable, allowing you to easily adjust the stream capacity based on the volume of data input. This means it can handle not only large amounts of data but also accommodate fluctuating data loads without manual intervention.
- High Throughput and Low Latency: Kinesis Data Streams is designed to offer high data throughput and low latency, even with very large streams. This is essential for applications that depend on the rapid processing of data, like monitoring and live dashboards.
- Durability and Reliability: Data in Kinesis Streams is stored across multiple Availability Zones in an AWS region, providing high durability and reliability. This redundancy ensures that the data is protected against individual machine or data center failures.
- Easy Integration with AWS Ecosystem: It integrates seamlessly with other AWS services like AWS Lambda, Amazon S3, Amazon Redshift, and Amazon Elasticsearch Service, enabling a wide range of processing and storage patterns.
- Simplified Data Processing: Kinesis Data Streams can simplify the architecture of data processing systems. It eliminates the need for complex and costly infrastructure to manage data ingestion and processing pipelines.
- Customizability: It offers the flexibility to customize the data processing applications according to specific needs. You can write custom code for data processing and analysis, which runs on servers or in a serverless environment like AWS Lambda.
- Real-time Metrics and Monitoring: Amazon Kinesis provides real-time metrics and insights into the performance of your data streams. This feature helps in monitoring the health of the application and quickly resolving any issues.
- Cost-Effective: With Kinesis, you pay for the capacity you use without upfront costs. This can be more cost-effective compared to managing your own streaming data infrastructure.
- Security: Kinesis Data Streams supports encryption at rest and in transit, ensuring that your data is secure both when it's being streamed and when it's stored.
By leveraging these advantages, organizations can build efficient, real-time analytics solutions and respond more quickly to business and operational needs.
Follow this steps to create an Amazon Kinesis Data Stream:
- In the AWS Console, select Amazon Kinesis service.
- Navigate the
Data streamsand selectCreate data stream.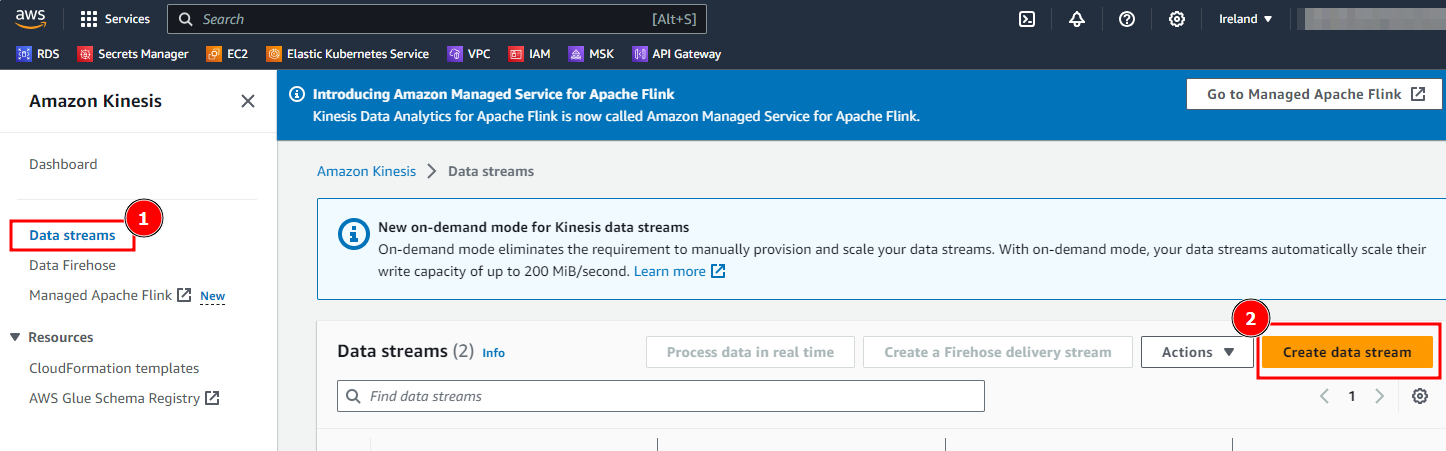
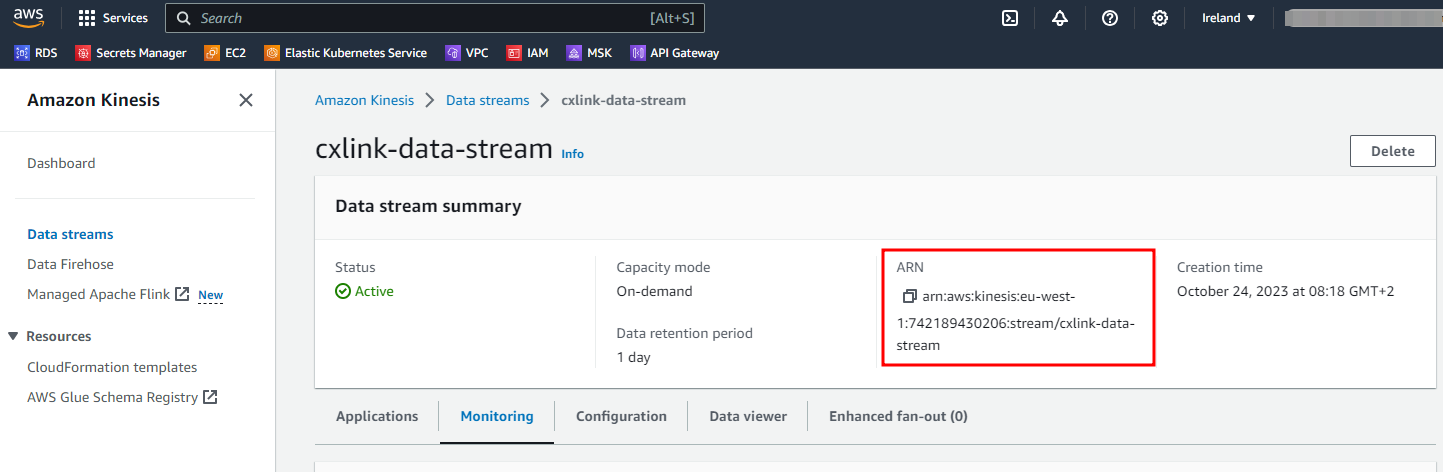
- Define a Data Stream Name and select
Create data stream. Leave all other options by default. - Once created, you will need to define the consumer of this data stream.
- In the data stream properties, note down the data stream ARN for later purposes.
Grant permissions for Cxlink Smartstore
Create an IAM policy
To grant access to the created S3 bucket to the SAP Server, it is recommended to create an IAM policy that grants the necessary permissions, adhering to the principle of least privilege by ensuring only the minimum required access rights are provided.
The following examples are a basic but functional implementation of a secure IAM Policy for s3 bucket access permissions. You may need to adapt it depending to meet your company requirements. You will need to ensure that the created policy grants access to the SAP server to store, read and delete existing files in the proper bucket.
Follow this steps to create the IAM policy:
- Go to the IAM Console: https://console.aws.amazon.com/iam/
- In the navigation pane, choose
Policiesthen clickCreate policy. - In the visual editor, go the
JSONtab and copy the following contents:
- CxLink for ArchiveLink and ILM
- CxLink Data Lakes
If you plan to use the below example, remember to change the <<kms_key_arn>> and <<s3_bucket_arn>> fields for the values previously obtained.
_55{_55 "Version": "2012-10-17",_55 "Statement": [_55 {_55 "Effect": "Allow",_55 "Action": [_55 "s3:ListAllMyBuckets",_55 "kms:ListKeys",_55 "kms:ListAliases"_55 ],_55 "Resource": "*"_55 },_55 {_55 "Action": [_55 "s3:DeleteObject",_55 "s3:GetAccessPoint",_55 "s3:GetBucketLocation",_55 "s3:GetEncryptionConfiguration",_55 "s3:GetIntelligentTieringConfiguration",_55 "s3:GetLifecycleConfiguration",_55 "s3:GetObject",_55 "s3:GetObjectLegalHold",_55 "s3:GetBucketObjectLockConfiguration",_55 "s3:GetObjectRetention",_55 "s3:ListAccessPoints",_55 "s3:ListBucket",_55 "s3:PutBucketObjectLockConfiguration",_55 "s3:PutBucketTagging",_55 "s3:PutEncryptionConfiguration",_55 "s3:PutIntelligentTieringConfiguration",_55 "s3:PutLifecycleConfiguration",_55 "s3:PutObject",_55 "s3:PutObjectLegalHold",_55 "s3:PutObjectRetention",_55 "s3:PutObjectTagging"_55 ],_55 "Effect": "Allow",_55 "Resource": [_55 "<<s3_bucket_arn>>",_55 "<<s3_bucket_arn>>/*"_55 ]_55 },_55 {_55 "Action": [_55 "kms:Decrypt",_55 "kms:Encrypt",_55 "kms:GenerateDataKey"_55 ],_55 "Effect": "Allow",_55 "Resource": [_55 "<<kms_key_arn>>"_55 ]_55 }_55 ]_55}
If you plan to use the below example, remember to change the <key_id>, <bucket_name> and <data_stream> fields for the values previously obtained.
_40{_40 "Version": "2012-10-17",_40 "Statement": [_40 {_40 "Sid" : "AllowListBucketsStreams",_40 "Effect": "Allow",_40 "Action": [_40 "s3:ListAllMyBuckets",_40 "kinesis:ListStreams"_40 ],_40 "Resource": "*"_40 },_40 {_40 "Sid": "Allow put objects in bucket",_40 "Effect": "Allow",_40 "Action": "s3:PutObject",_40 "Resource": "arn:aws:s3:::<bucket_name>/*"_40 },_40 {_40 "Sid": "Allow encrypt/decrypt data at rest",_40 "Action": [_40 "kms:GenerateDataKey",_40 "kms:Decrypt",_40 "kms:Encrypt"_40 ],_40 "Effect": "Allow",_40 "Resource": "arn:aws:kms:eu-west-1:012345678901:key/<key_id>"_40 },_40 {_40 "Sid": "Allow adding records to Kinesis data Stream",_40 "Effect": "Allow",_40 "Action": [_40 "kinesis:DescribeStream",_40 "kinesis:PutRecord",_40 "kinesis:PutRecords"_40 ],_40 "Resource": "arn:aws:kinesis:eu-west-1:012345678901:stream/<data_stream>"_40 }_40 ]_40}
-
If you plan to use AWS IAM User instead of Instance Profile add also the following statement to the policy.
_10{_10"Sid": "Allow get identity for IAM User",_10"Effect": "Allow",_10"Action": ["iam:GetUser"],_10"Resource": "arn:aws:iam::<aws_account>:user/<iam_user_name>"_10} -
Review the policy and name it, then click
Create policy.
Attach the policy - Amazon EC2 Role
To attach the policy to the IAM role for Amazon EC2:
- Go to the IAM Console: https://console.aws.amazon.com/iam/.
- In the
Roles(1) section, select the desired role (2). - In the
Permissions(3) tab, open theAdd permissionsdrop down and select Attach policy (4).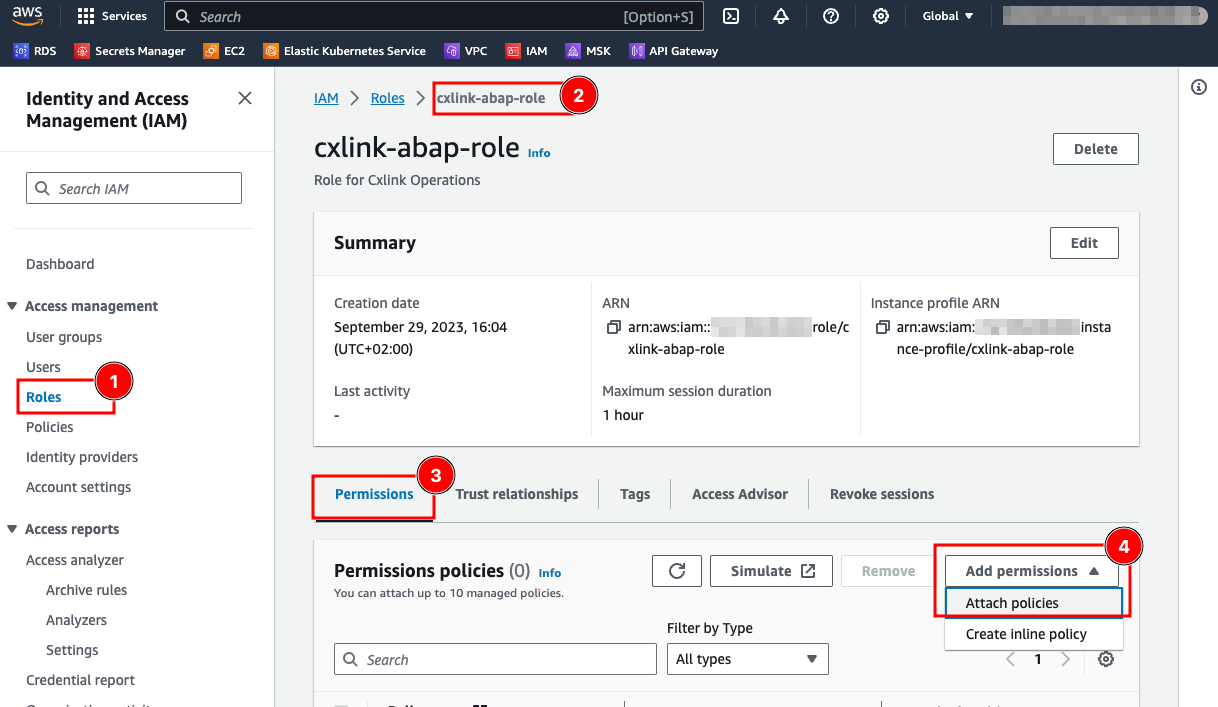
- On the Attach policy to ... page, on the
Other permissions policies, search for the previously created IAM policy (1), ensure that the policy is checked (2) and selectAdd permissions.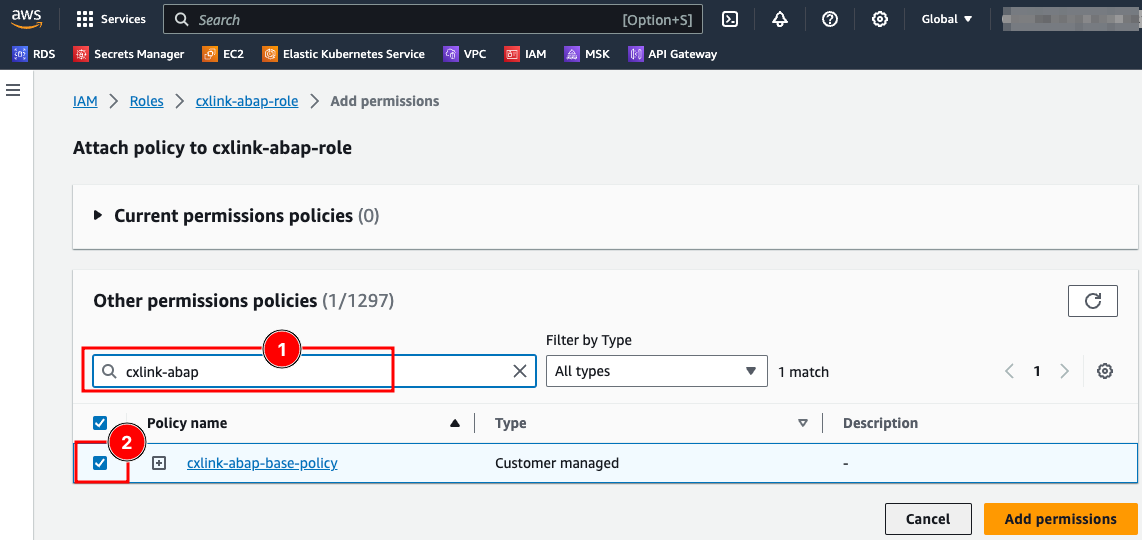
- You are now ready to go. Ensure again that the IAM role for EC2 (instance profile) is attached to all SAP application servers where the Cxlink addon will run.
Attach the policy - IAM User
Maximum IAM User length must be 27 characters
You will need to access the IAM console and select the user to whom the policy will be attached. If you don't have an IAM user for Cxlink Smartstore:
- Create a new IAM user: Creating an IAM in your AWS Account
- Ensure that the user has Programmatic credentials and you have its Access Key and Secret Keys for later usage: Managing access keys for IAM users
To add the policy to the IAM User:
- Go to the IAM Console: https://console.aws.amazon.com/iam/.
- In the
Users(1) section, select the desired user (2). - In the
Permissions(3) tab, open theAdd permissionsdrop down and select Add permissions (4).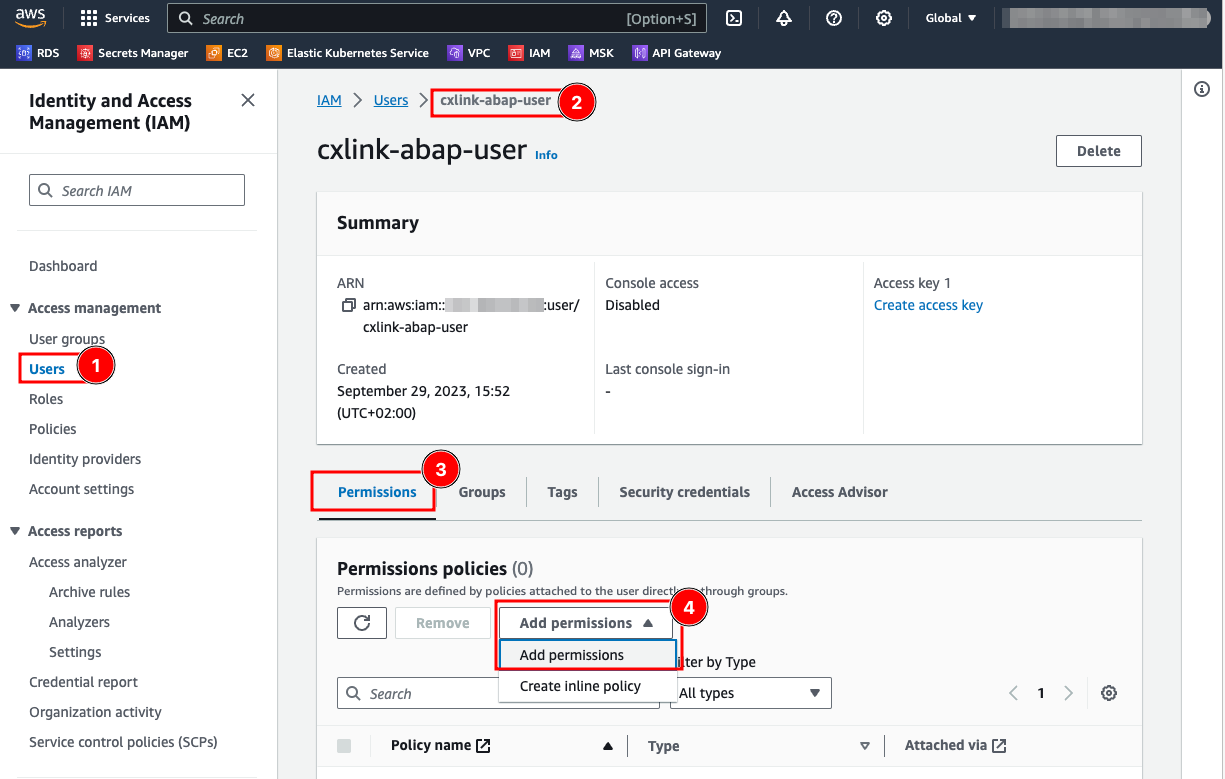
- On the
Add permissionspage, select Attach policies directly (1), search for the previously created IAM policy (2), ensure that the policy is checked (3) and selectNext.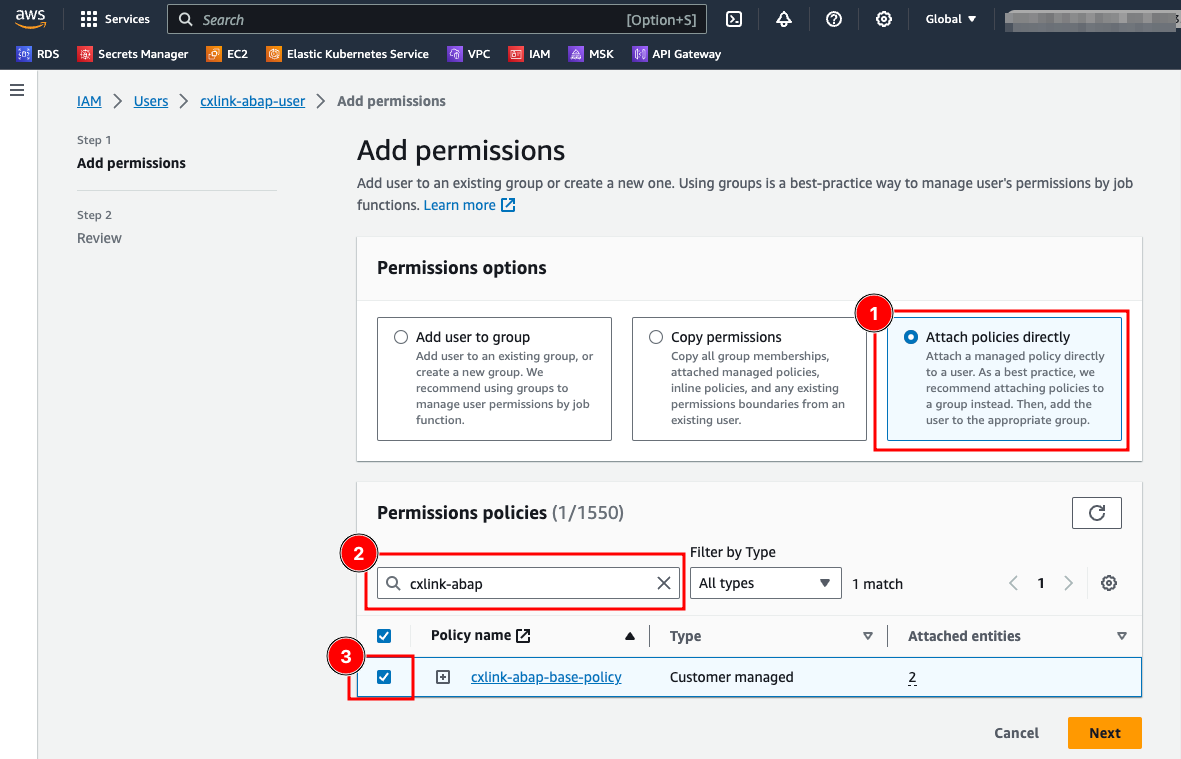
- In the Review panel, check that all parameters are valid and select
Add Permissions.