SAP ASE
You can perform your SAP ASE backups by using one of the following options. Select the one that better meet your needs.
Topics
- Configure backint-related parameters
- Configure database specific options
- Backup and restore your database - using SQL statements
- Backup and restore your database - SAP DBACockpit
- Backup and restore your database - using SAP Control Center
- System Copy
- High Availability configuration
- Where are your backup stored?
- Related SAP Notes
Configure backint-related parameters
Before you can start using CxLink Backup with your SAP ASE Database you will need to ensure that following configuration options are configured in your server:
Create a dump configuration
In order to make it easier for backup adminsitrator to launch backups with specific settings, it is a best practice to create dump profiles. We can create as many Dump Profiles as we want, each one with different settings. This can be useful when we want to use, for example, one profile for Full Backups, other for Incremental Backup, another one for logs backups, and so on.
_101> use master_102> go_10_101> sp_config_dump_10 @config_name = '<profile_name>',_10 @ext_api = 'emory::compression=<compression_level',_10 @num_stripes = '<int>',_10 @blocksize = '16384'_102> go
Use one of the following examples to create your dump configuration file. You can adapt these parameters to any value that better fits your needs:
_101> use master_102> go_10_101> sp_config_dump_10 @config_name = 'emory_S8',_10 @ext_api = 'emory::',_10 @num_stripes = '8',_10 @blocksize = '16384'_102> go
_101> use master_102> go_10_101> sp_config_dump_10 @config_name = 'emory_S8_C5',_10 @ext_api = 'emory::compression=5',_10 @num_stripes = '8',_10 @blocksize = '16384'_102> go
_101> use master_102> go_10_101> sp_config_dump_10 @config_name = 'emory_S4_C1',_10 @ext_api = 'emory::compression=1',_10 @num_stripes = '4',_10 @blocksize = '16384'_102> go
Ensure that the dump profile has been properly created you can list the existing dump profiles by executing the following command:
_101> use master_102> go_101> sp_config_dump_102> go
To view the configuration details of a specific dump profile, execute the following command:
_101> use master_102> go_101> sp_config_dump <profile_name>_102> go
Expand to see an output example
_10 optionname optionvalue_10 ----------------- ---------------------_10 ext_api emory::compression=5_10 num_stripes 8_10 blocksize 65536
Configure database specific options
In this section you will find the specific configuration settings modifiable for ASE.
All the modifiable values will be listed in the Specific Database configuration for ASE database section in CxLink Backup menu:
_10? CxLink Backup: [Use arrows to move, enter to select, type to filter]_10 Storage Providers profiles_10 Data storage providers for backups & restores_10> Specific Database configuration for ASE database_10 License Software_10 Logging settings_10 Syntax Backups Dashboard_10 Backups Lifecycle_10 Debug traces_10 Exit
Sybase IO Block Size
By default, the value of block size is set at 16 KB. You can keep increasing the value of block size by multiple of 2 KB till you get a higher I/O during dump and load operations.
It is a best practice to set the block size as 16 KB.
If you need to change this value, follow these steps:
-
Enter the proper section from the menu:
_10? Select action to perfom: [Use arrows to move, enter to select, type to filter]_10> Sybase IO Block Size_10Return -
Select the desired IO Block Size:
_10? Select action to perfom: Sybase IO Block Size_10? Select Sybase IO Block Size (change only under supervision): [Use arrows to move, enter to select, type to filter]_104096 bytes_108192 bytes_10> 16384 bytes_1032768 bytes -
You can now select Return and Exit to save the configuration if no other action should be taken.
The following settings should be applied to your SAP ASE Database:
To perform all the following actions your will need to connect to your SAP ASE database ISQL command line tool.
_10isql -U sapsa -P <your password> -S <SAP SID> -X
-
Check Database Page Size. The recommended value for creating dump configuration settings should be
16384_101> select @@maxpagesize_102> go_10_10-----------_1016384 -
Activate Database Logging. In order to be able to recover a database with Point In Time options, yu must activate database logging.
_101> exec master..sp_dboption D04, 'trunc log on chkpt', false_102> go -
Enable Dumphistory File. To enable the
dump historyfile, execute the following commands:_101> use master_102> go_101> sp_configure 'enable dump history', 1_102> go_101> sp_configure 'dump history filename', 1, 'dumphist'_102> gotipTo ensure that the proper parameters have been activated you can list the current configuration by executing the following commands.
_111> sp_configure 'dump history filename'_112> go_11Parameter Name Default Memory Used Config Value Run Value Unit Type_11--------------------- ----------- ----------- ------------ ------------ -------------------- --------------------_11dump history filename dumphist 0 dumphist dumphist name dynamic_11_111> sp_configure 'enable dump history'_112> go_11Parameter Name Default Memory Used Config Value Run Value Unit Type_11--------------------- ----------- ----------- ------------ ------------ -------------------- --------------------_11enable dump history 0 0 1 1 switch dynamic -
List Dumphistory File contents. To list the current
dump historyfile contents, you can execute the following commands:_101> sp_dump_history_102> go -
Result:
_24DUMP_24----_24Dump_Type Dbid Database_name Stripes Dump_instant File Server_name Compression_lvl Password Status Label Dump_date_24----------- ------ -------------- ------- --------------------------- ------------------------------------------------- ----------- --------------- -------- -------- ----- --------------------------_24DATABASE 4 D04 4 May 22 2020 9:41:29:070AM emory::compression=-2::D04.DB.20200522.093515.000 * 0 no Success * May 22 2020 9:41:33:096AM_24DATABASE 4 D04 4 May 22 2020 9:41:29:070AM emory::compression=-2::D04.DB.20200522.093515.001 * 0 no Success * May 22 2020 9:41:33:096AM_24DATABASE 4 D04 4 May 22 2020 9:41:29:070AM emory::compression=-2::D04.DB.20200522.093515.002 * 0 no Success * May 22 2020 9:41:33:096AM_24DATABASE 4 D04 4 May 22 2020 9:41:29:070AM emory::compression=-2::D04.DB.20200522.093515.003 * 0 no Success * May 22 2020 9:41:33:096AM_24DATABASE 4 D04 4 May 22 2020 11:28:44:076AM emory::compression=9::D04.DB.20200522.105442.000 * 0 no Success * May 22 2020 11:29:29:353AM_24DATABASE 4 D04 4 May 22 2020 11:28:44:076AM emory::compression=9::D04.DB.20200522.105442.001 * 0 no Success * May 22 2020 11:29:29:353AM_24DATABASE 4 D04 4 May 22 2020 11:28:44:076AM emory::compression=9::D04.DB.20200522.105442.002 * 0 no Success * May 22 2020 11:29:29:353AM_24DATABASE 4 D04 4 May 22 2020 11:28:44:076AM emory::compression=9::D04.DB.20200522.105442.003 * 0 no Success * May 22 2020 11:29:29:353AM_24DATABASE 4 D04 0 May 22 2020 11:30:06:163AM dump.error * 0 no Error May 22 2020 11:30:06:163AM_24DATABASE 4 D04 4 May 22 2020 11:34:45:076AM emory::::D04.DB.20200522.113046.000 * 0 no Success * May 22 2020 11:34:53:513AM_24DATABASE 4 D04 4 May 22 2020 11:34:45:076AM emory::::D04.DB.20200522.113046.001 * 0 no Success * May 22 2020 11:34:53:513AM_24DATABASE 4 D04 4 May 22 2020 11:34:45:076AM emory::::D04.DB.20200522.113046.002 * 0 no Success * May 22 2020 11:34:53:513AM_24DATABASE 4 D04 4 May 22 2020 11:34:45:076AM emory::::D04.DB.20200522.113046.003 * 0 no Success * May 22 2020 11:34:53:513AM_24_24CONFIG_24------_24_24ALTER DATABASE_24--------------_24(return status = 0)
Backup and restore your database - using SQL statements
The following are examples of SQL statements that you can use to perform backup and recovery. For more details, refer to the SAP Sybase or SQL Reference guides.
Full Backups
_10dump database <DB_SID> using config = <config_name>_10go
Incremental backups
_10dump database <DB_SID> cumulative _10 using config = <config_file>_10 with verify=header_10go
Transaction Log backups
_10dump tran <DB_SID> using config = <config_name>_10go
Restore your database
-
Get Load
_10LOAD DATABASE <DB_SID> WITH LISTONLY=LOAD_SQL_10go -
Get LOAD sequence (Point In Time)
_10LOAD DATABASE D04_10WITH LISTONLY=LOAD_SQL,_10UNTIL_TIME="may 25, 2020 18:33:43:866pm"_10go -
Header verification
_10LOAD DATABASE D04 FROM 'emory::compression=9::D04.DB.20200522.205006.000'_10STRIPE ON 'emory::compression=9::D04.DB.20200522.205006.001'_10STRIPE ON 'emory::compression=9::D04.DB.20200522.205006.002'_10STRIPE ON 'emory::compression=9::D04.DB.20200522.205006.003'_10WITH HEADERONLY_10go
Dump History
View Dump records from command line
_10sp_dump_history [ @operation = {'list' | 'purge' | 'listfiles' | 'help'}]|_10'listpurgefiles' | 'purgefiles' | 'upgrade' | 'downgrade'}][, @until_time =_10'date'] [, @name = '<database or file name>'][, @dump_type = {'DATABASE' |_10'TRAN[SACTION]' | 'CONFIG[URATION]' | 'CUM[ULATIVE]' | 'ALTERDB'}][, @status =_10{'success' | 'fail' | 'deleted'}][, @file = '<filename>'][, @version = '1.0']_10(return status = 0)
Backup and restore your database - SAP DBACockpit
You can schedule your backup from the SAP DBACockpit by following these steps:
-
In SAP GUI, run transaction DBACOCKPIT.
-
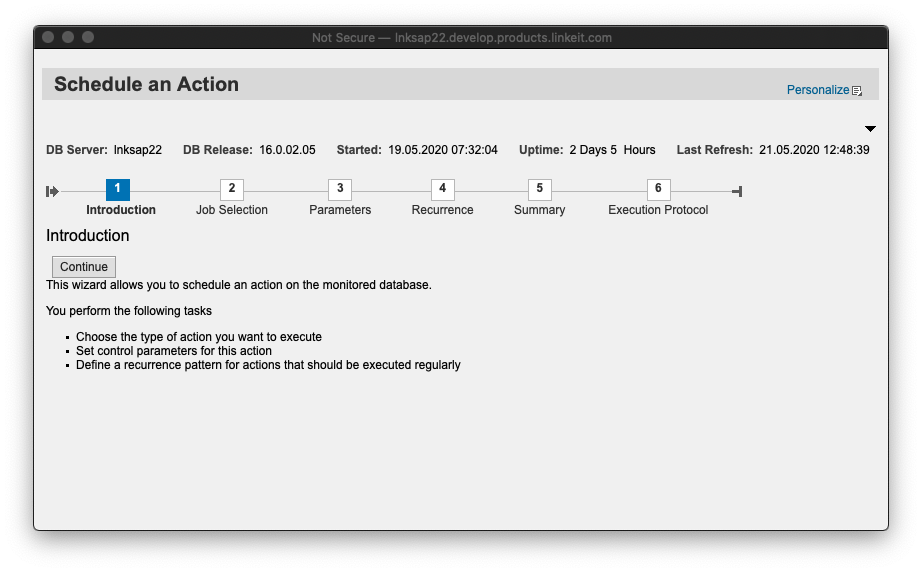
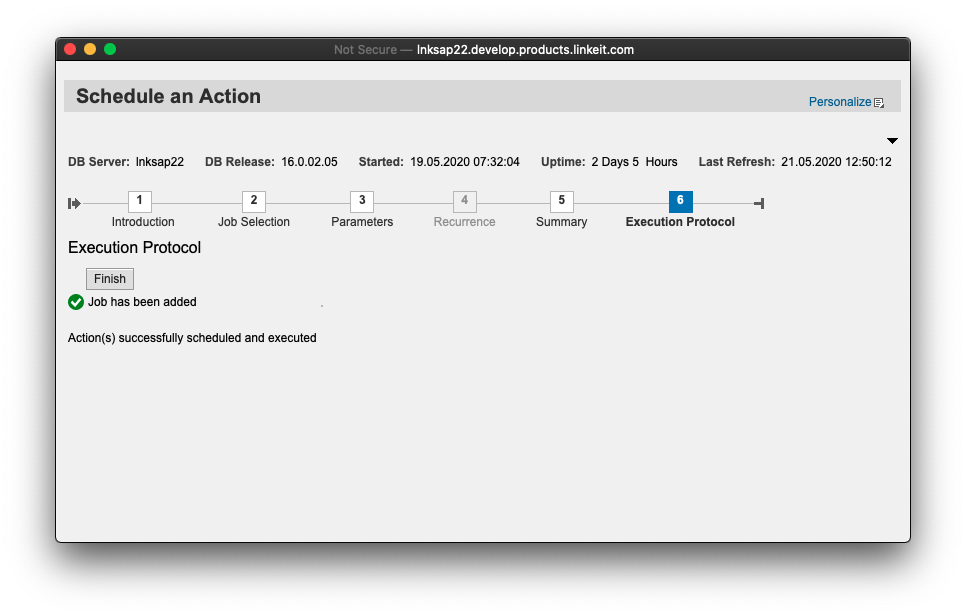
Click on Schedule an Action under Favorites to open the scheduling wizard
-
Continue to start the configuration
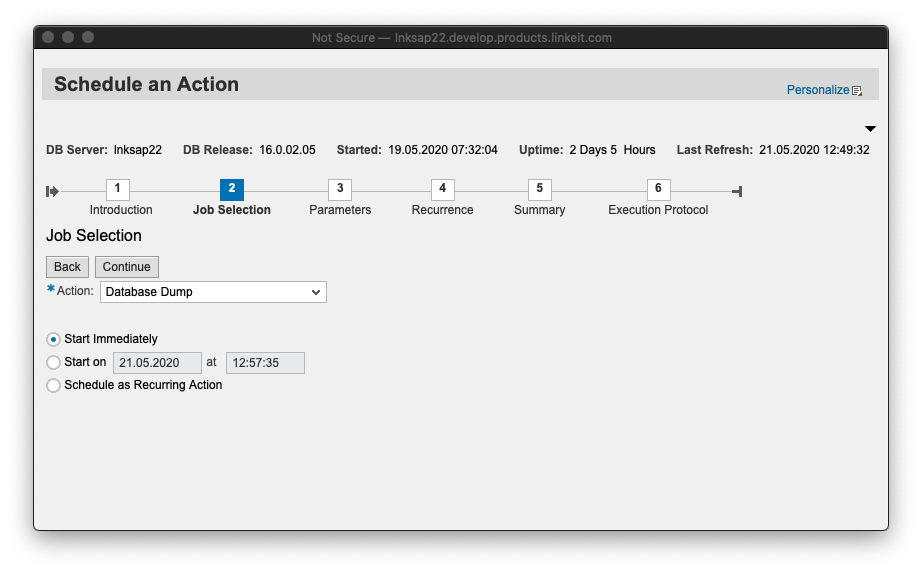
- Select Database Dump from the action drop down list.
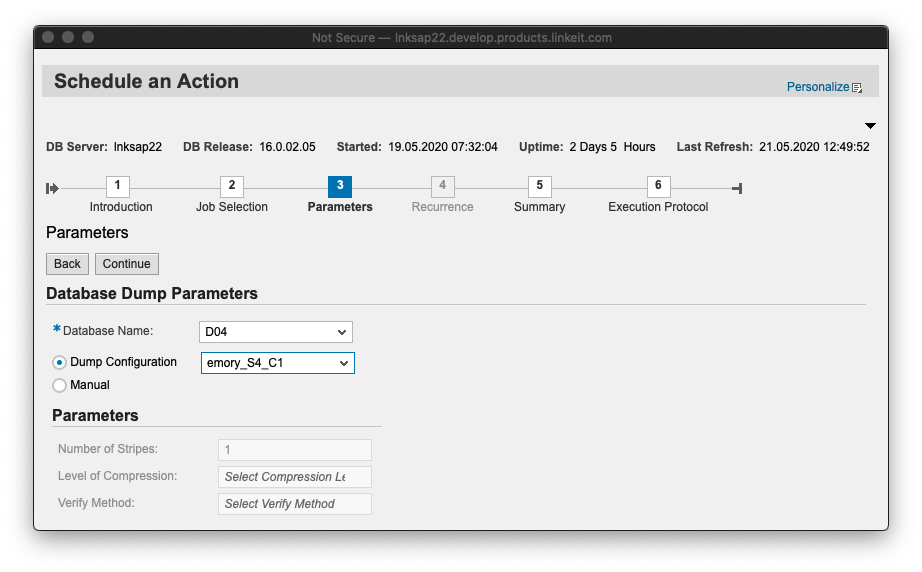
- Select the Database and the Dump Configuration. (For backint interfaces a dump configuration is mandatory. If you don't have any, please follow the steps in create dump configuration to create one.)
- Execute. Review the summary and execute the process.
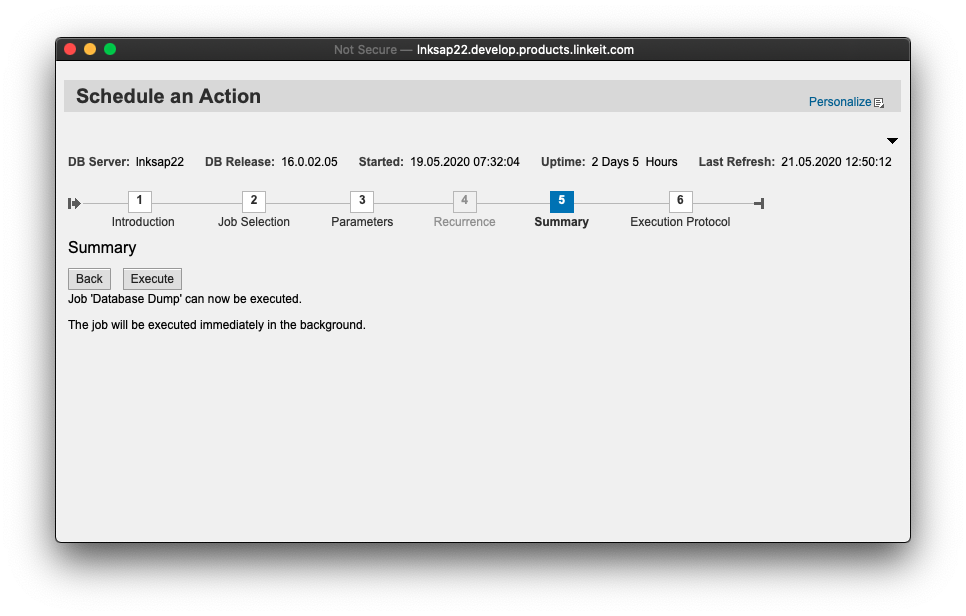
- Finish. The job has been launched. You can check for the results in the SAP DBACockpit Logs.
Backup and restore your database - using SAP Control Center
Access the Administration Console in SAP Control Center, and follow these steps to perform your backup/restore operations:
-
Jump to
Schema Objects-Databases-User Databases, select your database and select Back Up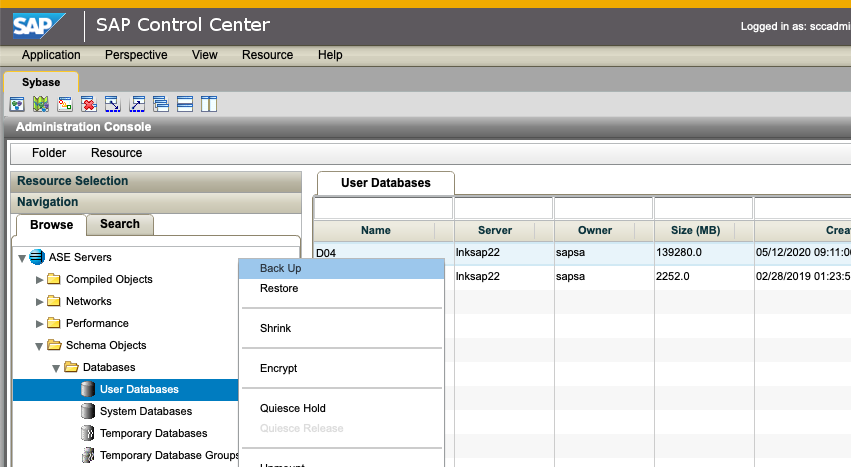
-
Select Backup using configuration and the Dump Configuration for your database. (For backint interfaces a dump configuration is mandatory. If you don't have any, please follow the steps in create dump configuration to create one.)

-
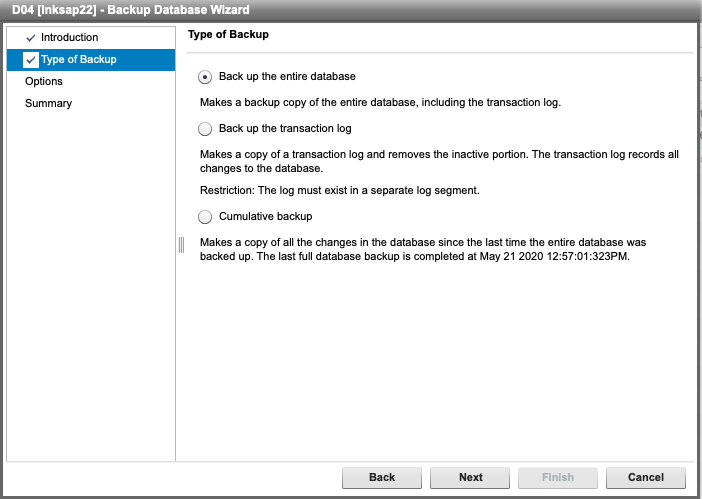
Type of Backup. Select the type of backup that you want to perform.
-
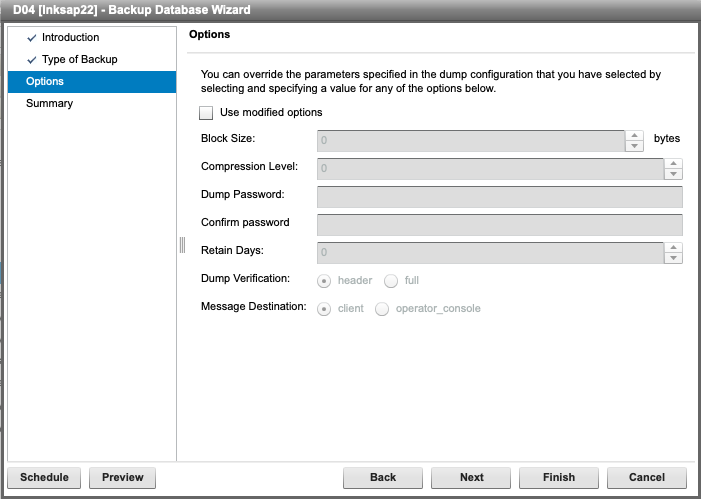
Options. Leave the use modified options option unckecked to use the configuration profile options.
-
Summary. Review the summary and finish the process.
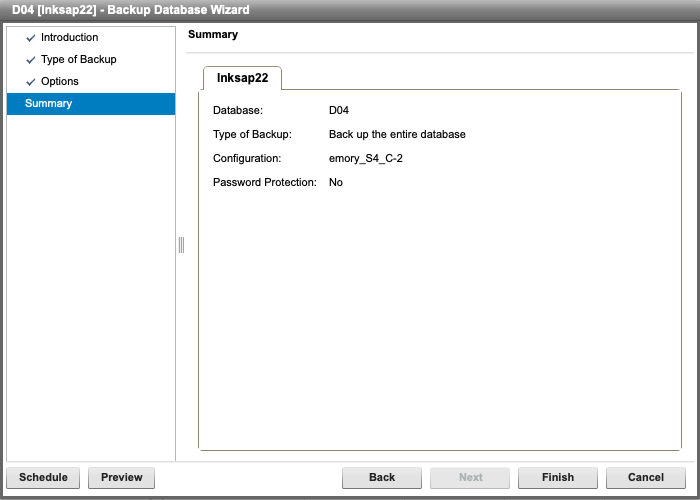
-
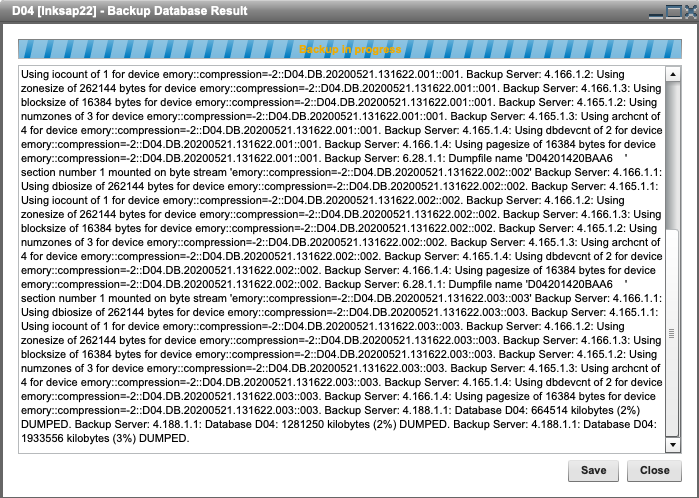
Activity Log. You will see the backup output if you have selected not to schedule the job.
System Copy
This section explains how to execute a system copy using CxLink backup.
Considerations
- Source System: D04
- Destination System: SYN
- Database: testing
Source System
Identify the backup you want to restore on Target System:

We choose to restore testing.DB.20240801.094421. This backup has been done using 2 stripes, so the restore sentence will look like:
_10LOAD DATABASE testing FROM 'emory::::testing.DB.20240801.094421.000' _10 STRIPE ON 'emory::::testing.DB.20240801.094421.001'
- Disk Layout
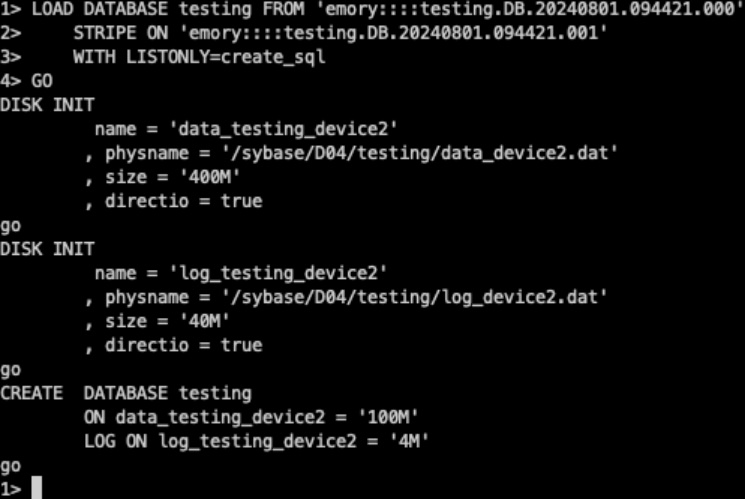
If needed, adapt disk layout on target system. Get the disk layout from Source System using the following sentence:
_10LOAD DATABASE testing FROM 'emory::::testing.DB.20240801.094421.000' _10 STRIPE ON 'emory::::testing.DB.20240801.094421.001'_10 WITH LISTONLY=create_sql
Target system
- Disk Layout
If needed, you have the following instructions to create disk layout.
You can use this output on Target System to recreate the needed disk layout: (replace D04 with SYN)
_10mkdir /sybase/SYN/testing
Create disk layout:
_16DISK INIT_16 name = 'data_testing_device2'_16 , physname = '/sybase/SYN/testing/data_device2.dat'_16 , size = '400M'_16 , directio = true_16go_16DISK INIT_16 name = 'log_testing_device2'_16 , physname = '/sybase/SYN/testing/log_device2.dat'_16 , size = '40M'_16 , directio = true_16go_16CREATE DATABASE testing_16 ON data_testing_device2 = '100M'_16 LOG ON log_testing_device2 = '4M'_16go
- Catalog
You MUST copy Source System Catalog file on Target System Catalog file. Before doing this, mak a copy of your actual target system catalog file. This catalog file should be restored to original after the system copy process.
_10TargetSystem$ scp SourceSystem@/opt/emory/conf/D04.db /opt/emory/conf/SYN.db_10_10TargetSystem$ chown sybsyb.sapsys /opt/emory/conf/SYN.db
- Execute Restore
_101> LOAD DATABASE testing FROM 'emory::::testing.DB.20240801.094421.000'_102> STRIPE ON 'emory::::testing.DB.20240801.094421.001'_103> go_10_10_101> ONLINE DATABASE testing_102> go
High Availability configuration
CxLink Backup has no explicit compatibilty for a Sybase database system with High Availability configuration.
However, there is a setup you can complete to achieve this:
- Create one bucket for each cluster node
- Install CxLink Backup in each node
- Configure CxLink Backup to store backups each node to one different bucket
- Execute backups only for the active node
- Execute Transaction Log backups for all nodes
Where are your backup stored?
Your backups will be stored in the target bucket following these formatting:
<SAP_SID>/<DB>/<year>/<month>/<day>/<SID>.DB.<start_date><start_time>.<dump_file>
All backup files from the same backup will have the exact same suffix. These can help you to identify the objects of a specific backup.
Example:
HDB/SYSTEMDB/2020/05/01/D04.DB.20210713.164512.003