IBM DB2
Following sections will show how to configure your DB2 system to use Backint functionalities.
All commands in this guide are executed using an SAP Database with SID DBD. Please replace DBD with your actual database SID.
Only DB2 SAP instances are supported by Backint. It is not possible to use Backint for a DB2 standalone database.
If you are using a release prior to 2301.27 Maki, Backint library name to be used is libemory.so instead of libemorydb2.so
Topics
Configure database archive log
To be able to recover a DB2 database with Point in Time options, database archive logging must be activated and configured to use Backint solution library.
Check actual archiving configuration using command:
_10db2 get db configuration for DBD
Archiving related parameters from command output:
_10First log archive method (LOGARCHMETH1) = VENDOR:/opt/emory/lib/libemorydb2.so_10Archive compression for logarchmeth1 (LOGARCHCOMPR1) = OFF_10Options for logarchmeth1 (LOGARCHOPT1) =_10Second log archive method (LOGARCHMETH2) = OFF_10Archive compression for logarchmeth2 (LOGARCHCOMPR2) = OFF_10Options for logarchmeth2 (LOGARCHOPT2) =_10Failover log archive path (FAILARCHPATH) =_10Number of log archive retries on error (NUMARCHRETRY) = 5_10Log archive retry Delay (secs) (ARCHRETRYDELAY) = 20_10Vendor options (VENDOROPT) =
First log archive method must be “VENDOR:/opt/emory/lib/libemorydb2.so” with no parameters, no compression, and no vendor options by using “db2 update” command:
_10db2 update db configuration for DBD using logarchmeth1 “VENDOR:/opt/emory/lib/libemorydb2.so”_10db2 update db configuration for DBD using logarchcompr1 “OFF”_10db2 update db configuration for DBD using logarchopt1 “”_10db2 update db configuration for DBD using vendoropt “”
Backup, restore and archive log history
Every single time DB2 finishes a backup, log archive or restore action, backup history is updated.
You can display actual DB2 database backup history by executing “db2 list history” like:
Backup history:
_10_10db2 list history backup all for DBD
Archive log history:
_10db2 list history archive log all for DBD
List history command has many options. Please read DB2 database documentation from IBM for more information.
These are different sections from command output:
Offline backup:
_16_16--------------------------------------------------------------------------_16 Comment: DB2 BACKUP DBD OFFLINE_16Start Time: 20211224073135_16 End Time: 20211224073234_16 Status: I_16--------------------------------------------------------------------------_16 EID: 2618 Location: /opt/emory/lib/libemorydb2.so_16_16Op Obj Timestamp+Sequence Type Dev Earliest Log Current Log Backup ID_16-- --- ------------------ ---- --- ------------ ------------ ------------_16 B D 20211224073135002 F O S0000002.LOG S0000002.LOG_16--------------------------------------------------------------------------_16 Contains 68 Tablespace(s):_16_1600001 SYSCATSPACE
Archive log:
_13_13--------------------------------------------------------------------------_13 Comment:_13Start Time: 20220104063242_13 End Time: 20220104063249_13 Status: A_13--------------------------------------------------------------------------_13 EID: 4013 Location: /opt/emory/lib/libemorydb2.so_13_13 Op Obj Timestamp+Sequence Type Dev Earliest Log Current Log Backup ID_13 -- --- ------------------ ---- --- ------------ ------------ ------------_13 X D 20220104063314 P D S0000249.LOG C0000015_13--------------------------------------------------------------------------
Restore:
_16_16-----------------------------------------------------------------------------_16 Comment: RESTORE DBD WITH RF_16Start Time: 20211230101407_16 End Time: 20211230101838_16 Status: A_16-----------------------------------------------------------------------------_16 EID: 3432 Location:_16_16 Op Obj Timestamp+Sequence Type Dev Earliest Log Current Log Backup ID_16 -- --- ------------------ ---- --- ------------ ------------ --------------_16 R D 20211230103250001 F 20211230065525_16-----------------------------------------------------------------------------_16 Contains 68 Tablespace(s):_16_1600001 SYSCATSPACE
Execute a backup operation using Backint
You can execute a backup operation using Backint Library from either command line or SAP database management transaction DB13.
Command Line Full Offline Backup
To execute a full offline backup, SAP application must be stopped and DB2 database deactivated.
Follow the steps as database administrator except first step that must be executed as SAP instance administrator:
- Stop SAP instance
_10stopsap r3
- Disconnect all connections
_10db2 force application all
- Terminate DB2 database
_10db2 terminate
- Deactivate DB2 database
_10db2 deactivate db DBD
- Stop DB2 database
_10db2stop force
- Restart the database in restricted access mode
_10db2start admin mode restricted access
- Execute backup with the desired options (compression, encryption, opening parallel I/O sessions, ...) In the example a backup using compression and 4 parallel I/O sessions is executed:
_10db2 backup db DBD load /opt/emory/lib/libemorydb2.so open 4 sessions compress
Command Line Full Online Backup
To execute an online backup, SAP application and DB2 database are up and running.
Follow the steps as database administrator:
-
Execute backup with the desired options.
In that case a backup with compression and 4 I/O parallel sessions is executed:
_10db2 backup db DBD online load /opt/emory/lib/libemorydb2.so open 4 sessions compress
Command Line Incremental Online Backup
To execute an incremental online backup, SAP application and DB2 database are started. Follow the steps as database administrator:
- Execute backup with the desired options.
In that case a backup with compression and 4 I/O parallel sessions is called:
_10db2 backup db DBD online incremental load /opt/emory/lib/libemorydb2.so open 4 sessions compress
Command Line Delta Online Backup
To execute a delta online backup, SAP application and DB2 database are started. Follow the steps as database administrator:
- Execute backup with the desired options.
In that case a backup with compression and 4 I/O parallel sessions is called:
_10db2 backup db DBD online incremental delta load /opt/emory/lib/libemorydb2.so open 4 sessions compress
SAP GUI Full Online Backup
Follow the steps with a properly authorized SAP user:
- Access DB13 transaction
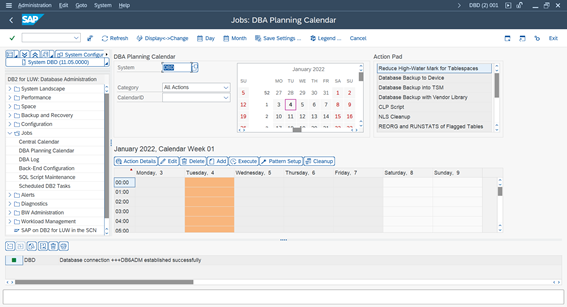
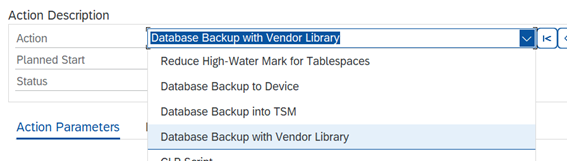
- Schedule a new action using Add button and select Database Backup with Vendor Library:
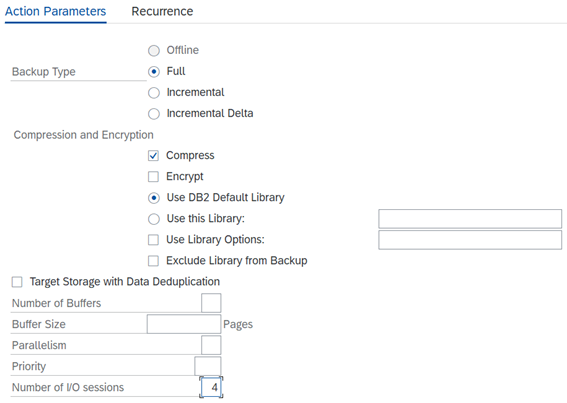
- Configure your backup with the desired options. In that case it is a full online backup including logs, compressing with default DB2 compression library, and opening 4 I/O sessions:
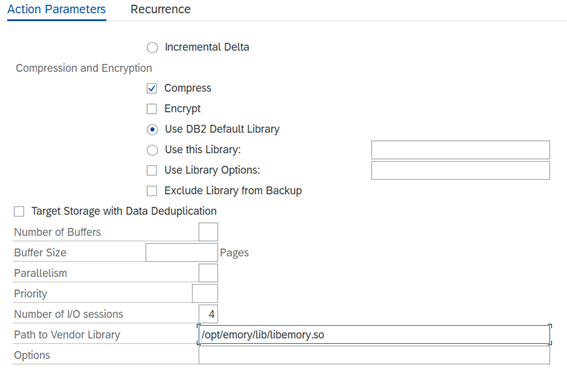
Specify Backint library:
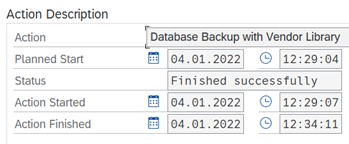
- Check backup result in the calendar:

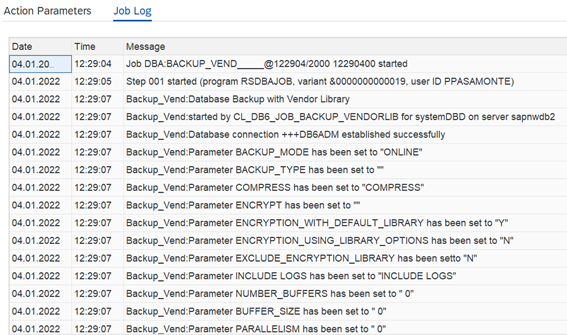
You can read result and Backint application log:
SAP GUI Incremental Online Backup
You can use DB13 transaction to schedule and execute an incremental online backup.
All execution steps won’t be reproduced here as they are the same described for SAP GUI Full Online Backup, just Incremental option must be selected:

SAP GUI Delta Online Backup
You can use DB13 transaction to schedule and execute a delta online backup.
All execution steps won’t be reproduced here as they are the same described for SAP GUI Full Online Backup, just Incremental Delta option must be selected:

Execute a restore operation using Backint
You can execute a restore operation using Backint Library from command line.
During all restore operations SAP application and DB2 database must be stopped.
A restore operation from command line can be executed using either db2 recover command with different options or db2 restore plus db2 rollforward if needed.
Command Line Database Recover
You can execute just a recover operation with no additional parameters and last successful full backup and incremental/delta/archives if needed will be restored to the last consistent database state.
Follow the steps:
- Stop SAP application and deactivate DB2 Database
- Execute command:
_10db2 recover db DBD
You can also specify a point in time and DB2 will retrieve necessary files from Backint. In the example, database DBD will be recovered to local time 2022-01-03-11.46.00:
- Stop SAP application and deactivate DB2 Database
- Execute command:
_10db2 recover db DBD to 2022-01-03-11.46.00 using local time
Command Line Restore using a specific backup image
Backup images are identified by DB2 by timestamp. You can look for a backup image using backup history commands or Backint catalog and restore it.
Following example would restore DBD database backup image with timestamp 20220104122907:
_10db2 restore db DBD load /opt/emory/lib/libemorydb2.so taken at 20220104122907
Command Line Restore using incremental backup images
You can execute a restore operation using a full backup (online or offline) and subsequent incremental/delta.
You can do it automatically letting DB2 to determine which backup images to restore or manually using DB2 utility db2ckrst.
For example, to restore an incremental backup of DBD database with timestamp 20220104124230, next steps would be performed:
- Execute:
_10db2ckrst -d DBD -t 20220104124230
DB2 will calculate backup images to be restored and order:
_10Suggested restore order of images usgin timestamp 20220104124230 for database DBD._10====================================================================_10 restore db DBD incremental taken at 20220104124230_10 restore db DBD incremental taken at 20220104122907_10 restore db DBD incremental taken at 20220104124230_10====================================================================
- Execute suggested commands specifying that Backint library is to be used:
_10db2 restore db DBD incremental load /opt/emory/lib/libemorydb2.so taken at 20220104124230_10db2 restore db DBD incremental load /opt/emory/lib/libemorydb2.so taken at 20220104122907_10db2 restore db DBD incremental load /opt/emory/lib/libemorydb2.so taken at 20220104124230
Note: replace existing has been added to avoid prompt asking to replace the database as we are restoring same database SID.
- Execute corresponding rollforward operation to desired point in time or log and start database
DB2 High Availability
When you configure your DB2 database to be HA, some configuration has to be done to have a common backup objects catalog for all your cluster nodes.
It consists in activate HA for DB2 from Backint and to define a shared location between your nodes to be used to save backup objects catalog.
Prerequisites
A shared filesystem over all your cluster nodes.
Backint for DB2 High Availability activation
Go to Configuration for DB2:
_20? Backint: [Use arrows to move, enter to select, type to filter]_20 --------------------------------------------------------------------------------_20 Storage Providers profiles_20 Set storage providers for backup/restore, disaster recovery and system copy_20> Configuration for DB2_20 Backups Lifecycle settings_20 Monitoring_20 --------------------------------------------------------------------------------_20 License_20 --------------------------------------------------------------------------------_20 Logging file settings_20 Debug traces_20 Show relevant information of this Backint_20 --------------------------------------------------------------------------------_20 Catalog & Backups management_20 --------------------------------------------------------------------------------_20 Generate troubleshooting package to be sent to Syntax Support_20 Migrate resources to last models_20 --------------------------------------------------------------------------------_20 Exit
Access to Set HA Configuration:
_10? Backint: Configuration for DB2_10? Select action to perfom: [Use arrows to move, enter to select, type to filter]_10> Set HA Configuration_10 Back
Activate the HA option:
_10? Backint: Configuration for DB2_10? Select action to perfom: Set HA Configuration_10? Enable DB2 HA configuration? (Y/n) y
And define a shared location to save catalog:
_10? Backint: Configuration for DB2_10? Select action to perfom: Set HA Configuration_10? Enable DB2 HA configuration? Yes_10? HA shared directory: (/opt/emory/db2ha)
Note: /opt/emory/db2ha is just an example, you can configure your own HA shared directory
Backint fo DB2 High Availability activation from Command Line
You can also configure DB2 HA using the command line.
Activate HA:
_10/opt/emory/emory datasource ha true
Define a shared location:
_10/opt/emory/emory datasource shared-dir /opt/emory/db2ha
Note: /opt/emory/db2ha is just an example, you can configure your own HA shared directory
Where are your backups stored?
They will be stored in the target bucket as:
<DB2_INSTANCE>/<DB>/<year>/<month>/<day>/<timestamp>.<db_sid>.<full|incremental|delta|archive>.<DB2_instance>.<database_partition>.<sequence_number>
Example:
db2dbd/DBD/2022/02/25/20220225093619.DBD.FULL.db2dbd.DBPART000.001
Backups executed prior to release 2304.11 Kimchi are stored in:
<SAPSYSTEMNAME>/<DB>/<year>/<month>/<day>/<timestamp>.<db_sid>.<full|incremental|delta|archive>.<SAPSYSTEMNAME>.<database_partition>.<sequence_number>