Logs
In this section you will define the relantioship between the buckets previously created and a Content Repository in transaction OAC0.
Overview
Once this relation is created, SAP will be able to configure all Business Documents, Archive Sessions and Attachments storage destination specifying one of the content repositories.
Define an application for the BAdI implementation
You specify the application when you create the configuration; the application links the configuration to a specific BAdI implementation. To do so:
- In the SAP LT Replication Server system, in transaction SM30, enter the table IUUC_REPL_APPL, and choose the button Maintain.
- On the next screen choose New Entries and enter ZLNKAWS_DATALAKES as name or any other descriptive name for later usage.
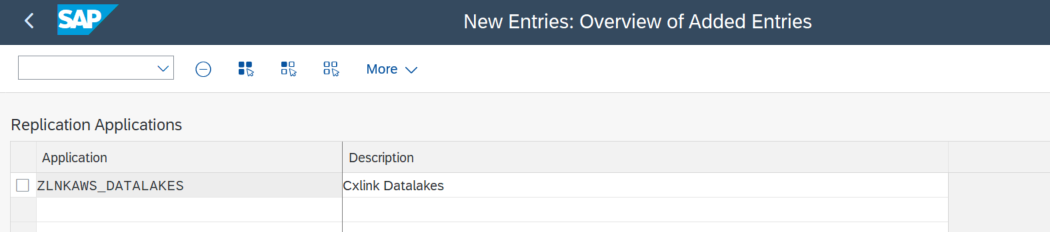
- Save. You will need to create a new Transport Request for this change or add the change to an existing TR.
Create a new configuration
The application values that you specify here will be later assigned to a configuration that wants to use the custom logic implemented here
To configure your :
- Go to transaction LTRC
- Select Create Configuration to start a configuration wizard.
- In Specify General Data section add:
- Configuration Name: Select a descriptive name that helps you easily identify the configuration purpose.
- Description: Specify a more descriptive message for the configuration.
- Authorization Group: Leave empty.
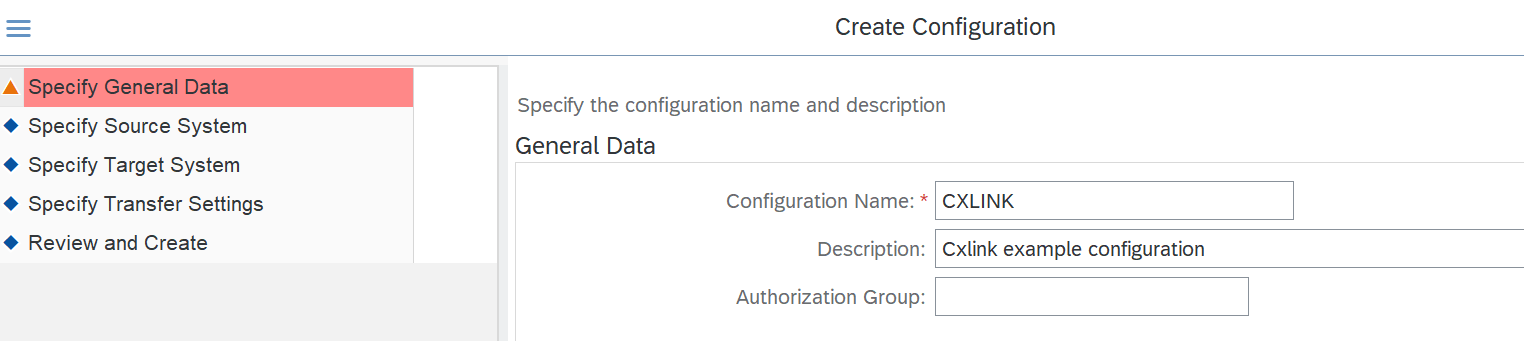
- Select Next.
- In the Specify Source System section define:
- RFC Destination: Select the RFC that connects to the SM59.
- Allow Multiple Usage: Keep checked to allow the configuration to be used in multiple environments.
- Read from Single Client: Check if you want to restrict the usage of this configuration to the current client. Leave unchecked if no restrictions apply.
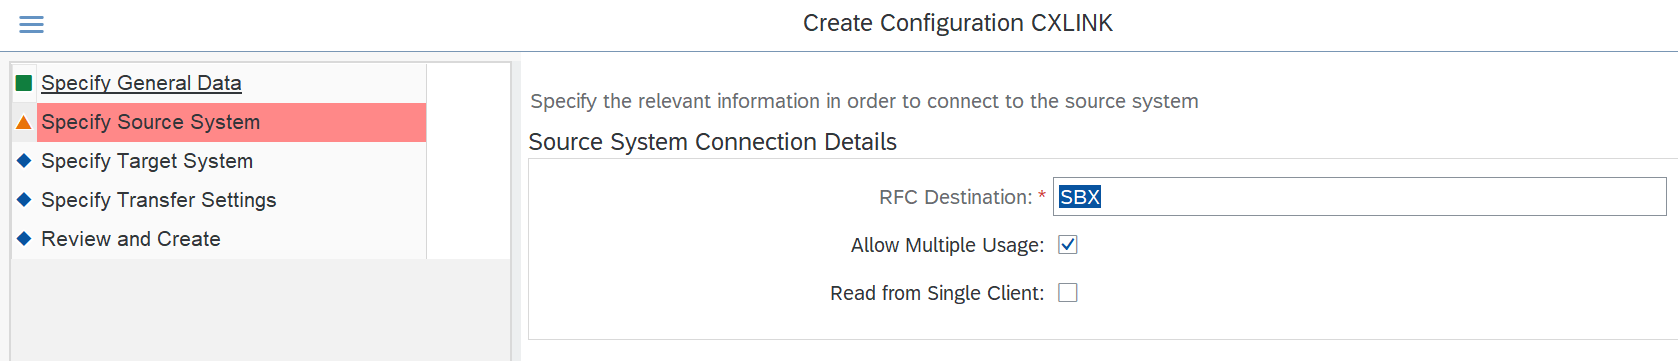
- Select Next.
- In the Specify Target System section define:
- Select Other from the option list.
- Select SLT SDK in the Scenario for RFC Communication dropdown.

- In the Specify Transfer Settings section define:
- In Application select the previously created application for BAdI implementation.
- In Job Options, set 3 for all values for testing purposes or adapt them to your needs.
- Leave the rest of options by default or adapt them to your needs.
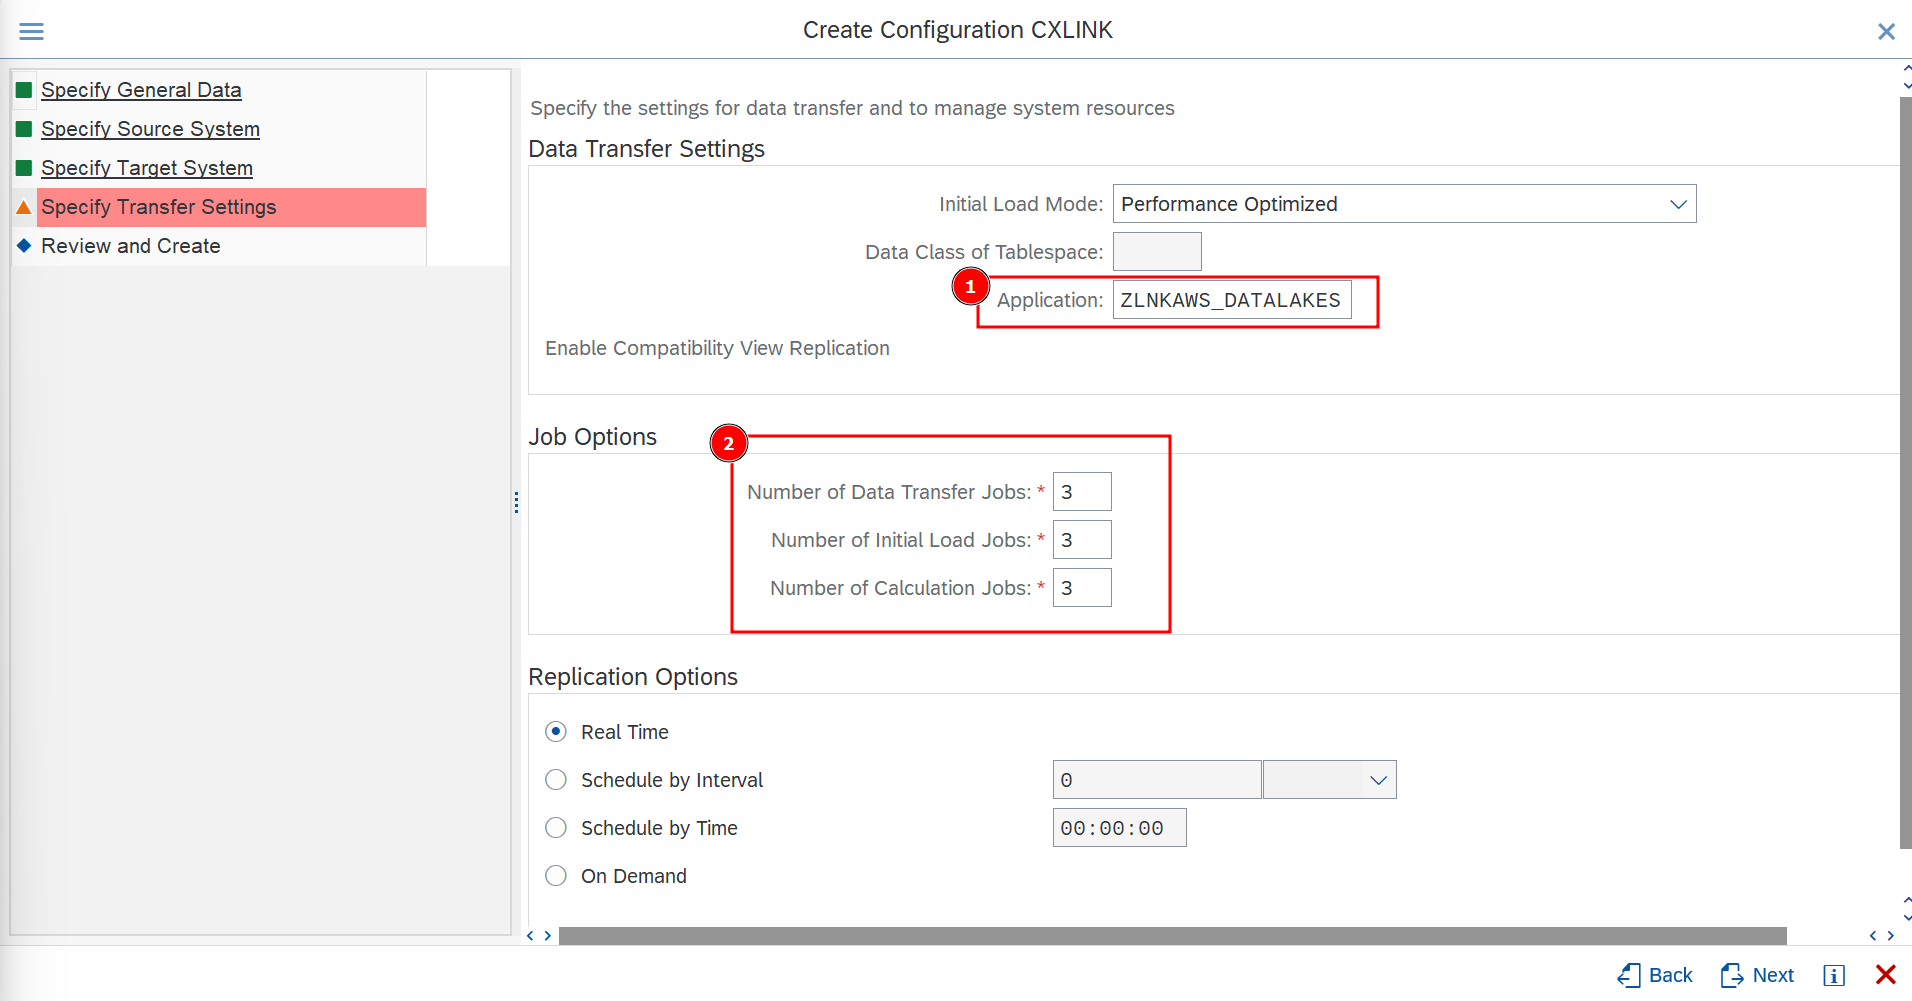
- Select Next.
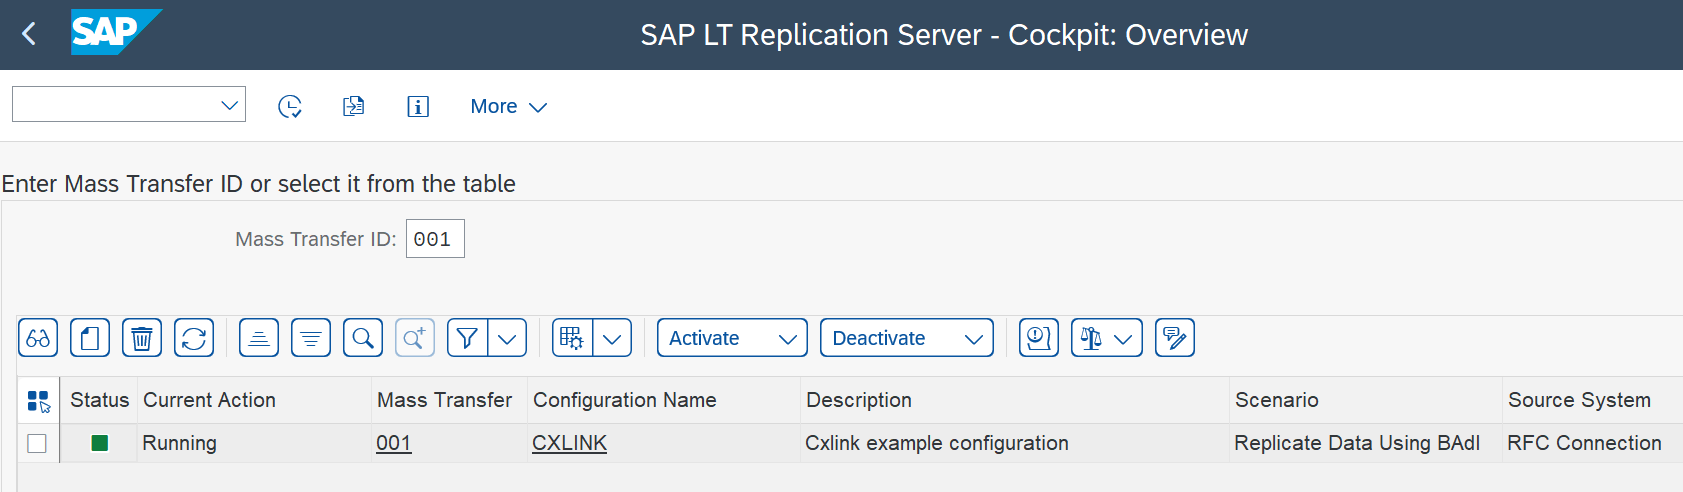
- In the Review screen, check the values and select Create to finish the process.
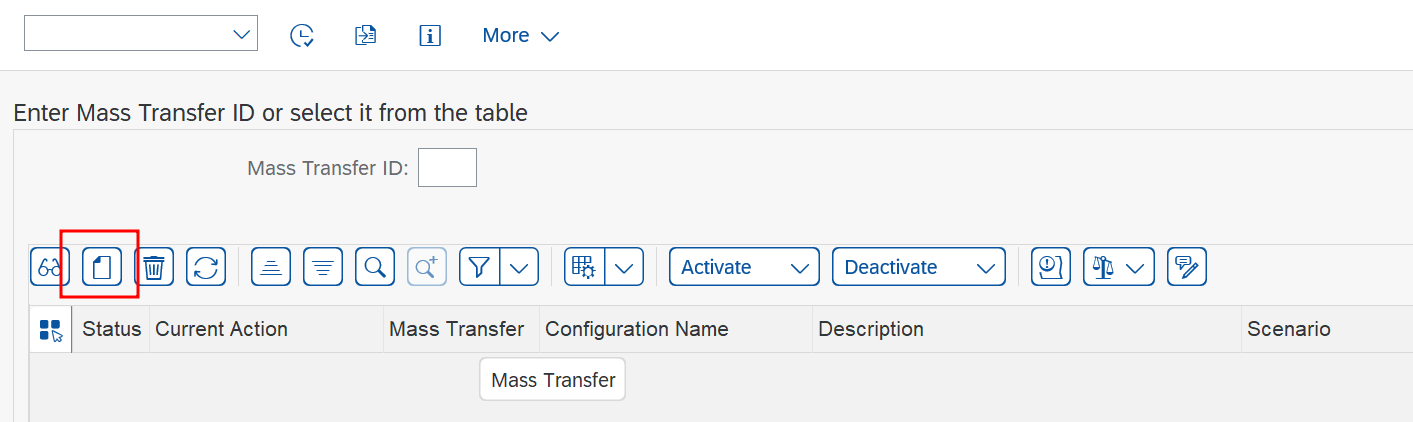
- Back in the SAP LT Replication Server - Cockpit: Overview screen, you should be able to see the new Mass Transfer.
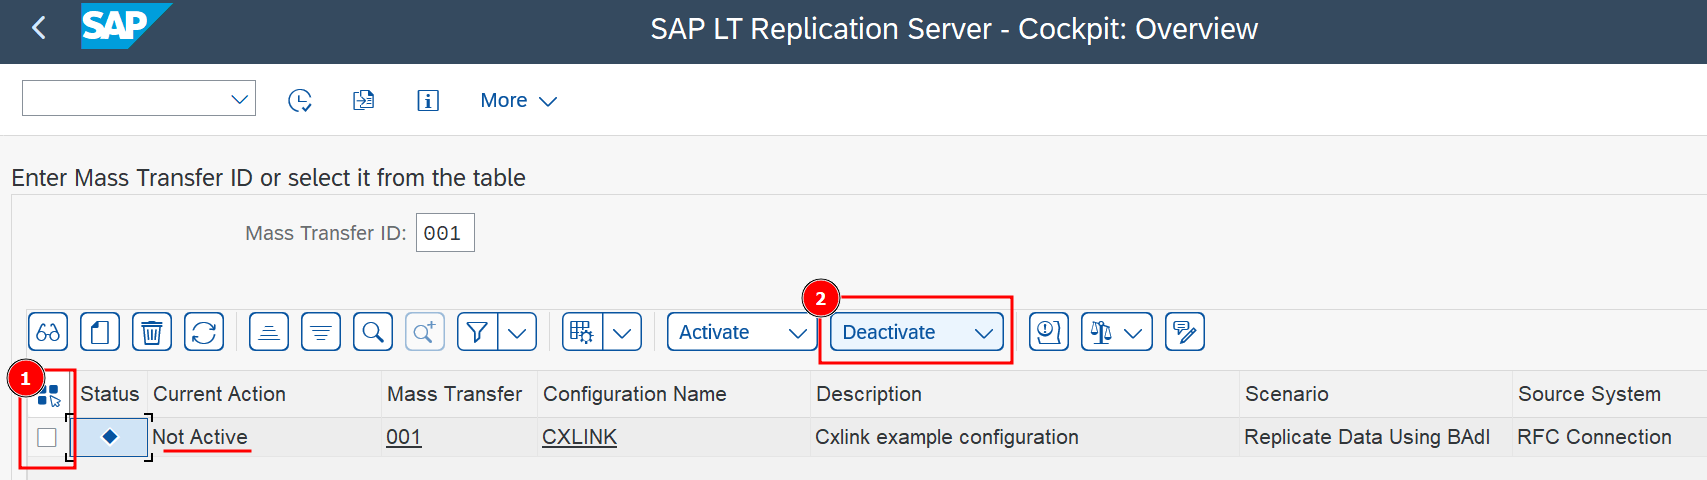
- Ensure that the configuration is deactivated before continuing.
Configure Cxlink Datalakes
Now that you have created the SLT standard configuration, you will need to create the relationship with the storage target for the data. To do so:
-
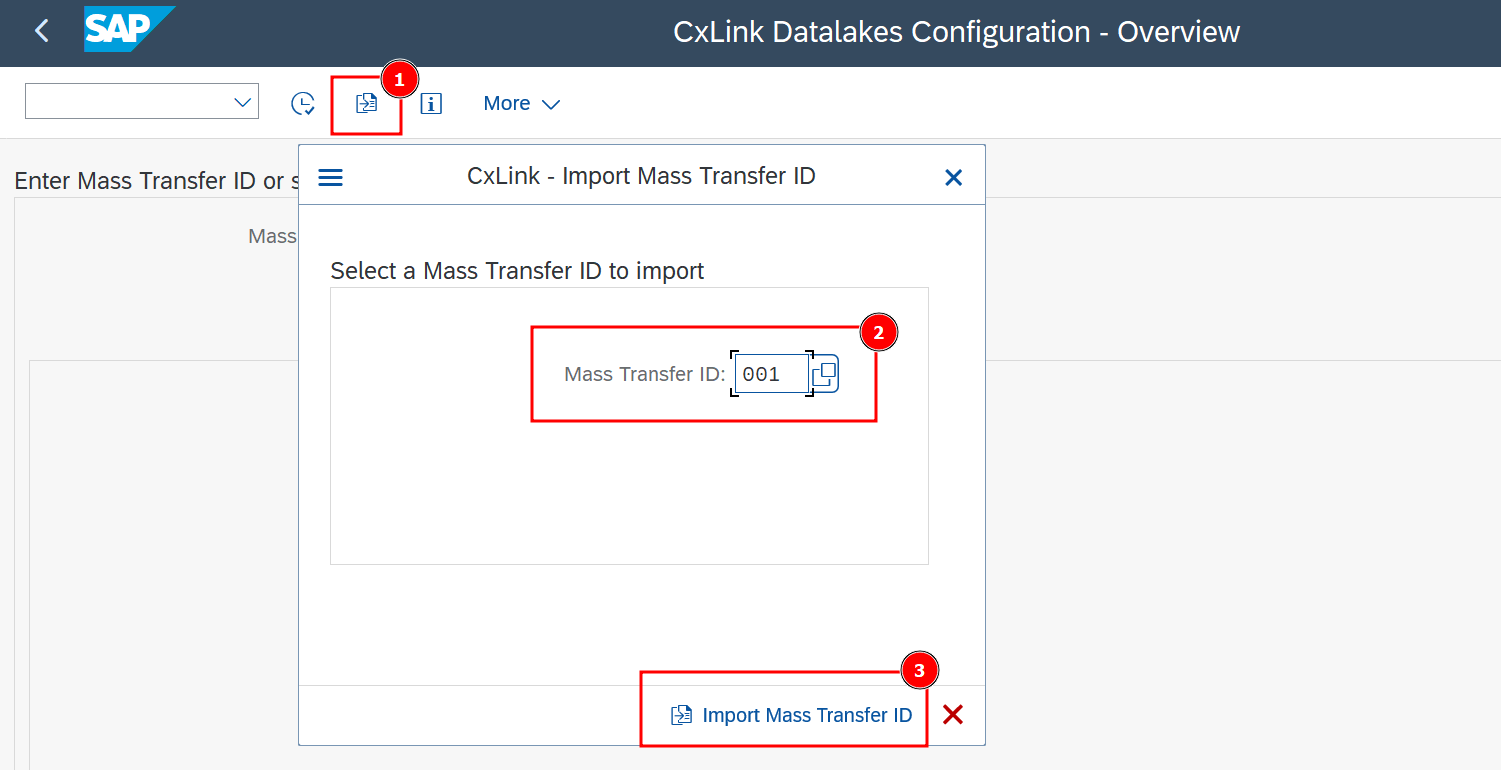
Go to transaction /n/LNKAWS/SLT_LTR.
-
In the CxLink Datalakes Configuration - Overview screen, select Import Mass Transfer ID or (F9).
-
Select the previously generated Mass Transfer ID* and select Import Mass Transfer ID.
-
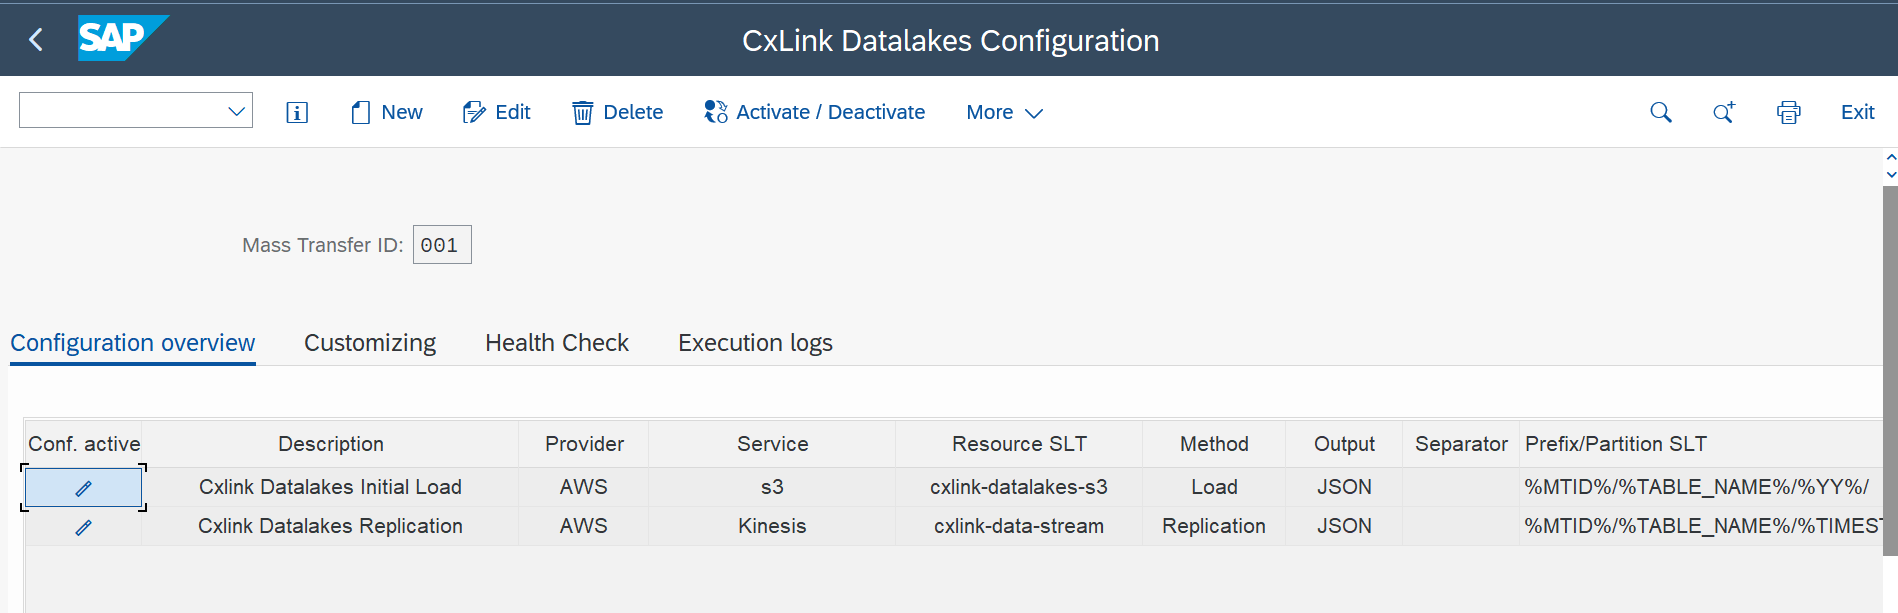
Back in the Cxlink Datalakes Configuration - Overview screen, find the imported MTID and open it.
-
Select New to create a new configuration.
-
In General data section define:
- Description: A descriptive text for this configuration.
- Cloud Service Provider: Select the desired cloud provider target for the data.

- Select Next.
-
In Access Control section define the Credential to be used:
-
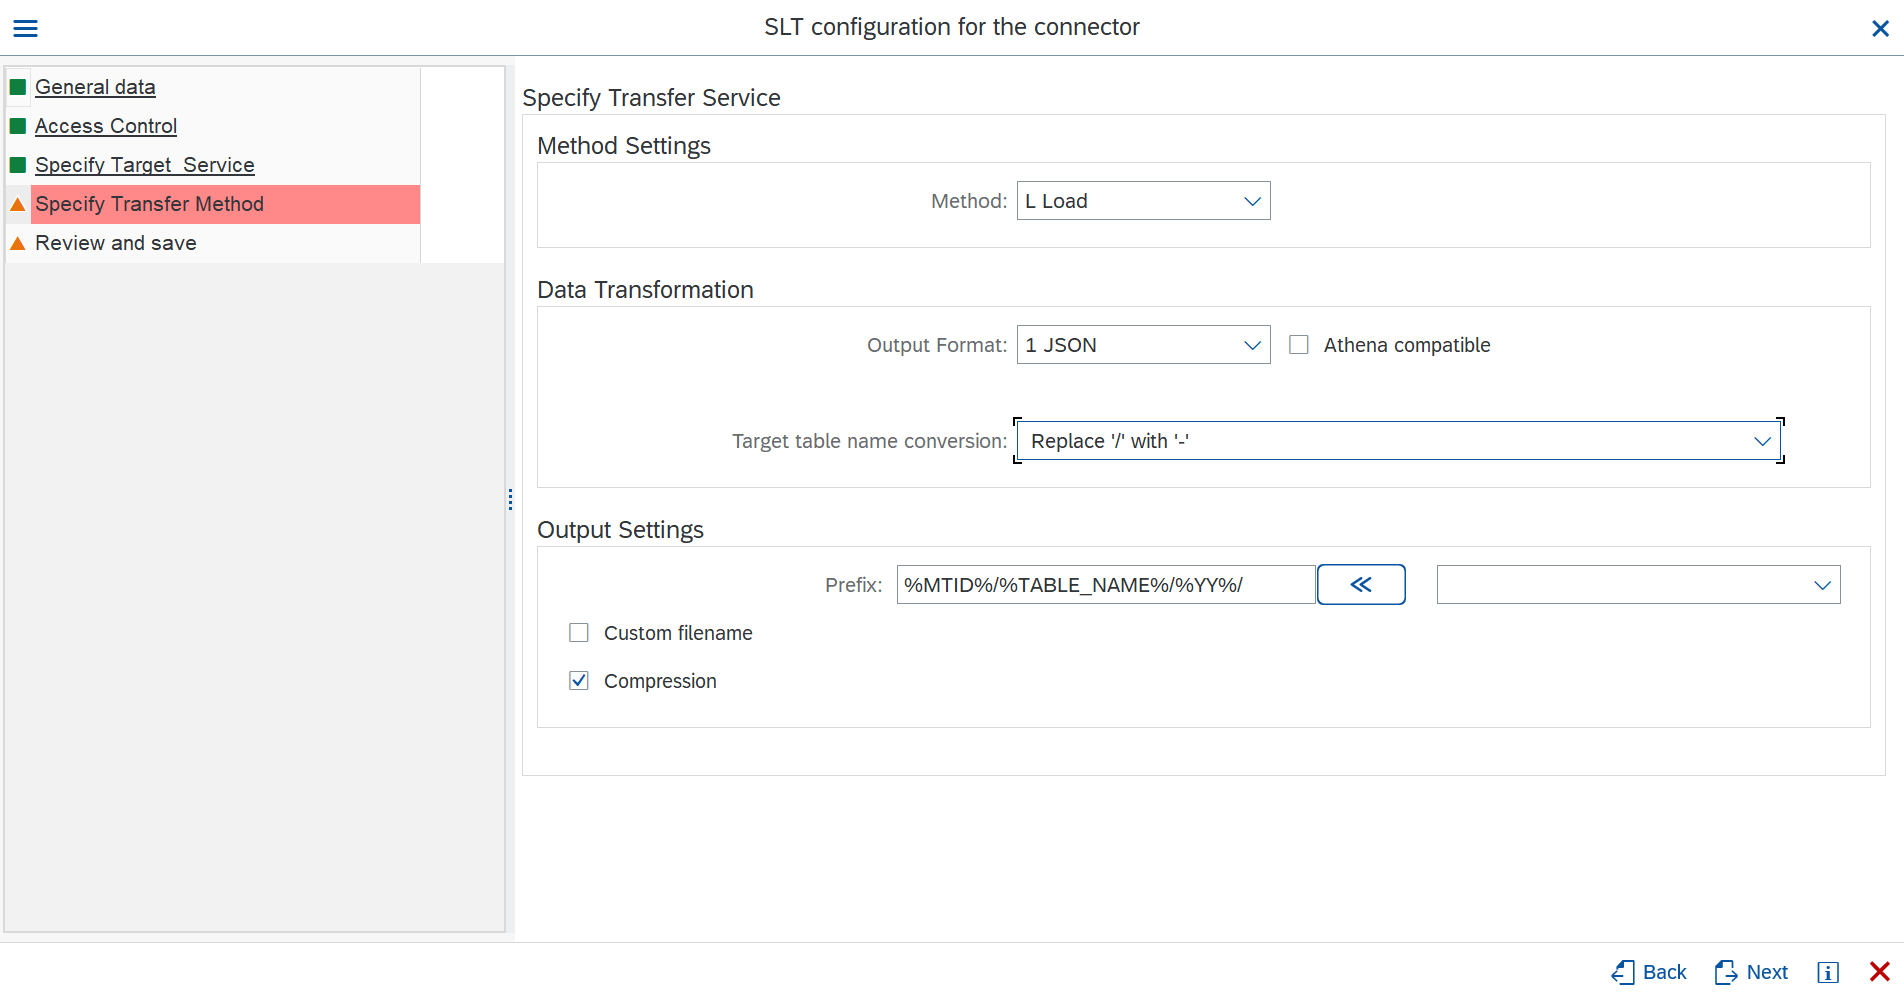
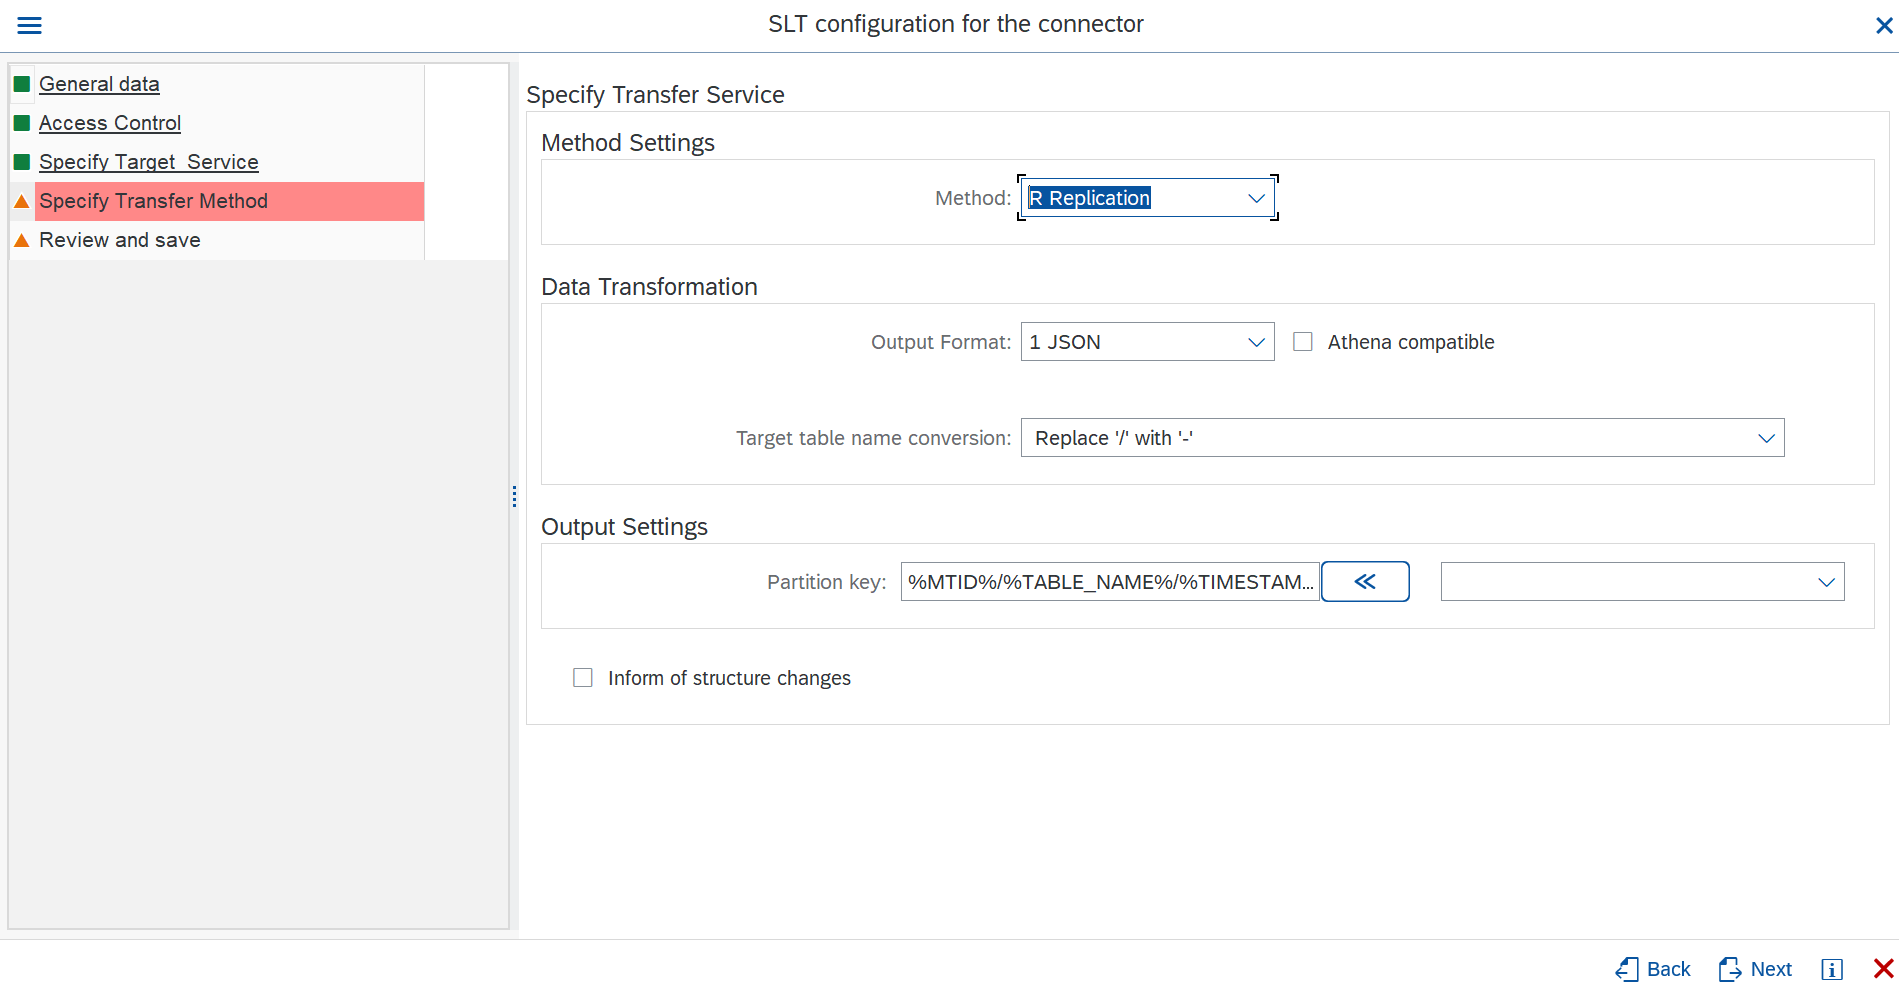
In Specify Transfer Method define:
-
Method: You can define a target for specific operations or the whole process:
- Load: Only Initial Load will be sent to the specified target.
- Replication: Only Replication data will be sent to the specific target.
- Both: Initial Load and Replication data will be sent to the specific target.
-
Output Format: Choose between JSON or CSV as output format.
- JSON: Check Athena compatible if you want to export the data in JSONL format (JSON Lines).
- CSV: Specify the ASCII representation of the separator you want to use in the data. (https://www.asciitable.com/)
-
Target table name conversion. Tables with "/" in their names can provoke path alterations when stored in Amazon S3, as they can be assumed as folder separation instead of a single table name. To avoid this behaviour, you can select to replace the '/' symbol for "-" or "__" depending on your needs.
-
In the Output Settings section:
Amazon S3 as target
- Prefix: You can use the listed dynamic env vars, to generate a custom path based on the values of the exported data.
- Custom filename: In the same way, you can use the listed dynamic env vars to build the file names generated to meet your requirements.
- Compression: You can enable the compression option to save some space while at rest. You should be able to uncompress the data from your consumers.
Amazon Kinesis as target
- Partition Key: You can use the listed dynamic env vars, to generate a custom partition key for kinesis data stream.
- Inform of structure changes: If checked, Cxlink Datalakes will inform of any
-
Select Next.
-
Back to the CxLink Datalakes Configuration - Overview screen, you should see all the configuration values listed.
-
-
In the Review section, check the values and select Create to finish the process.
-
Repeat the same steps to create as many configurations as needed.
Customizing
You can add additional customizing to your replication configuration. You will find all customizing options in /n/LNKAWS/SLT_LTR transaction under Customizing tab.
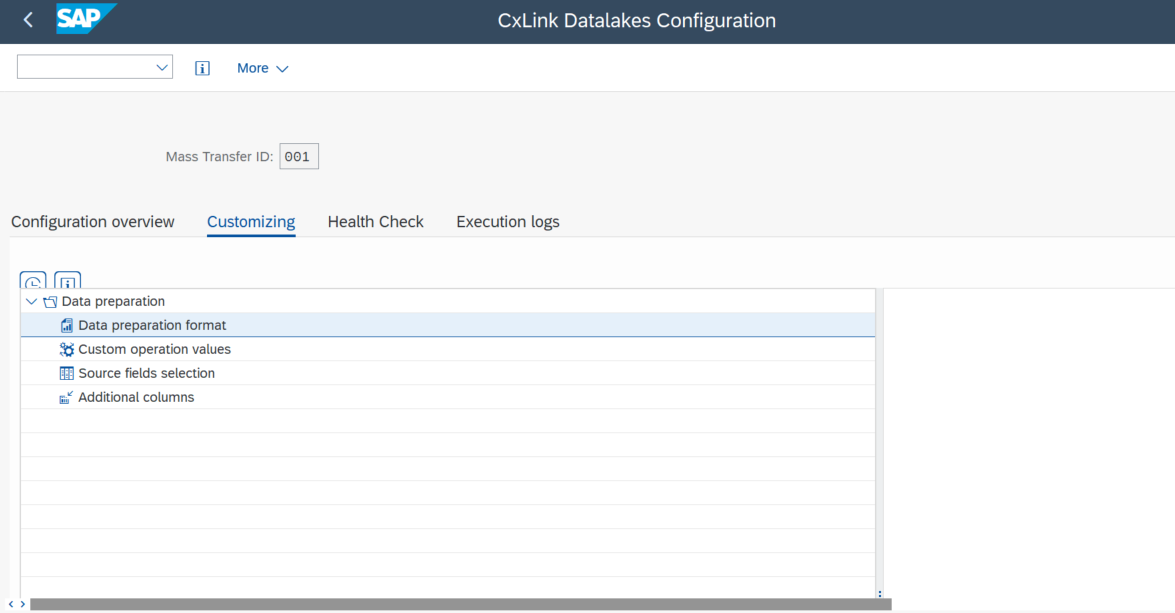
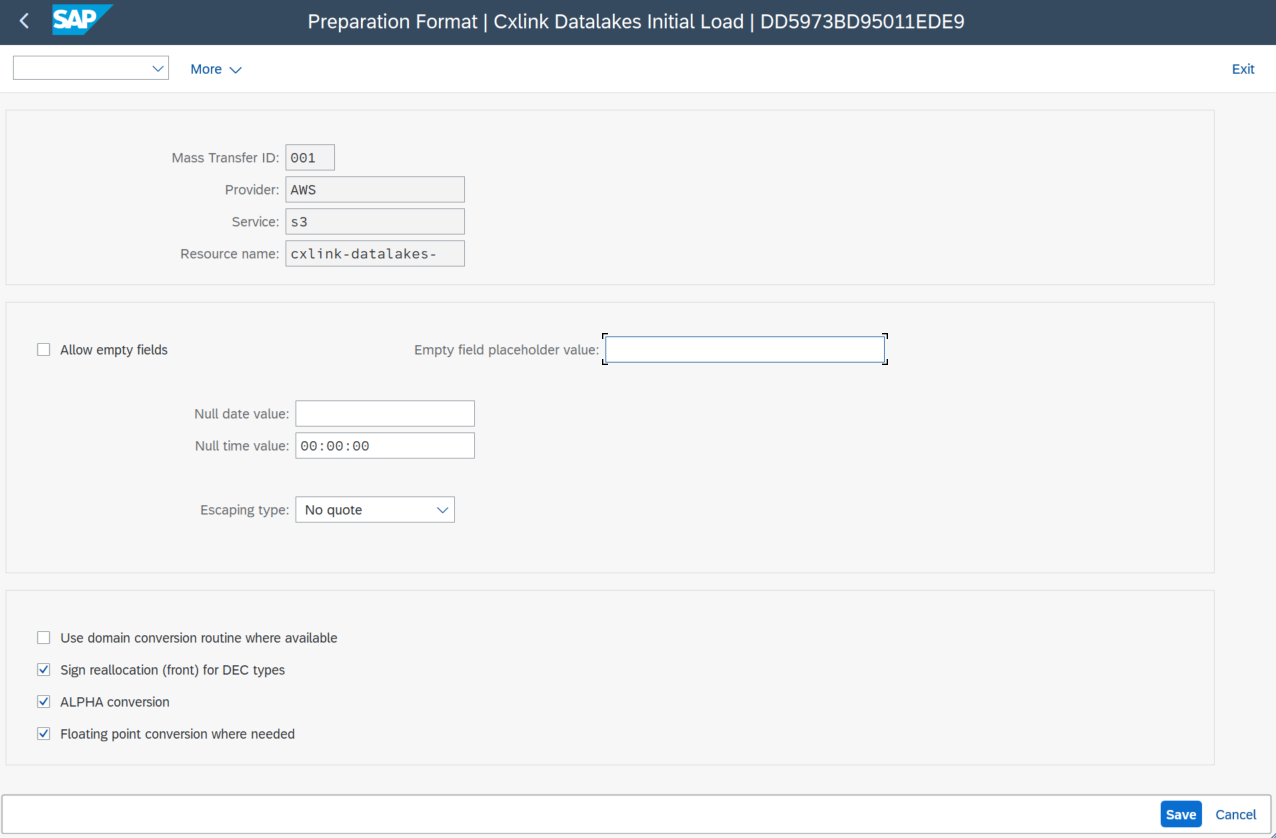
Data preparation format
This section allows you to configure various parameters related to data preparation at a general level. It provides a checkbox to include a header in the file with the name of each of the submitted fields (applicable to the CSV output format in files created in S3, but not meaningful in other options). There's also a checkbox to allow empty fields or, alternatively, define a character to use in such cases. You have the option to set fixed values when the source data contains an empty date or time, and the choice to establish a data escaping mode to prevent the resulting record from becoming unreadable in case a value contains the CSV separator.
Different options can apply to all possible combinations of target and output format. Please check all of them depending on your selection.
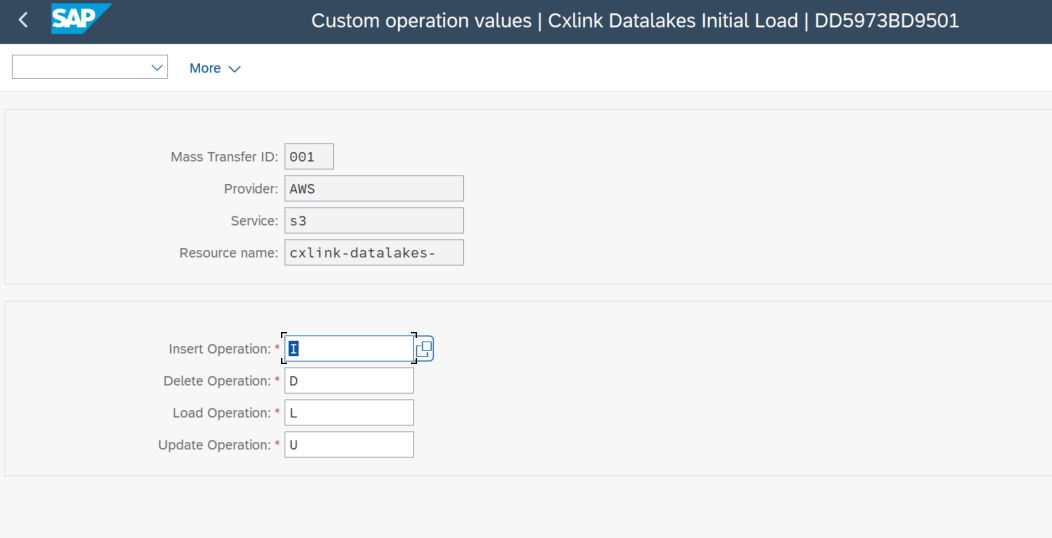
Custom operation values
On this screen, you can declare alternative character values to define insertion, deletion, loading, and updating operations. This is significant because an additional column with the operation type is added to all records, and setting this alternative value changes the character that gets transmitted.
Source fields selection
For system source tables that are loaded or replicated into the Mass Transfer ID, you can choose which fields to generate and which ones to exclude, as well as define specific data conversion types for each field.
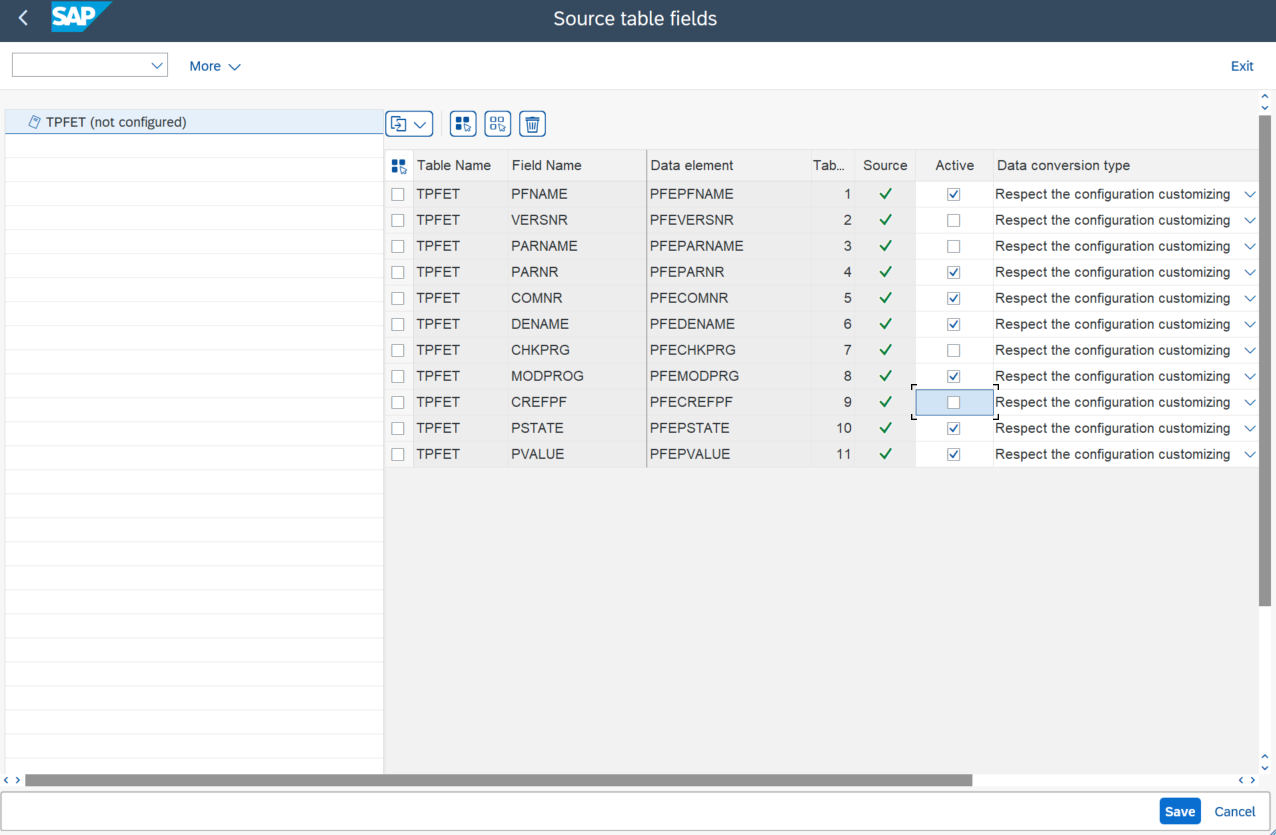
If this section is not configured, all fields will be sent, and the general-level options for data transformation will be used.
Additional columns
The Additional Columns screen allows you to add columns at the beginning or end of the payload generated from the data loaded or replicated from the source.
There is always an additional column at the start of the payload, which represents the record operation (insertion, modification, loading, or deletion).
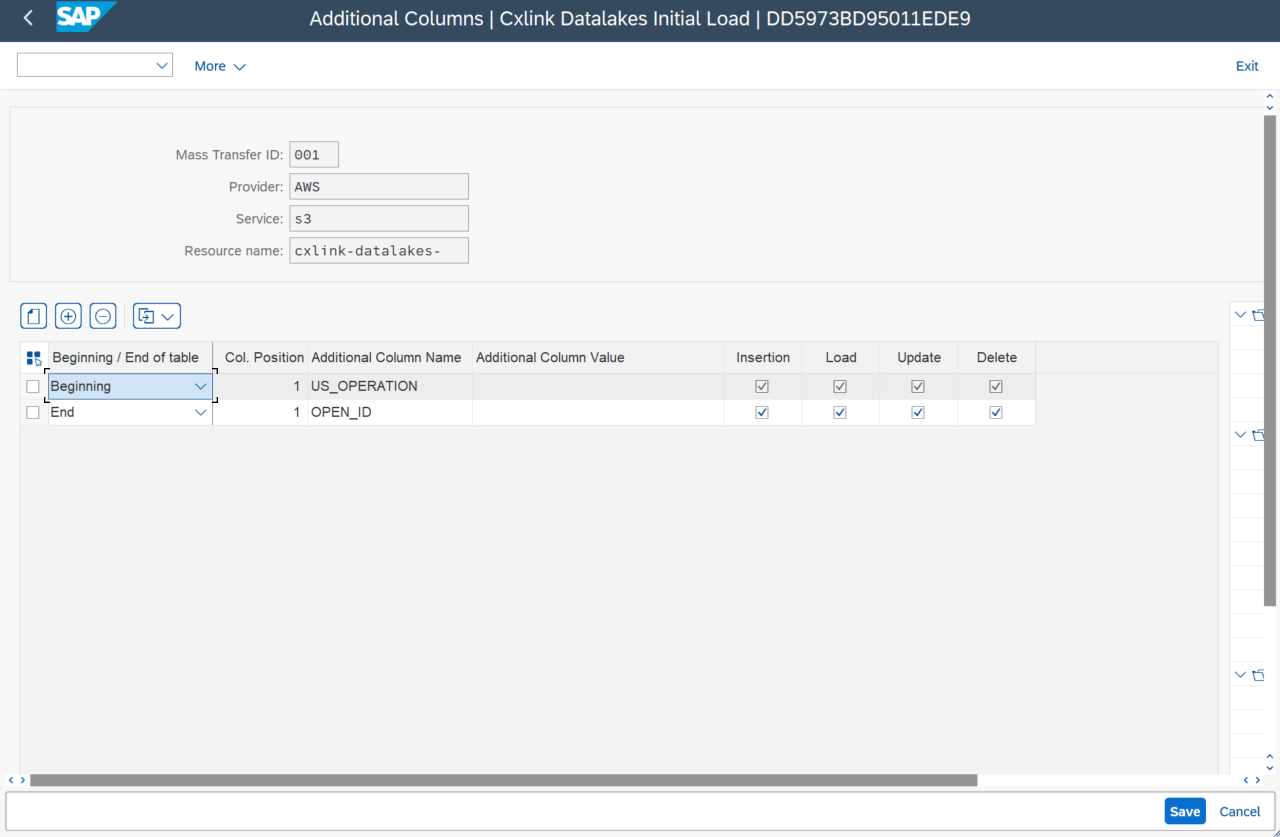
To populate the values of the additional columns, you can use literals, any of the existing environment variables, or a combination of both.
Advanced Configuration
In this section you will find all advance configuration needed for Datalakes to work properly.
Kinesis Data Limitation
If you are using Kinesis as a target for data replication, you will need to add a custom configuration to limit the number of records per data chunk to avoid Kinesis limits.
To do so:
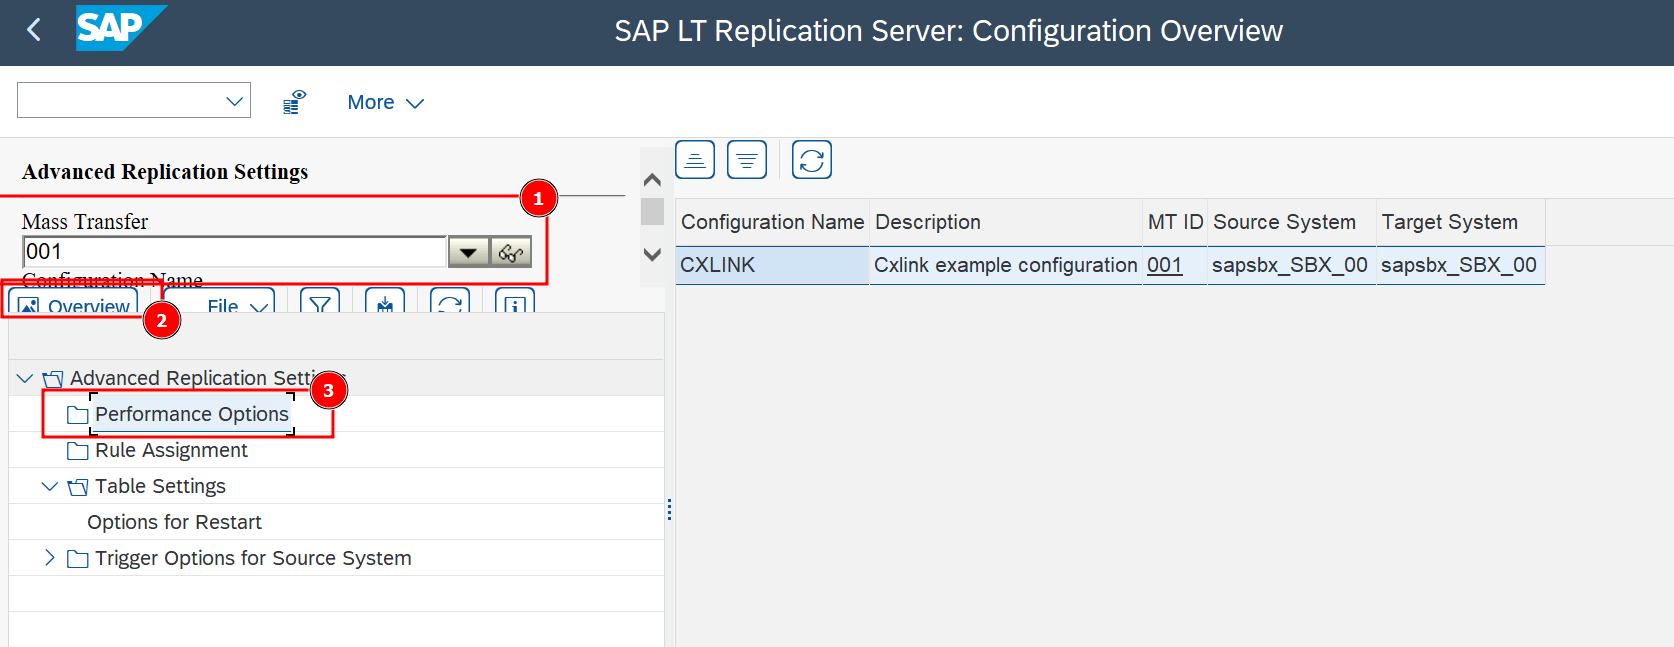
- Go to transaction LTRS
- Select the desired Mass Transfer ID and double-click to open its properties.
- Right-click on Performance Options and Add table.
- Go to Replication Options tab and set the Portion Size (Records) to 500.
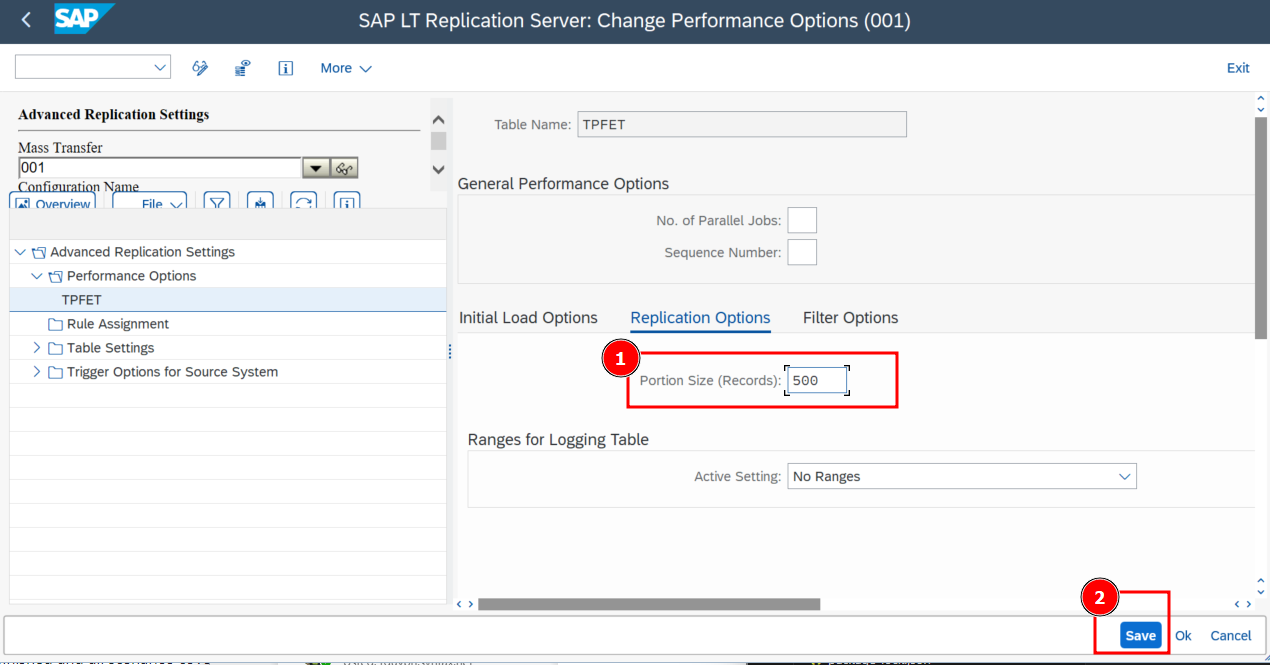
- Save to finish the configuration.
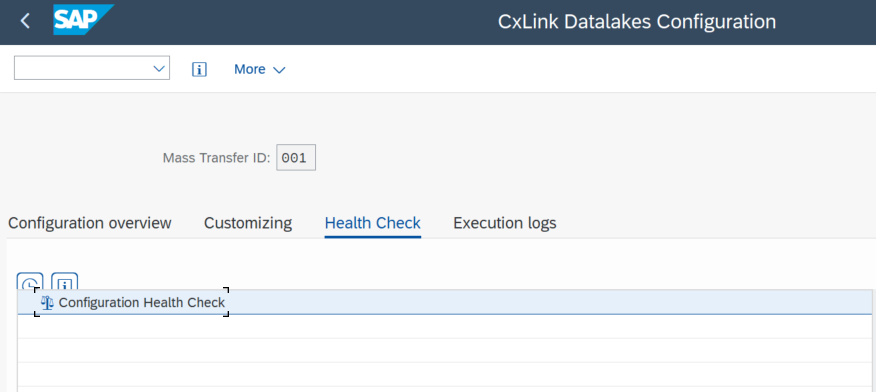
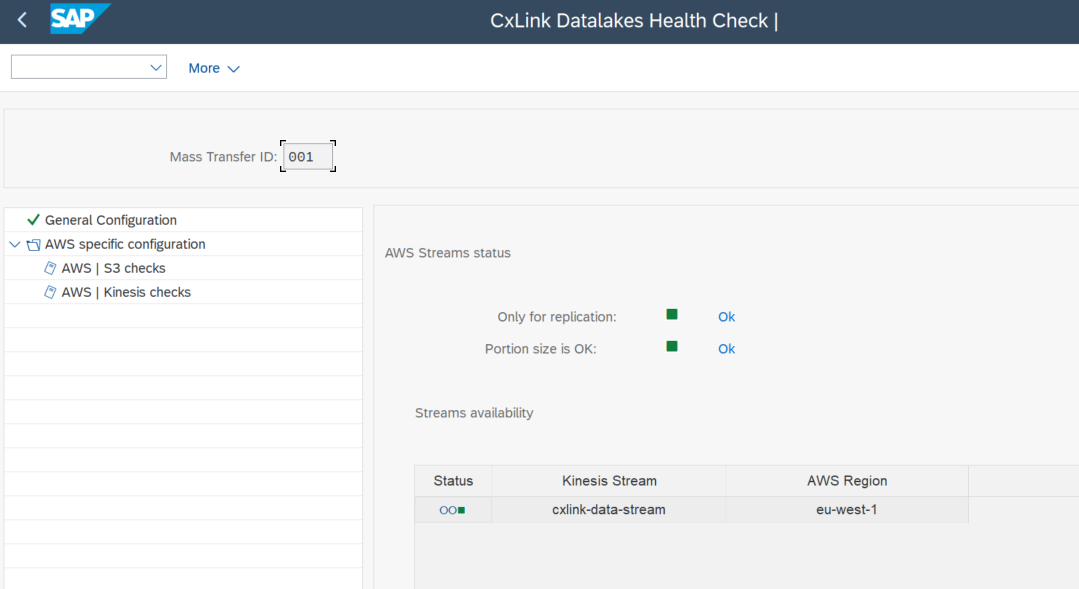
Health Checks
You can perform some health checks over the configuration created to ensure that everything is correctly configured before start replication tables.
To perform the checks:
- Go to transaction /n/LNKAWS/SLT_LTR.
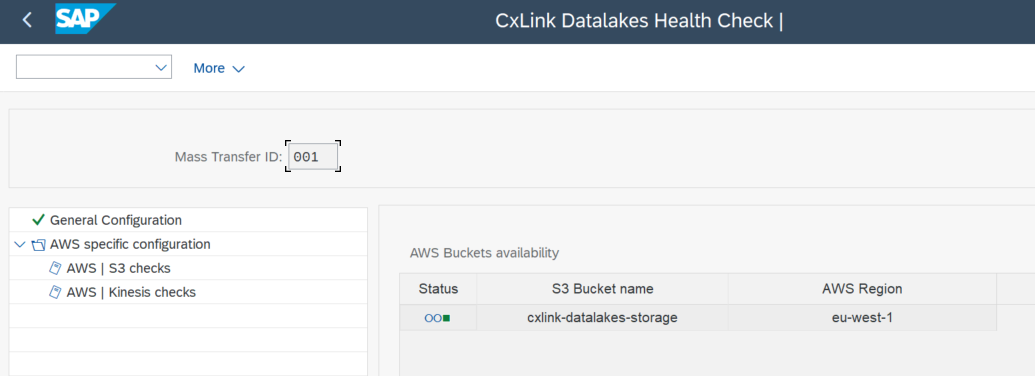
- In the CxLink Datalakes Configuration - Overview screen, go to the Health check tab, select Configuration Health Check and Execute.
- Double click on the nodes under AWS specific configuration and check the logs.
- For S3 Checks output should look similar to:
- For Kinesis checks output should look similar to:
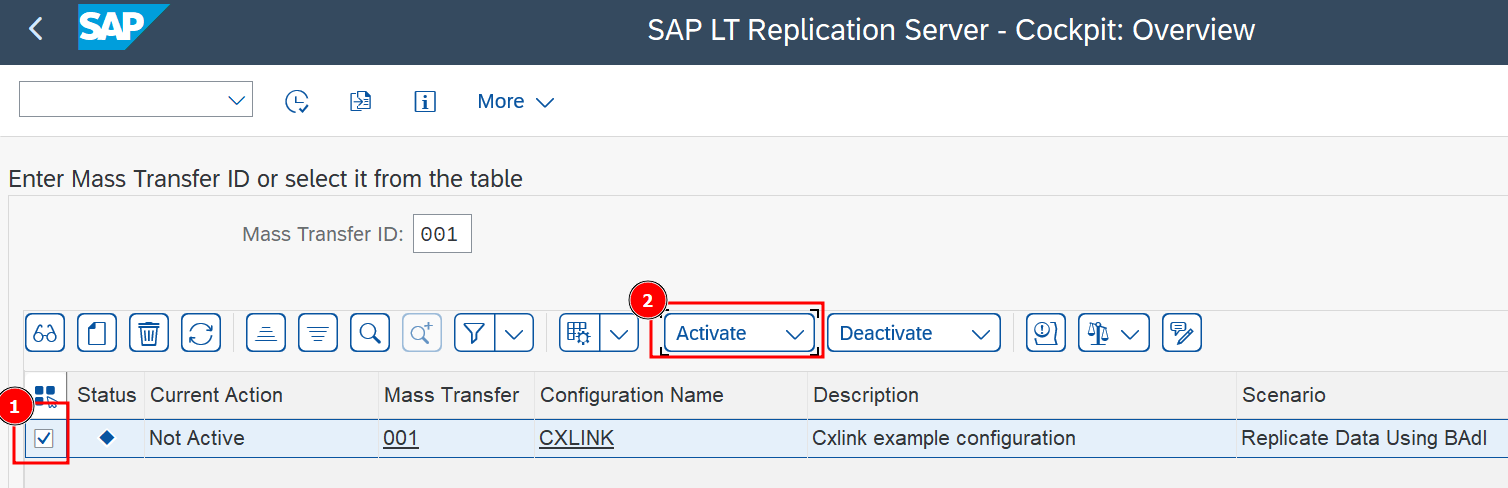
Activate configuration
Once configuration is finished and all scenarios covered you can activate the Transfer ID to begin with table replication:
- Go to transaction LTRC.
- Select the desired Mass Transfer ID and Activate.
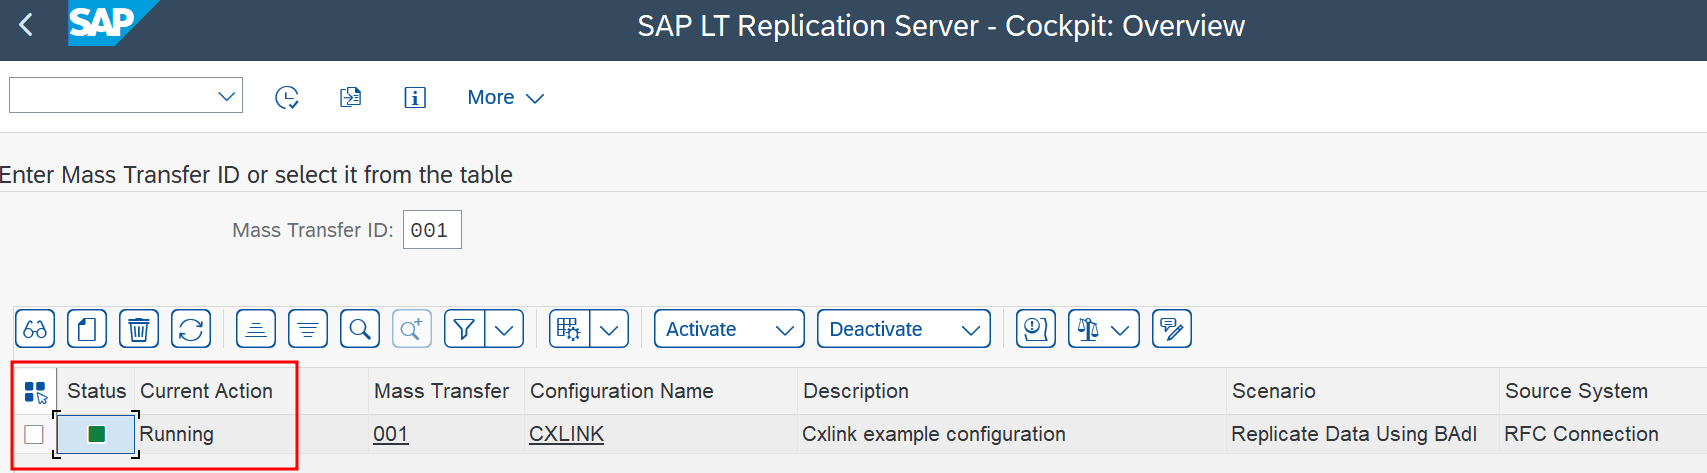
- You should see the Mass Transfer ID 🟩 with status Running.
Start replicating tables
Now you are ready to start adding tables to the replication process. As an example, follow these steps for a test scenario: