Quick Setup
Configuration steps are available in the SPRO transaction in your SAP server. To start the configuration process, login to your SAP Server and execute the following transaction and follow all steps in order to configure Cxlink Suite.
You will find all configuration steps defined under Cxlink Suite by Syntax.
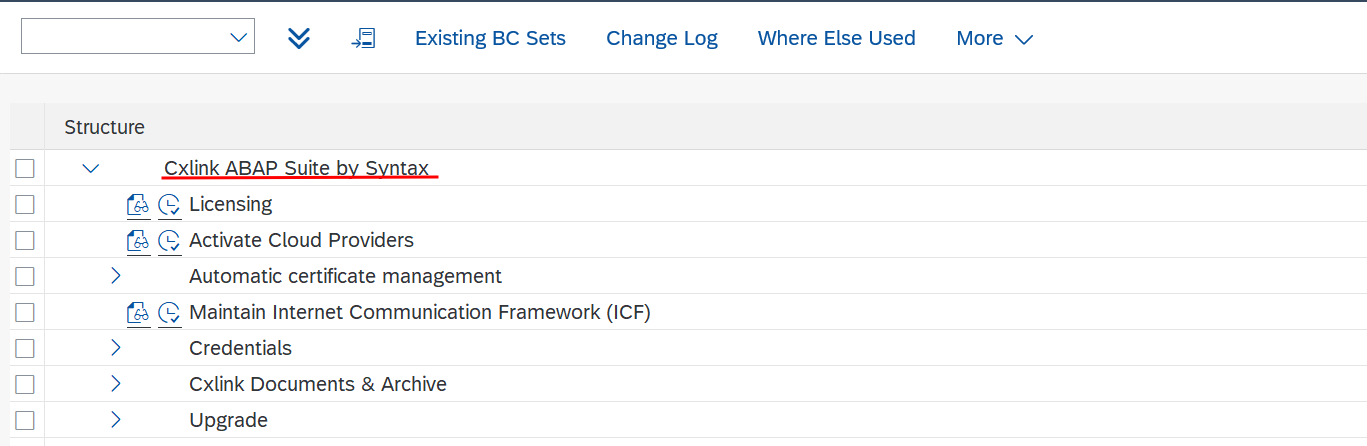
Follow all steps in order to prepare your server to start using CxLink Suite.
Licensing
CxLink Suite use a similar model to SAP. You will first generate a unique identifier file from your SAP Server. Once obtained, you will need to upload that file to the Cxlink Portal License Manager and attach it to an active license. If upload is succesfull, it will generate a license file that will be imported to the SAP Server and will activate the license. Follow these steps to activate your license:
-
Login to your productive client in SAP and go to SPRO → Cxlink Suite by Syntax → Licensing and select Execute.
-
Choose Generate License Request and execute.
 Production system
As per license model, one cxlink license is valid for both prod and non-prod servers in the same landscape, but only one server can be set as the production one.
If you are running this step for your production server, please mark the Production system option for support purposes.
-
In the pop-up screen, select a destination in your computer to store the license request file. Specify a name for the file and Save.
-
Login to CxLink Portal
-
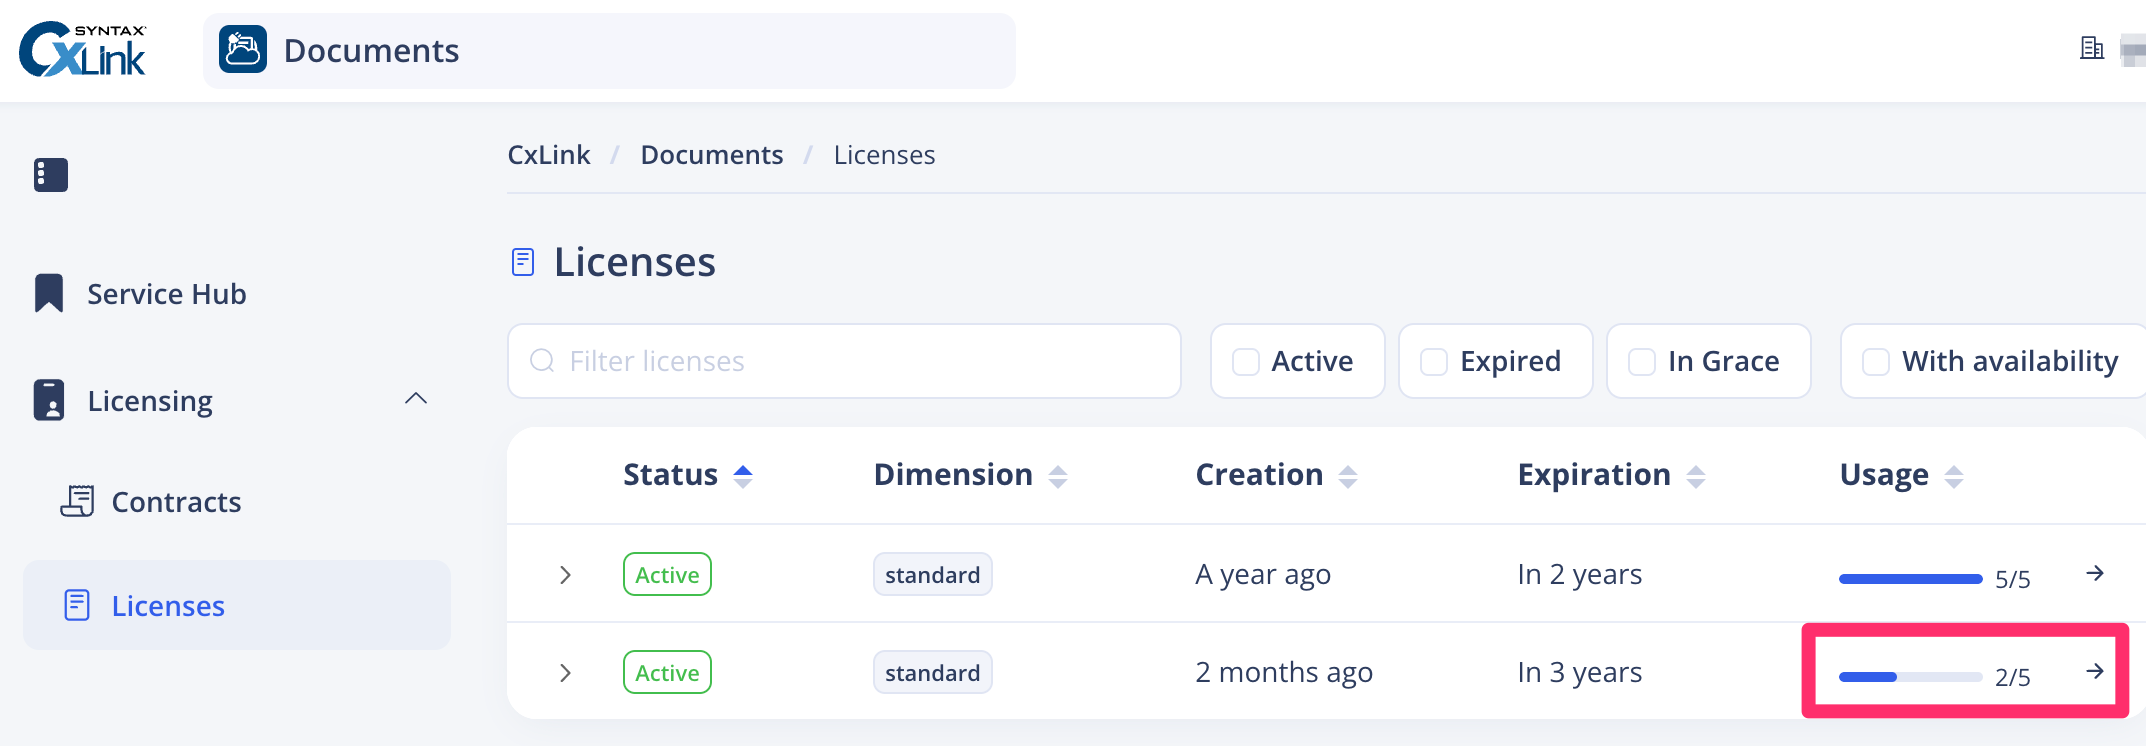
Go to Licensing → Licenses section in Documents Hub, and search for a license with free slots. (Check the Usage column to find if there are free slots available)
-
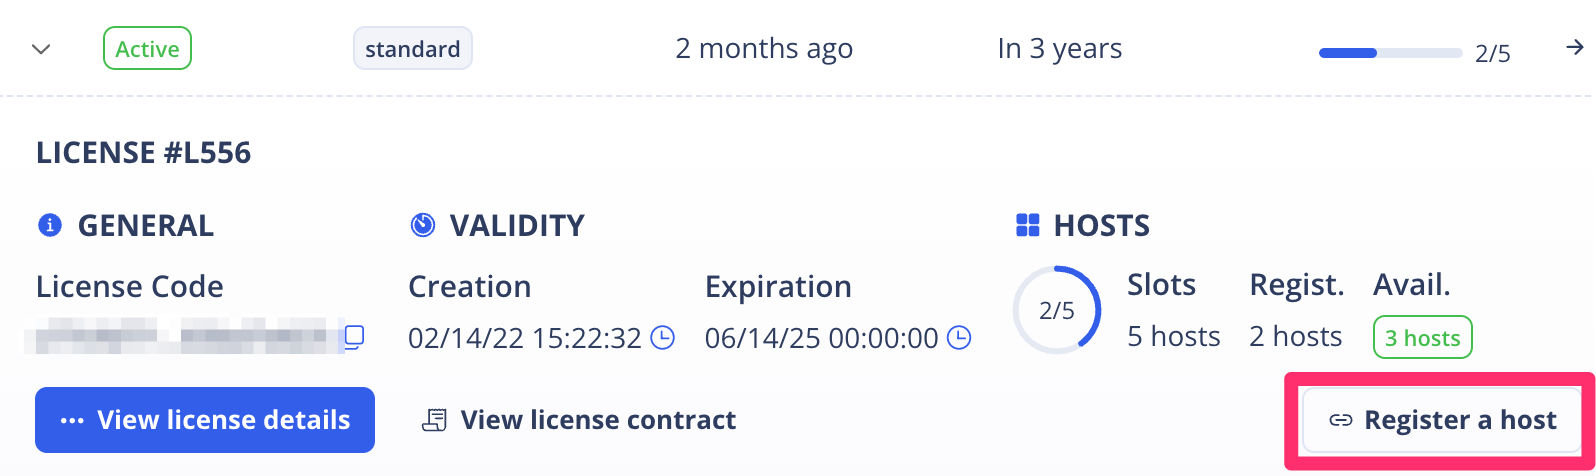
Open the license details and press Register a host
-
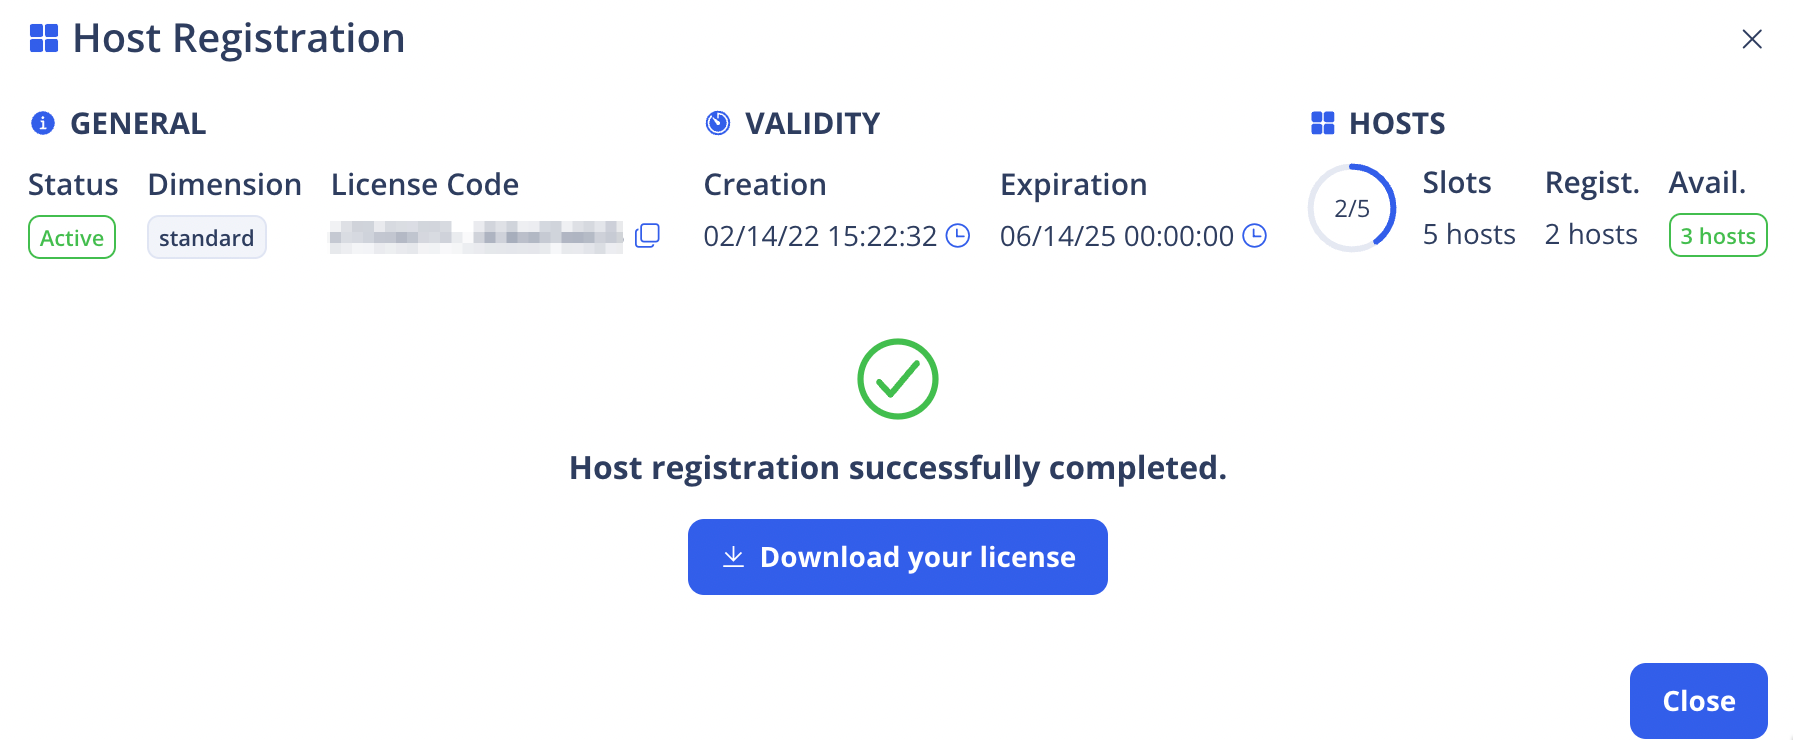
In the Pop Up screen, Upload the license request file previously generated.
-
If the file is correctly uploaded, you will see a message Host registration successfully completed.
-
Press on Download the license to save the path to your computer.
-
Go back to the SPRO → Cxlink Suite by Syntax → Licensing section in your SAP Server.
-
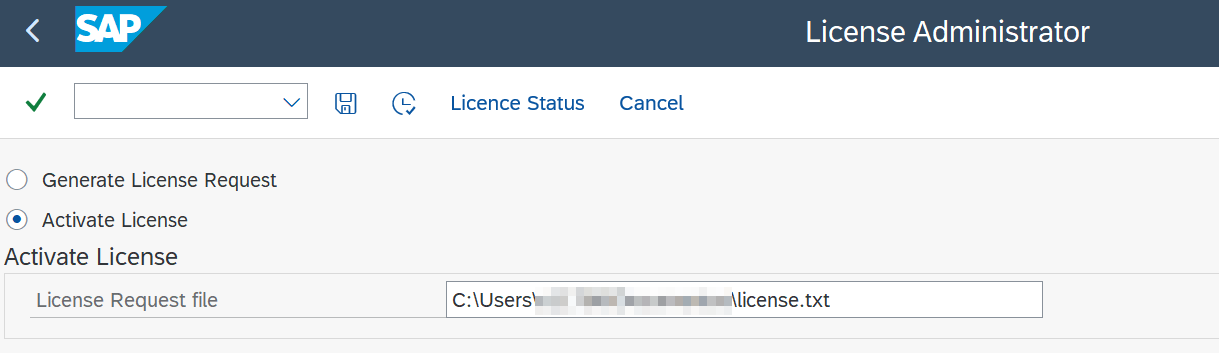
Select Activate License, find the license file from the dialog box window and select Execute or (F8).
-
If everything is in order, you should see a message at the bottom of the SAP Logon screen with the message Product successfully installed.
-
To double-check, select License Status to check the license validity.
Activate cloud providers
Cxlink Suite integrates with multiple cloud providers (Microsoft Azure, Amazon Web Services....). In this section you will specify which providers do you want to work with. Those unchecked will remain hidden for a cleaner experience. You can activate them later if needed.
- In your SAP server, go to SPRO-> Cxlink Suite by Syntax -> Activate Cloud Providers and select Execute.
- Mark every provider that you want to use as a destination for your files. To keep system clean, we recommend to only activate those providers that will be actually used.
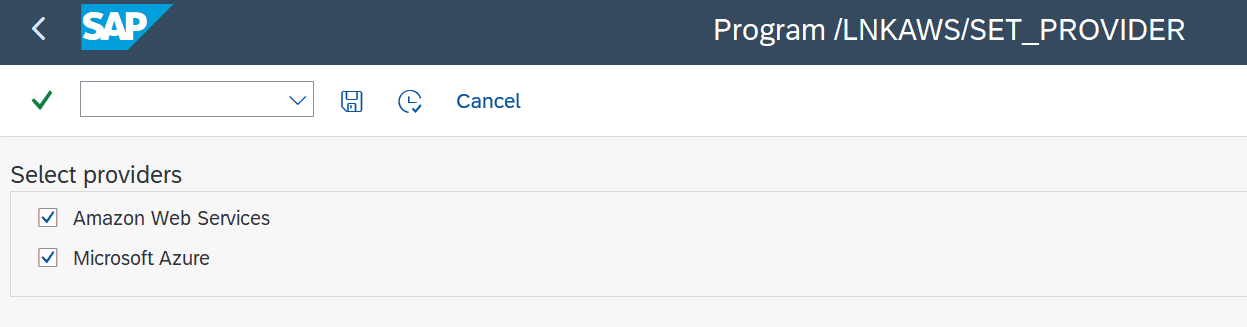
- Select Execute or (F8).
Certificate Management
To ensure secure connections between SAP and the cloud providers by using HTTPS connectivity you will need to ensure that your SAP servers holds all Root and CA certificates for every cloud in the STRUST transaction.
You can skip this section if you have previously download and imported the proper cloud certificates into your SAP Strust transaction and go directly to the Maintain Internet Communication Manager (ICF) Service section
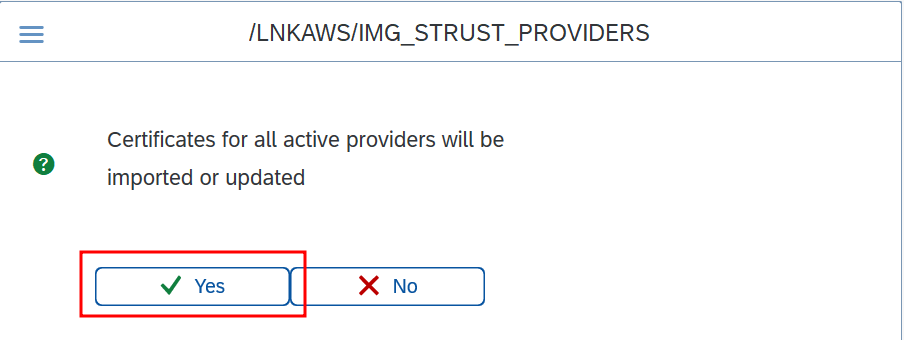
Cxlink can handle the download and installation of the proper certificates for all providers that were activated in the previous step. Cxlink uses the report /LNKAWS/IMG_STRUST_PROVIDERS to take care all needed actions. It uses wget and openssl programs to retrieve the certificates.
Ensure that you have at least the following software versions in your SAP Server if you want to use the automatic certificate control.
wget- version1.2.3openssl- version13.4.
To prepare and execute the automatic process:
-
In your SAP server fo to SPRO transaction.
-
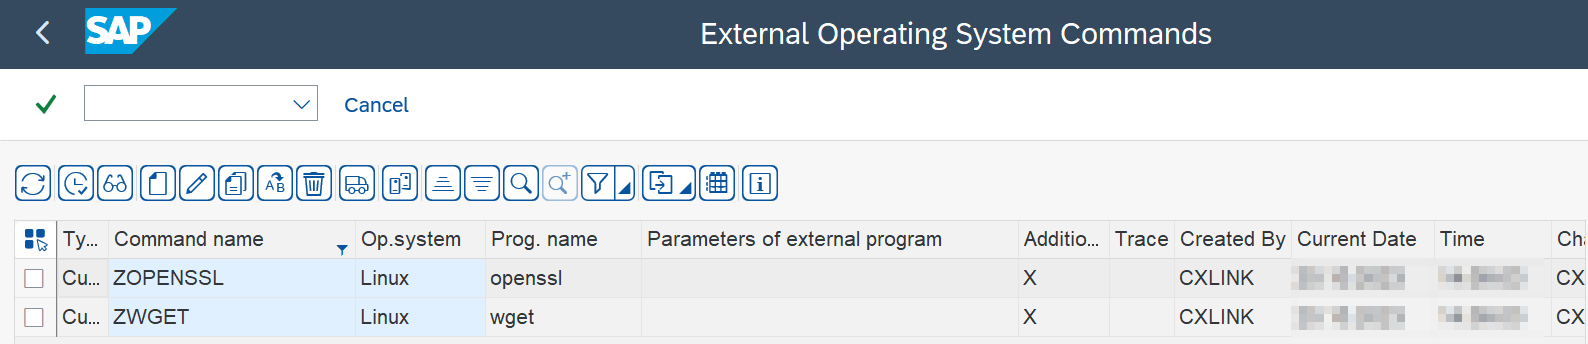
Go to Cxlink Suite by Syntax -> Automatic Certificate Management -> Maintain external OS commands (SM69) and select Execute.
This program will generate two entries in the SM69 transaction (ZWGET and ZOPENSSL) to operate with the corresponding programs at os level for certificate handling.
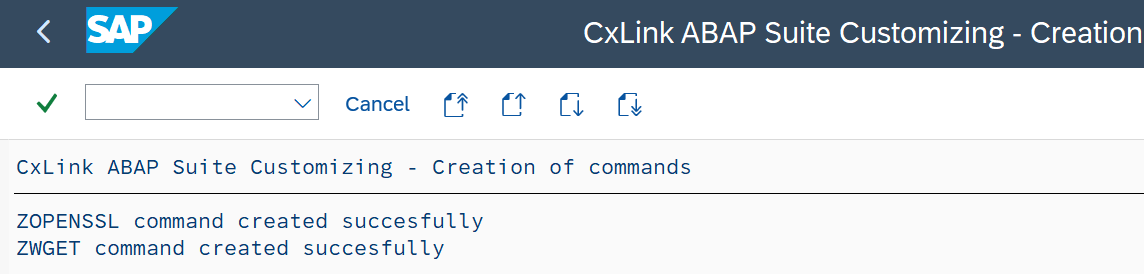
On success, you will get the following message.
-
Go back to SPRO, and execute Cxlink Suite by Syntax -> Automatic Certificate Management -> Import certificates
noteThis program will download and import all needed certificates to the STRUST transaction under the
SSL Standard (Client)section.- In the pop up screen, Accept the execution.
- It can take a few minutes to complete, but on success you will get a list of the imported certificates.
- In the pop up screen, Accept the execution.
-
(Optional) Go back to SPRO and execute Cxlink Suite by Syntax -> Automatic Certificate Management -> Schedule certificates job.
noteIn some occassions certificates could expire. You can schedule a periodical job to take care of downloading the latest versions of each certificates. This action can be scheduled in a weekly period. No need to execute it daily.
- In the Job start conditions select the execution date and time and periodicity.
- Keep the rest of steps with the default values.
Maintain SICF Service
When you send a request to a specific URL, the system triggers a Service Integration Communication Framework (SICF) node. This SICF node is responsible for initializing specific functionalities and tasks within the system.
One of these tasks is to call a particular handler class, named /LNKAWS/CL_ARCH_LINK_TO_SDK. This handler class serves as a universal manager for interacting with multiple cloud services. It has been designed to facilitate a seamless interface between your application and all available cloud platforms, allowing you to leverage different cloud capabilities without having to deal with the intricacies of each individual service.
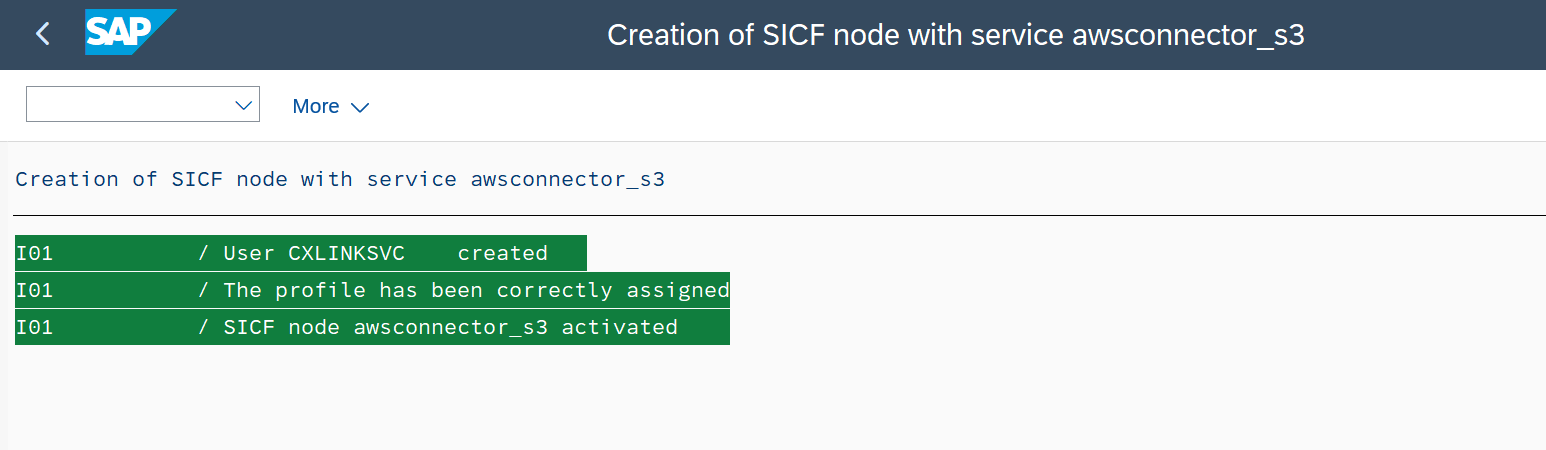
In this step, you will need to define a SAP user that will be assigned to the awsconnector_s3 SICF service to handle all communications. You can choose between allowing the system to create that user or to select an existing one. If you choose to select an existing one, our recommendation is to use a communication user.
Process will try to attach the /LNKAWS/WD_MAMAGER role to the defined user.
If the user executing this report does not have the proper permissions to attach roles, please ask your basis team to assign the role to the user.
- Go to SPRO-> Cxlink Suite by Syntax -> Maintain Internet Communication Framework (ICF) and select Execute.
- Choose to Create new user or Select an existing user.
- Define the Username and Password in both cases.
- Check the Add authorization profile to user option if you have not previously attached the role to an existing user and you have the proper permissions to assign roles
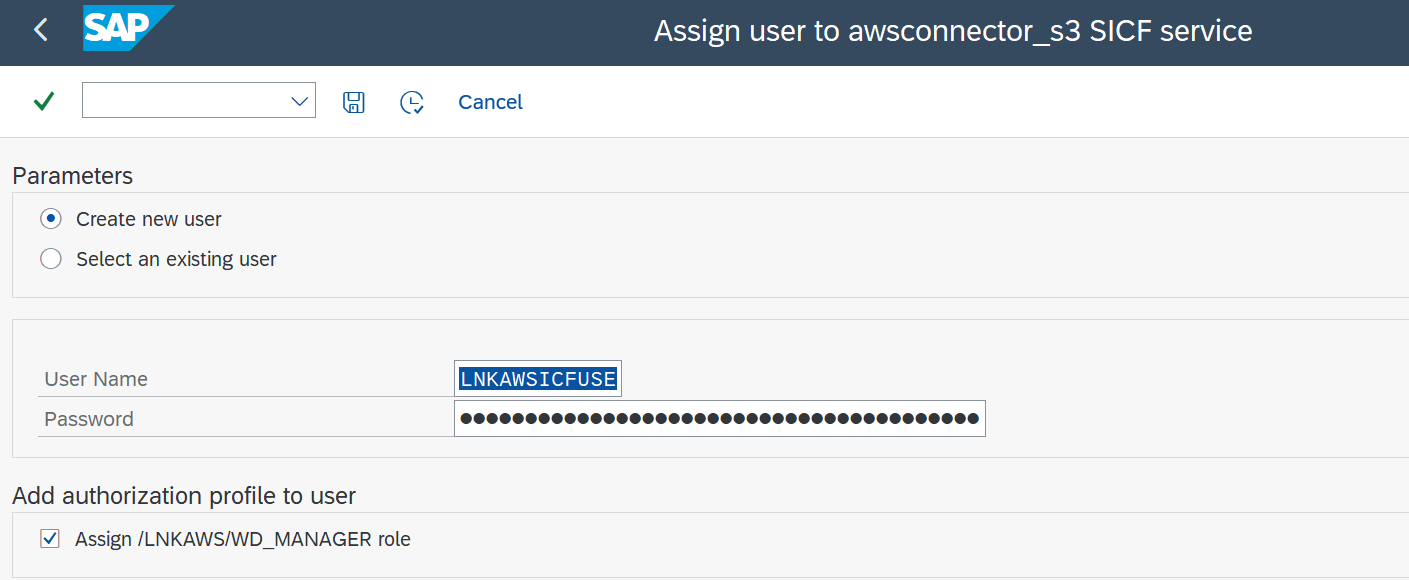
- Execute to activate the service and assign the user.
- Ensure that the role
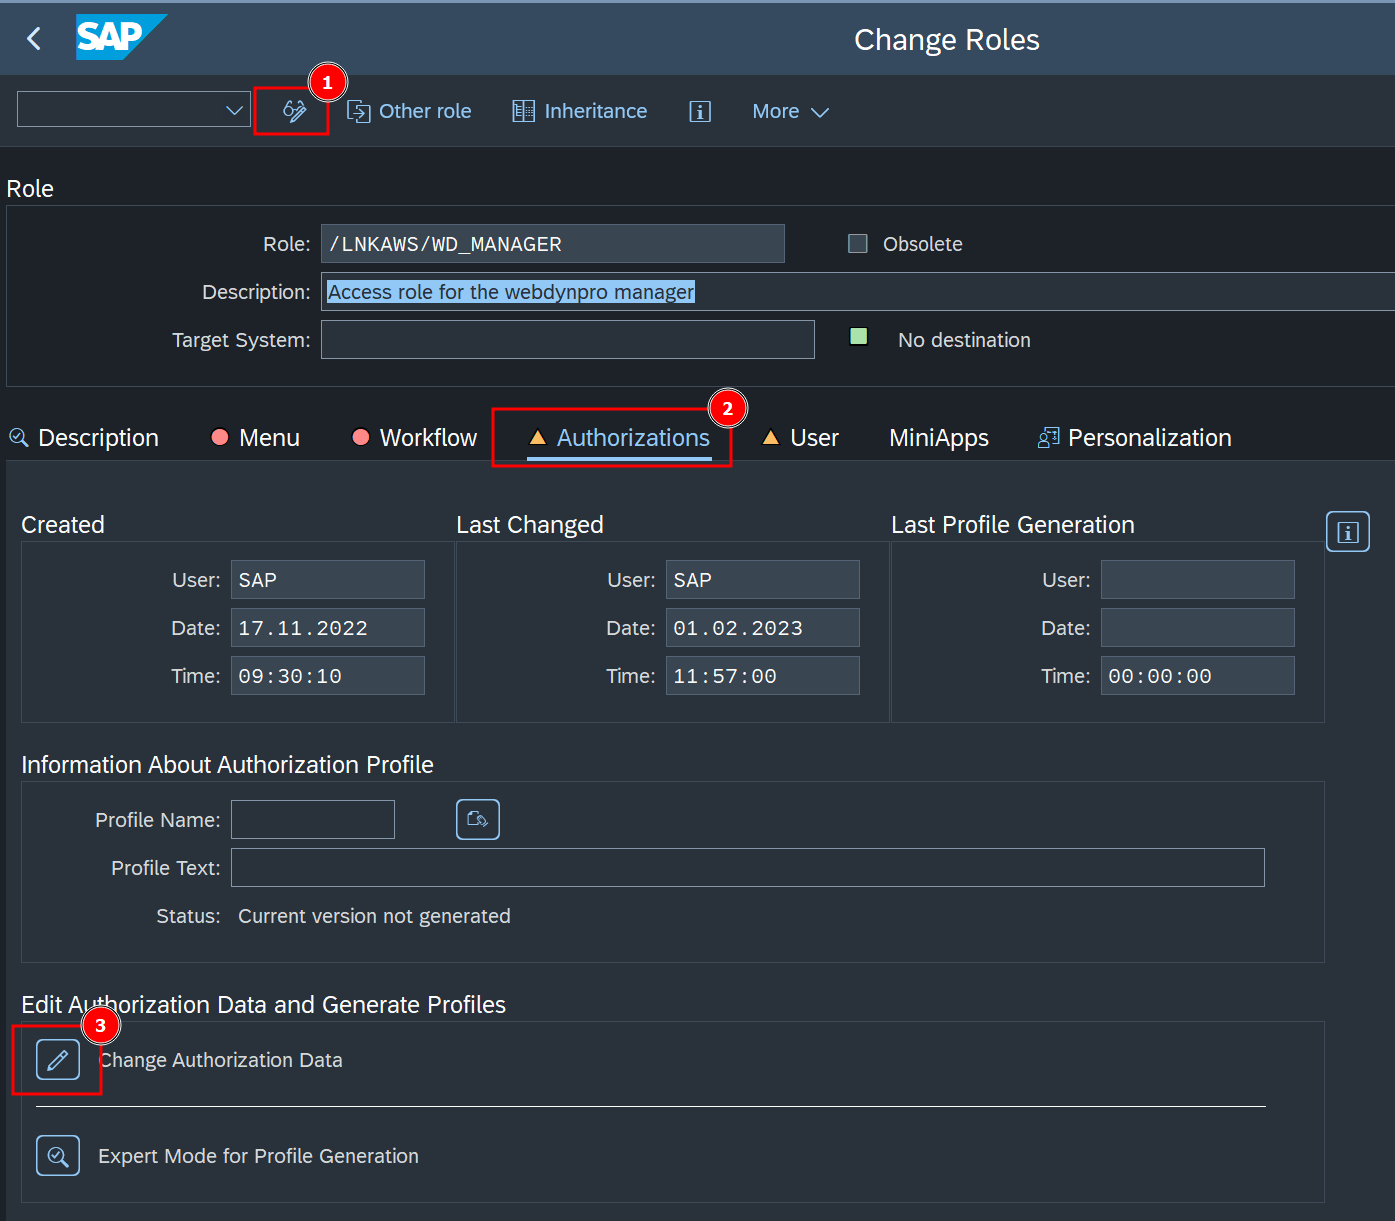
/LNKAWS/WD_MAMAGERhas been generated and the User comparison is correct. For that go toPFCGtransaction, select /LNKAWS/WD_MANAGER role and click on Display.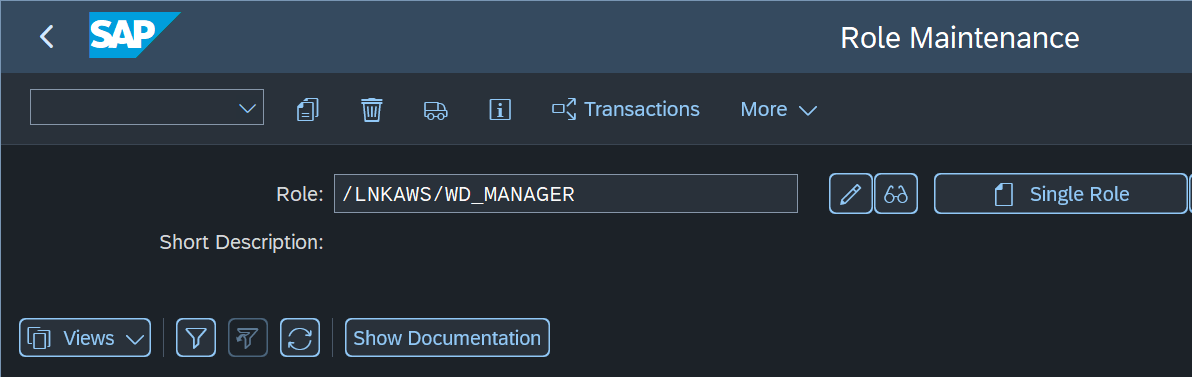
- If both the Authorizations and User tabs are green, you can skip the rest of steps and jump to Credentials section.
- If not, Enter Change Mode and select Change Authorization Data to generate the authorization profile.
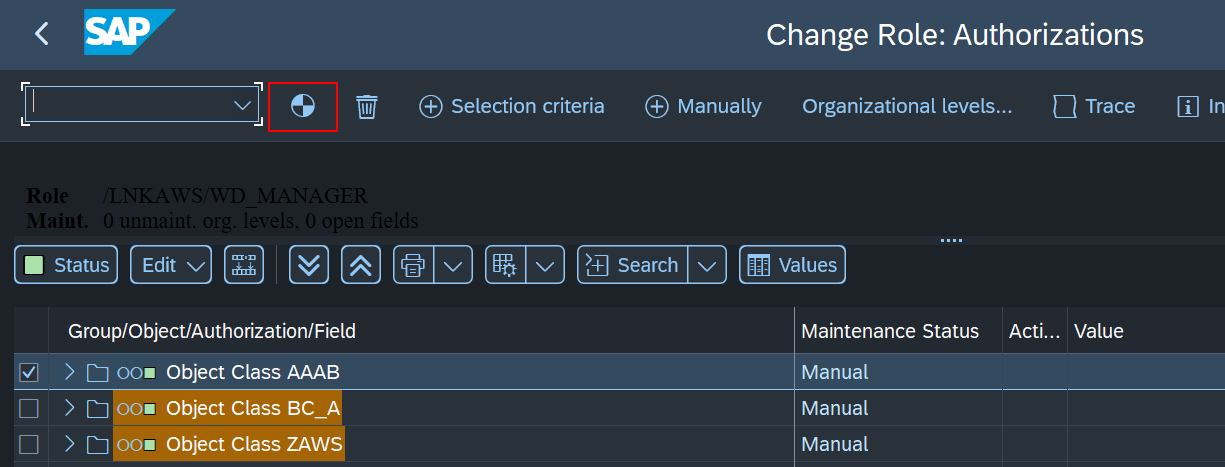
- Select Generate and Exit. Accept the default values when prompted for a Profile Name.
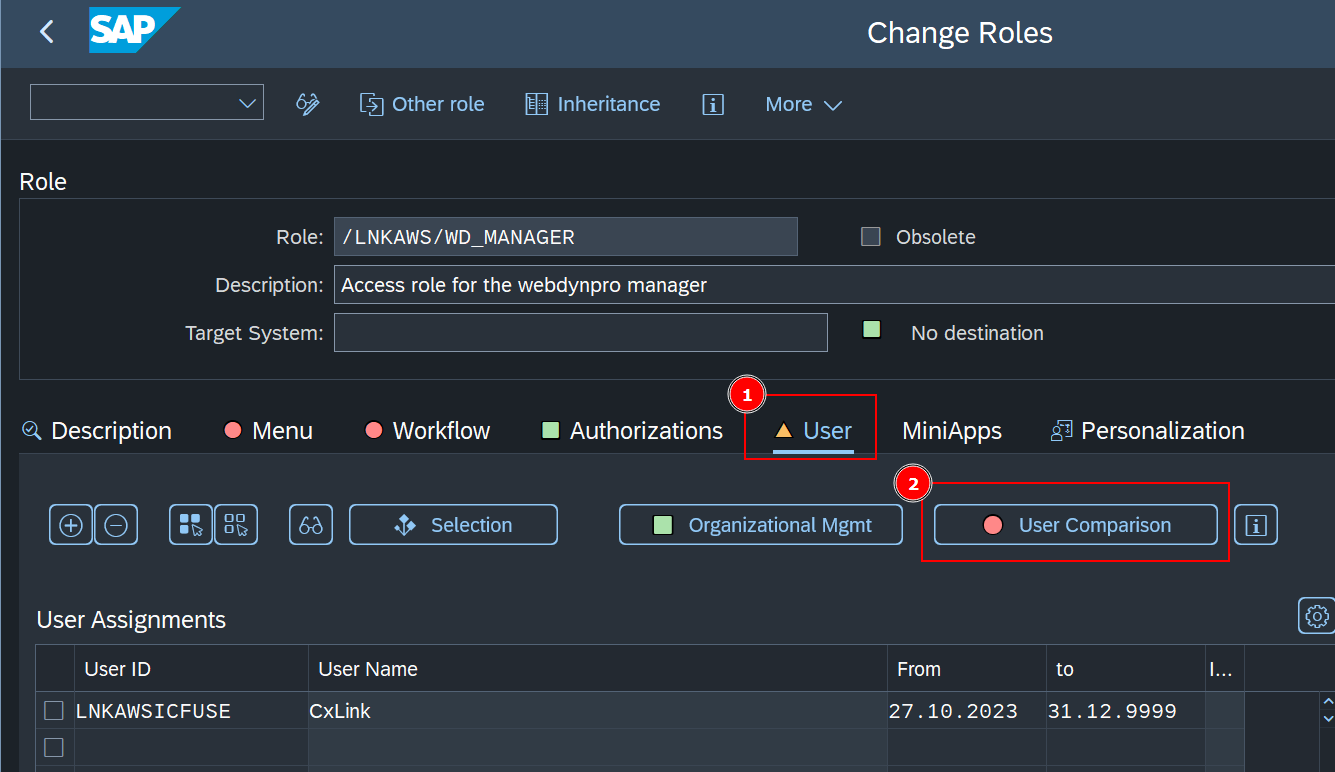
- Back to the Change Roles screen, select the User tab and execute User Comparison.
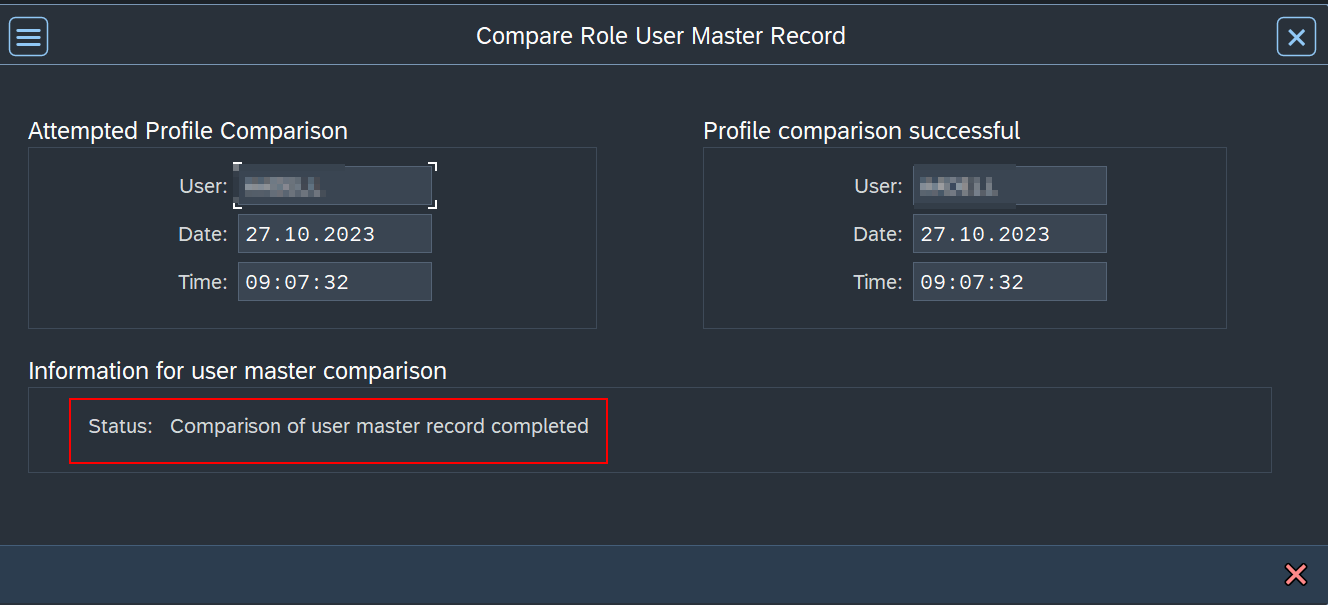
- Select Full Comparison and check the success message.
- You can now exit and continue with the process.
Credentials
If you server is running on-prem or in a different provider and you want to connect by using IAM credentials specific for your cloud provider, you will need to define them in this step.
All credentials stored in this table will be encrypted by default.
To add credentials:
-
Go to SPRO-> Cxlink Suite by Syntax -> Credentials -> Cloud Credentials
-
From the dropdown list, select the desired option:
- AWS IAM User
- Azure Active Directory (AAD)
- Azure Shared Key (ASK)
- Azure Shared Access Signature (SAS)
To add a new AWS Identity Management (IAM) user to the configuration:
- Select New credential.
- In the General Data section:
- Select Amazon Web Services for provider
- Select AWS IAM User as credentials type.
- In the Specify Credentials Data, specify the AWS Account ID and User Name of the IAM user and its Access Key and Secret Key.
- Press Next.
- Review for details and accept.
To add a Azure ADD credential to the configuration:
- Select New credential.
- In the General Data section:
- Select Microsoft Azure for provider
- Select Azure Active Directory (AAD) as credentials type.
- In the Specify Credentials Data, specify the Tenant ID, Client ID and Client Secret.
- Press Next.
- Review for details and accept.
To add an Azure ASK credential to the configuration:
- Select New credential.
- In the General Data section:
- Select Microsoft Azure for provider
- Select Azure Shared Key (ASK) as credentials type.
- In the Specify Credentials Data, specify the Tenant ID, Resource Name and Account Access Key1.
- Press Next.
- Review for details and accept.
To add an Azure SAS credential to the configuration:
- Select New credential.
- In the General Data section:
- Select Microsoft Azure for provider
- Select Azure Shared Access Signature (SAS) as credentials type.
- In the Specify Credentials Data, specify the Tenant ID, Resource Name and Account Access Key1.
- Press Next.
- Review for details and accept.
(Only for AWS) Assumed Roles
If you plan to use Assumed Roles to access resources in different AWS Accounts than the one that your server is running on, you will need to define them in the following table, assigning a short alias name to them. This will prevent some errors to occur because of the long size of the IAM roles ARN.
To add assumed roles to the configuration:
- Go to SPRO-> Cxlink Suite by Syntax -> Credentials -> Assumed Roles and select Execute.
- Select New to create a new key/pair value role.
- In the Assume Role Manager screen:
- Provider: Keep
Amazon Web Services. - Assume alias: A short descriptive name for your role to let you easily identify it during later steps.
- Assume ARN: ARN of the role that you want SAP to assume.
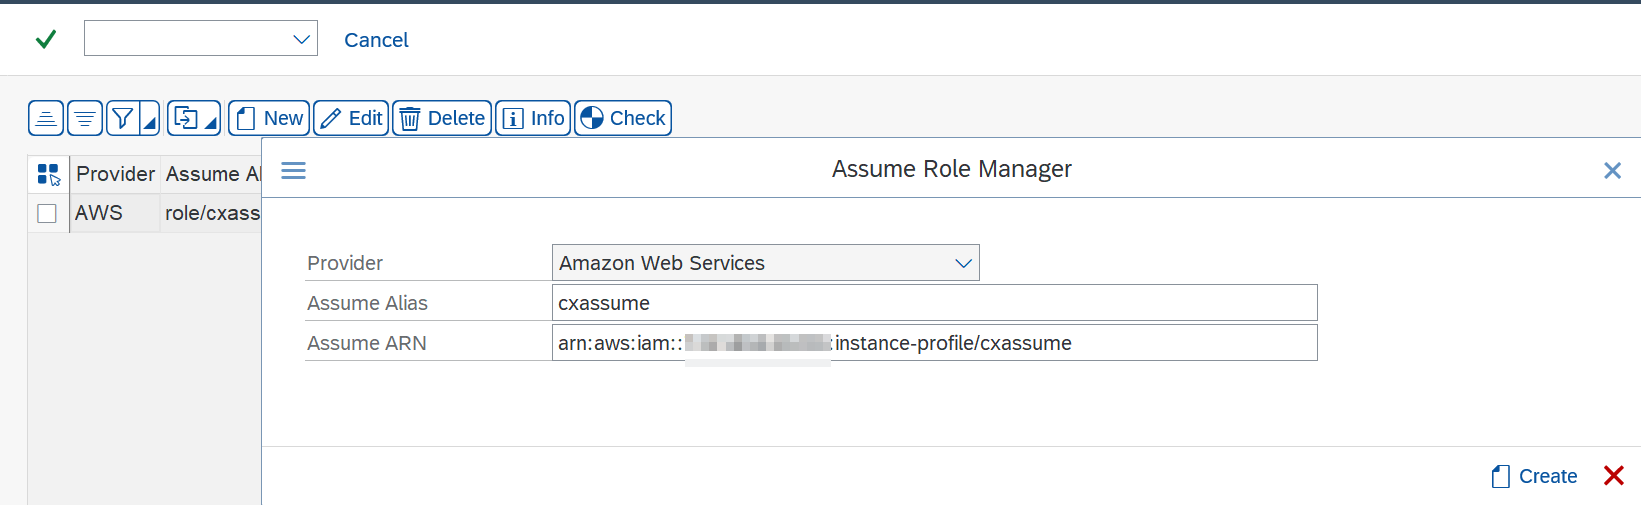
- Provider: Keep
- Repeat the process to create as many assumed roles as you need.