
Configure SAP SLT
The following steps need to be performed to implement your custom logic when writing to a target system.
Topics
Create a configuration
This section describes how to create a new SLT configuration to work with CxLink Datalakes.
Call transaction LTRC and click on Create Configuration button.
Enter the Configuration Name and Description, and click Next.
Environment Variables
You can use the values defined in Configuration name and description in addition to the Mass Transfer Id generated as values to use for the creation of the file path in Amazon S3 or as part of the Amazon Kinesis partition key. More information at Customizing the output
In the Source System Connection Details, set the RFC Connection for the SAP Source System, and click Next.
In the Target System Connection Details, select RFC Destination, set the following values, and click Next.
- Set the value of Scenario for RFC Communication to 'Write Data to Target Using BAdI' or 'SLT SDK'
- Set RFC Destination to None

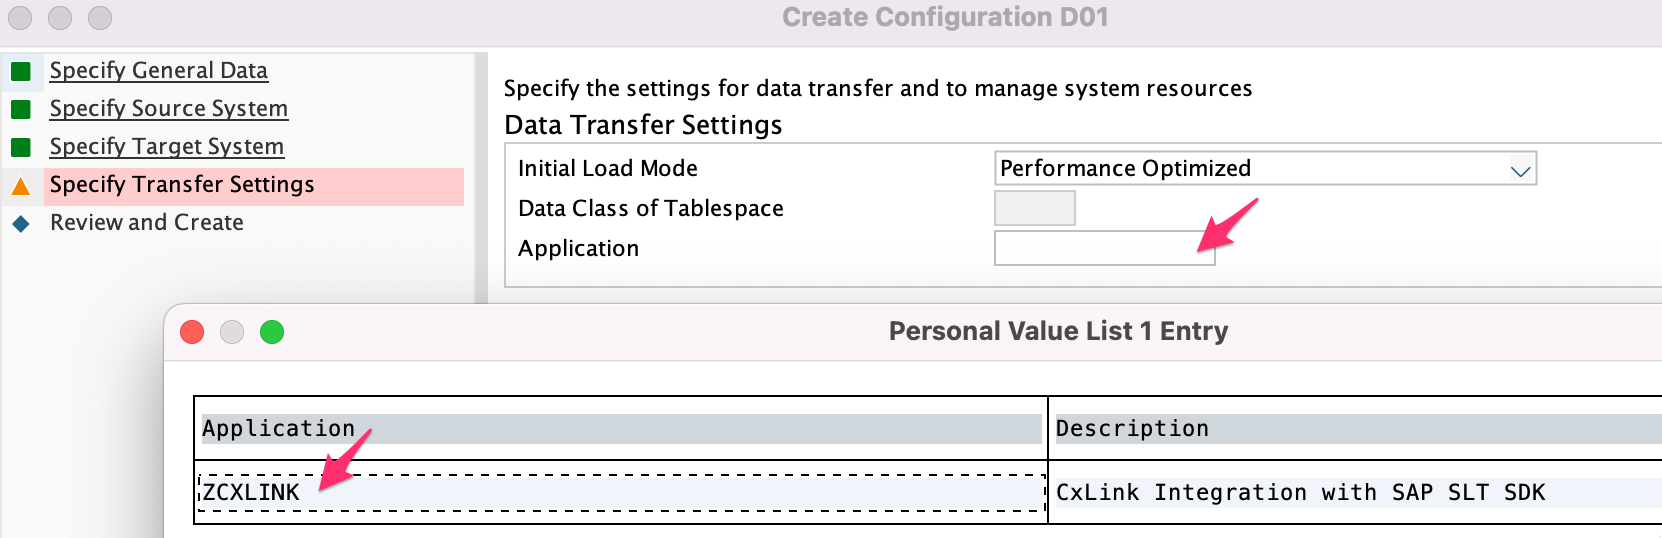
In the Data Transfer Settings, open the Application selector and search and select /LNKAWS/SLTSDK
Set the value for Number of Data Transfer Jobs, Number of Initial Load Jobs and Number of Calculation Jobs.
SAP SLT Performance Guide
You can find additional details in SAP Landscape Transformation Replication Server - Performance Optimization Guide
In the Replication Options, select Real Time and click Next.
Review the configuration and Save.
Note down the Mass Transfer ID generated for later steps.
Formatting the Output data
Before configuring the initial load and replication destination you can customize how the output data will be formatted. You can do that by using one of the following options:
Headers and Operations
You can customize how the information will be formatted in the output data. Below you will find the list of files that can be customized.
| Parameter | Default Value | Description |
|---|---|---|
| Headers | false | Set to true if you want the output data to contain the table headers |
| Load Operation | L | Set the letter to identify load operations. This information can be added to the output data or metadata |
| Insert Operation | I | Set the letter to identify insert operations. This information can be added to the output data or metadata |
| Delete Operation | D | Set the letter to identify delete operations. This information can be added to the output data or metadata |
| Update Operation | U | Set the letter to identify delete operations. This information can be added to the output data or metadata |
| Empty Fields | true | (only for JSON output) Set to false if you want to omit the empty fields of each row |
To adapt these values follow these steps:
- Open transaction SM30, select table /LNKAWS/SLT_CONF and click on Mantain
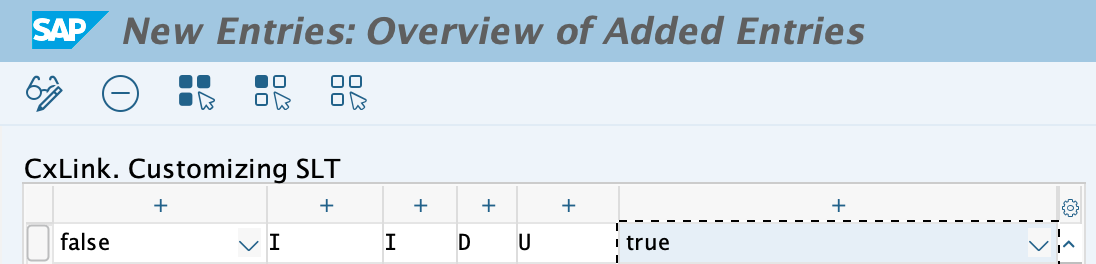
- Click on New Entries and add the desired values:
- Save the newly created values in a transport request.
Environment variables
You can use some predefined variables in CxLink Datalakes to format both the Amazon S3 Prefix or Amazon Kinesis Partition Key. The following list is the currently supported variables:
| Variable | Description |
|---|---|
| %TABLENAME% | Source table name |
| %MTID% | SLT Mass Transfer Id |
| %MTNAME% | SLT Configuration Name |
| %MTDESC% | SLT Configuration Name |
| %YY% | Current Year (YYYY) |
| %MM% | Current Month (MM) |
| %DD% | Current Day |
| %HRS% | Current Hour |
| %MIN% | Current Minute |
| %SEC% | Current Second |
| %ROW_HASH% | MD5 Hash of the row values |
Example using enviroment variables
Using as an example the configuration below:

For Kinesis you can build a partition key with the following format:
%MTID%_%MTNAME%_%MTDESC%_%TABLENAME%Resulting Kinesis Partition Key:
00I_CXLINK_D01_SFLIGHTFor Amazon S3 you can build a file path with the following format:
%MTID%/%MTNAME%/%MTDESC%/%TABLENAME%/Resulting Amazon S3 Bucket Path:
s3://<bucket>/00I/CXLINK/D01/SFLIGHT/<FILENAME>
Configure destination for Initial Load
Amazon Kinesis Data Stream not supported
Currently, Amazon Kinesis Data Streams is not supported as a target for SLT table Initial Load due to SLT handling of big volumes of data and some Amazon Kinesis limits (see https://docs.aws.amazon.com/streams/latest/dev/service-sizes-and-limits.html)
We are currently investigating if this feature can be added in the future.
SLT loads existing data or a defined subset of it from the source system to the target system (the initial load), and the source system sets up logging tables for each table to be replicated. You can run the initial load of data while the source system is active. In parallel to the initial load, by means of database triggers, SLT detects any data changes that occur while the initial load process is running.
SLT transfers the entries from the logging table to the target system in portions. More information in 3005284 - What is the portion size option in LTRS? - SLT.
For each SLT Portion generated, a data file is generated in the target with the following format:
<TABLENAME>_<TIMESTAMP>.<MILISECONDS>
Example

Follow these steps to configure CxLink Datalakes to send the generated data files to an existing S3 Bucket:
Call transaction /n/LNKAWS/S4MANAGER and jump into the SLT Configuration tab.
Create a new line by pressing Add button and select the proper parameters:
Mass Transfer ID: Select the Mass transfer ID to be managed by Cxlink Datalakes.
Service: Select Amazon S3 Bucket. (Kinesis not currently supported for Initial Load)
Resource: Bucket name where the files will be stored.
Region: AWS Regions where your resources are created.
Method:
- Choose Load if you want to send only the initial load to the target bucket. -
- Choose Both if you want to send Initial Load and Replication (CDC) created files to the same bucket.
Credentials: Select Instance Profile or an existing IAM User.
Assume Role: Enter the Role ARN to be assumed in case that the resources are located in a different AWS Account.
Output format: CSV (JSON to be supported in the next release)
Separator ASCII: Decimal value of the ASCII Code to be used as the field separator. Examples in: https://www.ascii-code.com/
Compression: Choose if you want to compress the data using GZIP before it is sent to AWS.
Prefix: Set the AWS Bucket prefix for the stored files. More information in Environment Variables
Structure: (Only if Both option is set under Method) Mark this option if you want changes in the tables structure to be also sent to the target.
Save.
Repeat these steps if you want to add multiple targets for the same process.
From now on, all tables included in the specified Mass Transfer IDs will be stored directly in the configured Amazon S3 Bucket.
You can start now loading your tables.
Configure destination for Replication
After the initial load is complete, SLT continues to monitor the tables in the source system and replicates data changes (also known as delta data) in the source system to the target system in real-time. As long as the SLT system is functioning correctly, temporary downtimes of the source or target systems do not result in the loss of any business data. If the target system were to become temporarily unavailable, SLT continues to record any changes to the source system in the log tables, and updates the relevant target system tables when the system is back online.
Each time a change (CDC) is detected by SAP SLT in one of the source system, it will be sent to the defined AWS Service target, even it is one change or thousands of them.
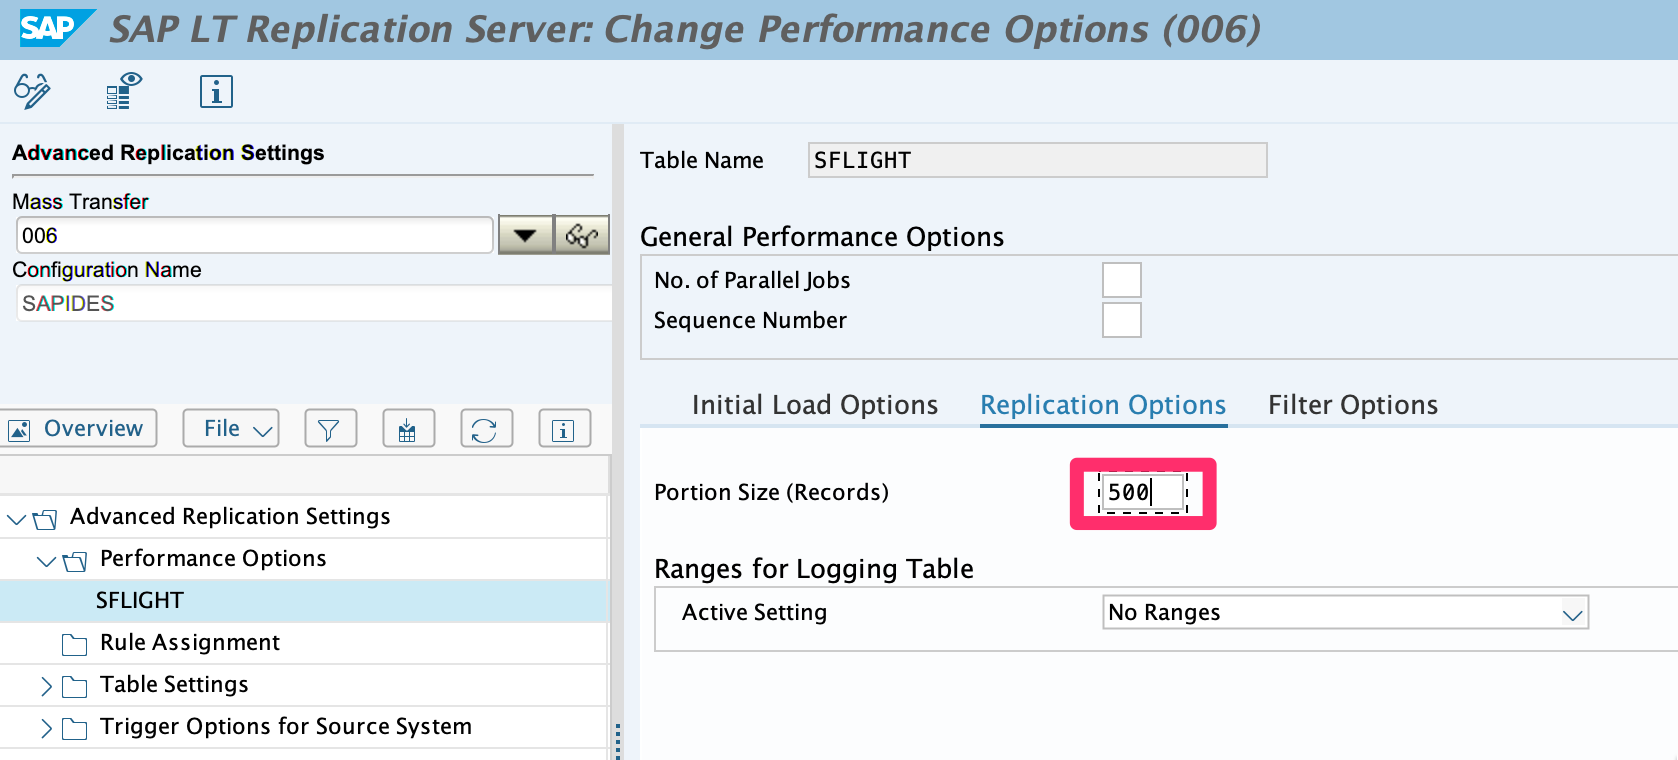
The logging table is a table in the source system that stores any changes to the source table in order to replicate these changes to the target system. SAP LT Replication Server transfers the entries from the logging table to the target system in portions. The number of logging table records is the maximum number of records transferred in a portion. By default up to 5,000 recorded changes are handled in one portion (100 for cluster tables). Due to limits on the amount of data that Amazon Kinesis can handle per request, Portion Size (Records) parameter must be limited to 500 records in the Replication Options section in transaction LTRS.
To ensure that the data is sent in supported Amazon Kinesis Data Streams volumes follow these steps:
If you want to use Amazon Kinesis as the replication destinations and you expect thousands of records per table to be exported in a short period of time (meaning minutes), you should adjust some table configuration parameters to avoid reaching the limits in Amazon Kinesis calls. If you don't plan to use Kinesis or you expect only small amounts of data to be replicated per minute/table, you can skip this step and jump directly to step 2.
1.1. Call transaction LTRS.
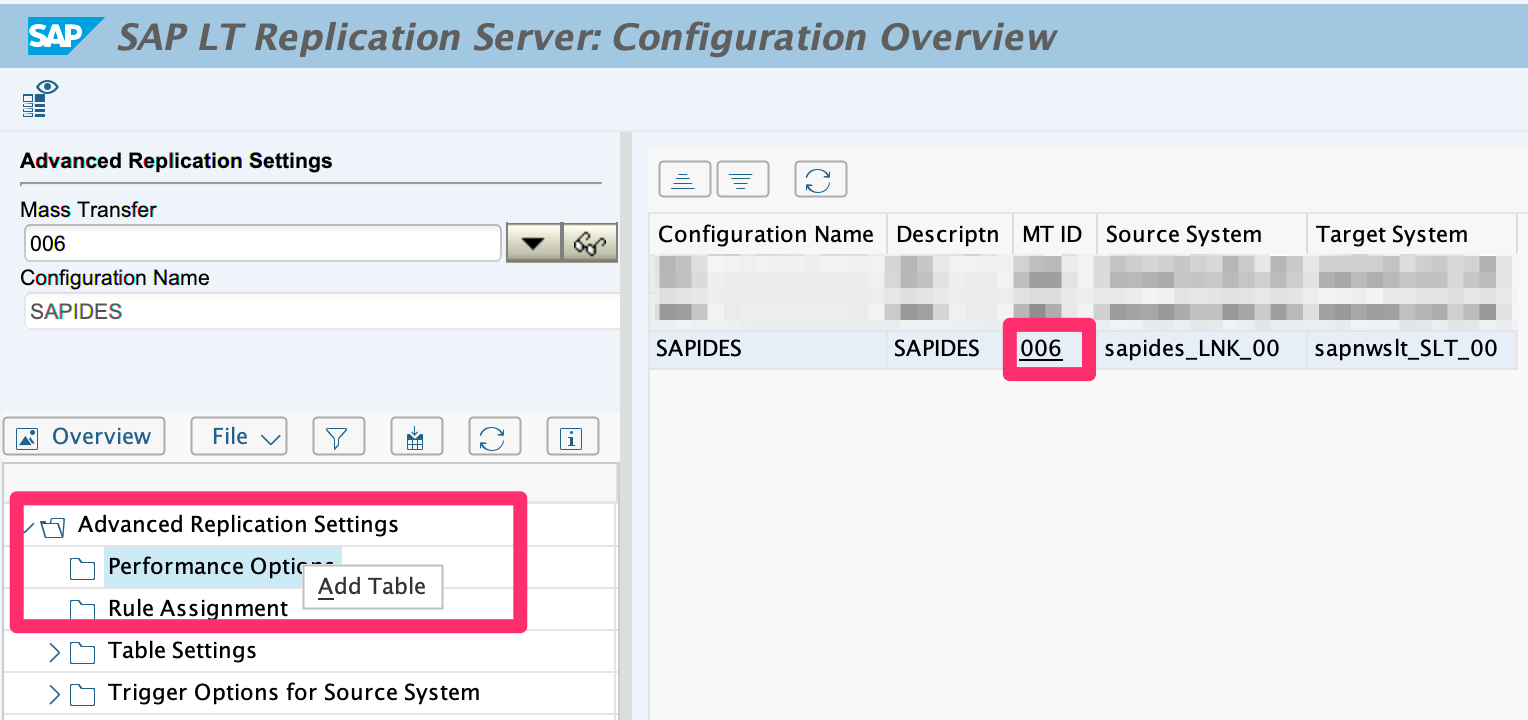
1.2. Click on the Mass Transfer ID.
1.3. In the Menu Tree, Right-click the Advanced Replication Settings -> Replication Options section and Add Table (SFLIGHT table is used in this example)
1.4. Access the Replication Settings tab and set the maximum number of portions to 500
1.5. Save
1.6. Repeat these steps for all tables that want to be replicated to Amazon Kinesis.
Best Practice
If the SLT Configuration was active before the change, deactivate and activate it again just to ensure that the configuration is taking place.
Call transaction /LNKAWS/S4MANAGER and jump into the SLT Configuration tab.
Create a new line by pressing Add button and select the proper parameters:
Mass Transfer ID: Select the Mass transfer ID.
Service: Select Amazon S3 Bucket or Amazon Kinesis Data Streams as the destination.
Resource: Bucket or Data Stream name.
Region: AWS Region where the destination resides.
Method: Select Replication.
Credentials: Select Instance Profile or an existing IAM User.
Assume Role: Enter the Role ARN to be assumed in case that the resources are located in a different AWS Account.
Output format: CSV (JSON to be supported in the next release)
Separator ASCII: Decimal value of the ASCII Code to be used as the field separator. Examples in: https://www.ascii-code.com/
Compression: Choose if you want to compress the data using GZIP before it is sent to AWS or not.
Prefix: Set the AWS Bucket prefix or Amazon Kinesis Partition Key for the stored files. More information in /abap/datalakes/customizing.html#environment-variables
Structure: Mark this option if you want changes in the tables structure to be also sent to the target.
Save
Repeat these steps if you want to add multiple targets for the same process.